
Introduction
Growing carrots from seed can be an incredibly rewarding experience, but it often comes with challenges, especially when it comes to planting. One of the most common difficulties gardeners face is ensuring that the carrot seeds are planted evenly and at the right depth. That’s where carrot seed-strips come in. These easy-to-make strips of paper help you plant your seeds in an organized manner, eliminating the need for later thinning and ensuring a more successful harvest. Whether you’re a beginner or an experienced gardener, making carrot seed-strips is an easy DIY project that can save you time and effort in the garden.
In this article, we will guide you through a simple step-by-step process to make your own carrot seed-strips and offer helpful tips on how to grow healthy carrots. By the end of this article, you will have all the knowledge you need to successfully grow carrots using seed-strips and achieve an abundant harvest!
What are Carrot Seed-Strips?
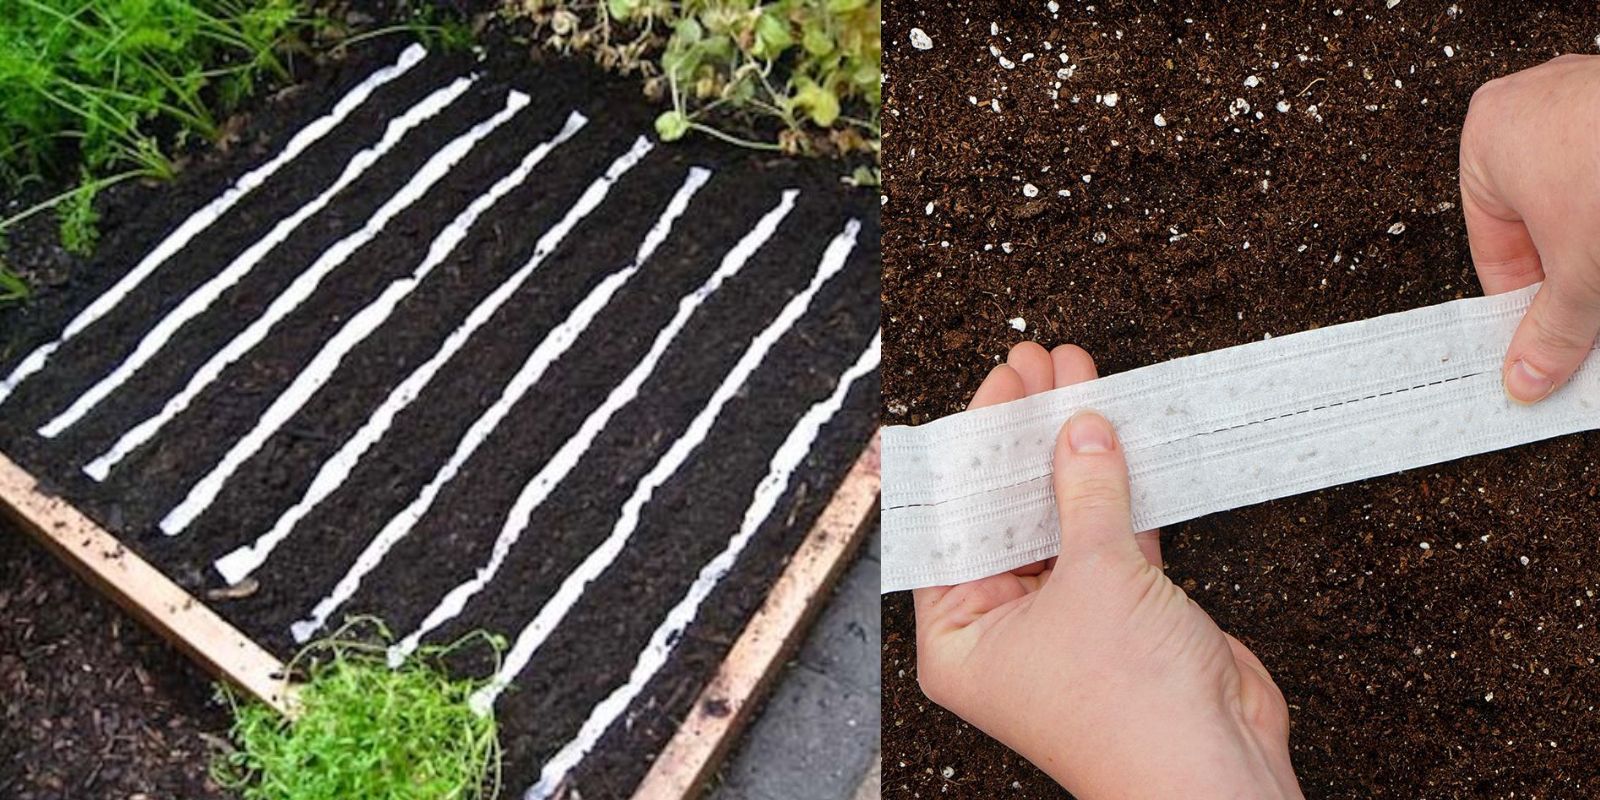
Carrot seed-strips are strips of paper (usually toilet paper or paper towels) that are coated with carrot seeds, spaced out evenly. These strips can be placed directly in your garden, allowing you to plant carrot seeds quickly and efficiently. Not only do seed-strips help you plant more precisely, but they also reduce the need for thinning later on, as the seeds are already spaced correctly. This simple technique helps improve the success rate of your carrot crops and makes the planting process much more organized.
Why Use Carrot Seed-Strips?
Before we dive into how to make them, let’s explore the benefits of using carrot seed-strips:
- Precision Planting: Carrot seeds are tiny, and it can be tricky to space them evenly. Seed-strips help you achieve a uniform row of seeds, ensuring that they are spaced just right for optimal growth.
- No Thinning Required: When you plant seeds using a seed-strip, the spacing is perfect, meaning there’s no need to thin out seedlings as they grow. This saves you time and effort in the garden.
- Increased Success Rate: Planting evenly spaced seeds can increase the chances of getting a good harvest, as overcrowded carrots can stunt their growth or lead to malformed roots.
- Simple and Cost-Effective: Making seed-strips is an inexpensive and easy way to organize your planting. You can use recycled materials, like old toilet paper rolls or paper towels, making it an eco-friendly option as well.
- Great for Beginner Gardeners: If you’re new to gardening, seed-strips are a fantastic tool for ensuring you plant your carrots correctly without any guesswork.
Now, let’s get started with the step-by-step guide to creating your very own carrot seed-strips.
Materials You’ll Need:
To make your own carrot seed-strips, you’ll need a few simple supplies that are likely already available in your home or garden:
- Paper: Toilet paper or paper towels are ideal, but you can also use any thin, absorbent paper you have on hand (even newspaper can work).
- Carrot Seeds: Choose your favorite variety of carrot seeds. Smaller or thinner varieties of carrots are best for this method, but you can experiment with any type of carrot.
- Flour or Cornstarch: This will be used to create a simple paste to stick the seeds onto the paper.
- Water: To mix with the flour or cornstarch to make the paste.
- Scissors: To cut the paper into strips of your desired length.
- Paintbrush or Spoon: To apply the paste evenly on the paper.
- Small Bowl or Cup: To mix the paste.
Step-by-Step Instructions to Make Carrot Seed-Strips
Step 1: Prepare the Paper
Start by cutting your paper into strips. Depending on your garden bed size and how long you want the rows to be, you can cut the paper into strips that are about 2-3 inches wide and 12-18 inches long. It’s important to use thin paper that will be easy to work with and decompose quickly once planted in the soil.
Step 2: Make the Seed-Paste
In a small bowl, mix about one tablespoon of flour or cornstarch with two tablespoons of water. Stir the mixture until it forms a smooth paste. This paste will act as glue to hold the seeds in place. If the paste is too thick, add a little more water. If it’s too runny, add more flour or cornstarch until it reaches a consistency similar to pancake batter.
Step 3: Apply the Paste to the Paper
Lay the paper strips flat on a clean surface. Using a paintbrush or spoon, spread a thin layer of the paste along the length of the paper. Make sure the paste is evenly spread, but not too thick, as you don’t want it to overwhelm the paper. The paste should just be enough to stick the seeds in place without clumping.
Step 4: Add the Seeds
Once the paste is applied, take your carrot seeds and place them evenly along the paper strip. You can either sprinkle them along the strip or use your fingers to carefully place one seed every 1-2 inches. Make sure there is enough space between the seeds to allow the carrots to grow without crowding. If you’re planting multiple strips, you can also label them with the variety of carrot seeds you’re using.
Step 5: Let the Seed-Strips Dry
After the seeds are placed, allow the seed-strips to dry completely. This may take anywhere from a few hours to a day, depending on the humidity and temperature. Be sure the strips are completely dry before storing them or using them in your garden. Once dried, the paste will hold the seeds securely in place, and they won’t shift when you move the strips.
Step 6: Store or Plant the Seed-Strips
Once the seed-strips are dry, they are ready to be planted! You can either store them in a cool, dry place until you’re ready to plant or you can plant them immediately. To plant the seed-strips, simply place them on top of prepared soil in your garden or in raised beds. Gently cover the strips with a thin layer of soil, about 1/4 to 1/2 inch deep. Water the strips lightly, and keep the soil moist until the seeds begin to sprout.
Step 7: Water and Care for the Seedlings
After planting, continue to water the seed-strips regularly to keep the soil moist but not soggy. As the seeds begin to germinate, they will grow through the paper, and the paper will naturally decompose into the soil. Once the carrots have started growing, ensure they have enough space to mature and keep the soil free from weeds that could compete with the young plants.
Additional Tips for Growing Carrots with Seed-Strips
- Soil Preparation: Before planting your seed-strips, make sure your soil is loose, well-draining, and rich in organic matter. Carrots thrive in soil that is free of rocks and hard clumps, as these can impede root growth.
- Sunlight: Carrots prefer full sun, so plant your seed-strips in an area that receives at least 6 hours of direct sunlight per day.
- Watering: Carrots require consistent moisture, especially in the early stages of growth. Be sure to keep the soil consistently moist, but not overly saturated.
- Thinning: While seed-strips help with even spacing, you may still need to thin out any overcrowded plants once they’ve grown large enough to handle. Thin to the strongest plants, leaving about 2-3 inches between each carrot.
Conclusion
Making and using carrot seed-strips is a simple yet effective way to improve your gardening experience. This easy DIY hack can save you time, effort, and frustration when planting carrots and increase your chances of a bountiful harvest. By following these simple steps, you can plant carrots with precision, avoid overcrowding, and reduce the need for thinning later on. So go ahead, try making carrot seed-strips in your own garden, and watch your carrots grow with ease!
Motivation:
Carrot seed-strips are not only a great way to plant your carrots but also a fun and eco-friendly project that can bring joy to your gardening journey. Share your results and inspire fellow gardeners! 🌱💚
#GardeningTips #DIYGardening #CarrotGardening #SeedStrips #HomeGarden #OrganicGardening #GrowYourOwn #UrbanGardening #GardenHacks #SustainableLiving