
Water is a vital resource, and having access to clean water is essential for survival. In many emergency situations, access to clean drinking water may become limited or contaminated. Whether you’re lost in the wilderness, caught in a natural disaster, or facing a water shortage at home, knowing how to make an emergency water filter and purifier can be life-saving. This guide will walk you through the process of building your own water filtration system using simple, readily available materials.
Why is Clean Water Important?
The human body is made up of about 60% water, and every single cell, tissue, and organ relies on it to function properly. Water is involved in digestion, nutrient absorption, temperature regulation, waste removal, and more. Without clean water, we cannot survive for long, making it a crucial element in any emergency preparedness plan.
When faced with contaminated water sources, it’s essential to have a way to filter and purify the water before drinking it. Without proper filtration, water may contain harmful bacteria, viruses, parasites, or pollutants that can cause serious illness or even death. Therefore, knowing how to make an emergency water filter and purifier is not just a practical skill but a life-saving one.
What You Will Need
Building your own water filter and purifier requires only a few common household materials. Here’s what you’ll need:
- A plastic bottle (empty, 2-liter size works best)
- Cotton fabric, a coffee filter, or a piece of cloth
- Activated charcoal (you can also use charcoal from a campfire, but activated charcoal is preferred)
- Gravel (small pebbles or gravel)
- Sand (fine-grained sand)
- A knife or scissors (to cut the plastic bottle)
- Clean container (to collect filtered water)
- Optional: Boiling pot (to further purify the water)
Steps to Make Your Emergency Water Filter and Purifier
Now that you have your materials, let’s dive into the process of making a DIY emergency water filter and purifier.
Step 1: Prepare the Plastic Bottle
Start by taking a clean 2-liter plastic bottle. Cut off the bottom of the bottle, leaving the neck and mouth intact. You will use the bottle’s neck as the exit point for the filtered water, and the body of the bottle will hold the filtration materials. Make sure the bottle is clean and free from any contaminants before starting the filtration process.
Step 2: Add the Cotton or Coffee Filter
At the neck of the bottle, place a layer of cotton fabric, a piece of cloth, or a coffee filter. This is your first filtration layer. Its purpose is to catch larger debris like dirt, leaves, or particles from the water. You want to make sure the cotton or filter is snugly fit into the neck of the bottle, so no particles can slip through.
Step 3: Layer of Activated Charcoal
Once you have the cotton or filter in place, the next step is to add a layer of activated charcoal. Activated charcoal is effective at absorbing harmful chemicals, bacteria, and other toxins from water. You can buy activated charcoal at pet stores, pharmacies, or online. If you don’t have activated charcoal, you can use charcoal from a campfire, but it’s important to make sure it’s well-ground into a fine powder.
Pour a generous amount of activated charcoal on top of the cotton filter. This will help trap any impurities in the water that are not caught by the cotton.
Step 4: Add a Layer of Sand
Next, add a layer of fine-grained sand on top of the charcoal. The sand acts as an additional filter to trap smaller particles and help further clean the water. Ensure that the sand layer is thick enough to provide good filtration, but not so thick that it prevents water from passing through.
Step 5: Add Gravel
The last layer is gravel. Add a layer of small pebbles or gravel at the top of the filter. Gravel will catch larger debris and dirt, preventing it from entering the finer filtration layers below. It also helps water to pass through the filter more easily.
Step 6: Assemble the Filter
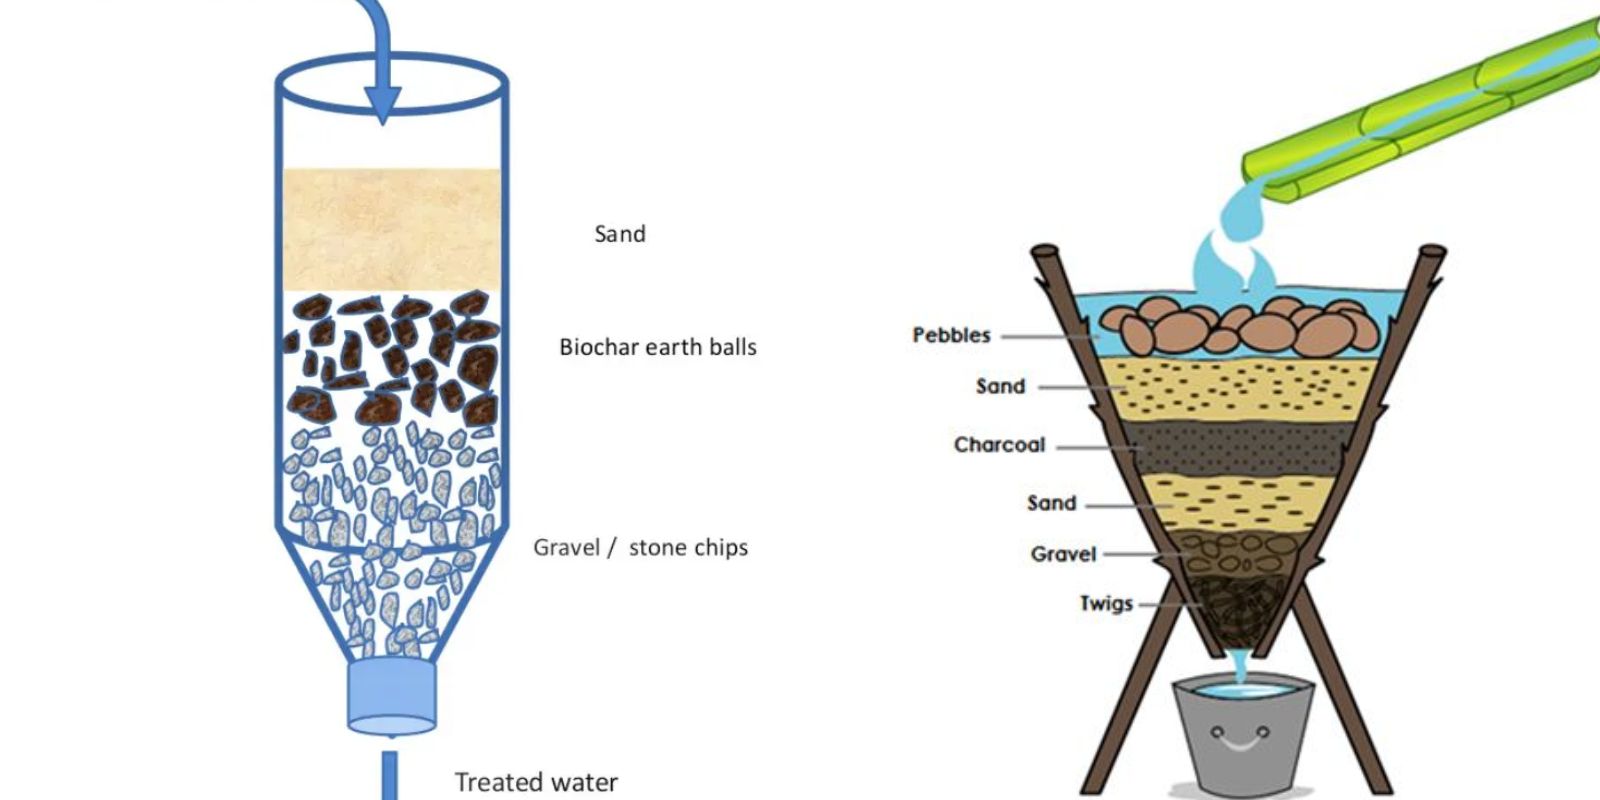
Your bottle should now have five layers: gravel at the top, followed by sand, activated charcoal, cotton or coffee filter, and the neck of the bottle at the bottom. Secure the cotton or coffee filter tightly to ensure that no water can pass around it. The water should only pass through the layers of gravel, sand, charcoal, and cotton, effectively filtering out contaminants.
Step 7: Collect Contaminated Water
Now that your filter is ready, it’s time to collect contaminated water. Make sure the water you’re using is visibly dirty but not thick with mud, as thick mud can clog the filter. Simply pour the contaminated water into the top of the filter and let it pass through the filtration layers.
Step 8: Collect the Filtered Water
Once the water has passed through the filter, collect the clean water in a clean container. You should notice that the water appears clearer than it did initially, but it may still contain some bacteria and pathogens.
Step 9: Purify the Water (Optional but Recommended)
While your DIY filter can remove many impurities, it may not remove all harmful pathogens, such as viruses and bacteria. To further purify the filtered water, it’s recommended to boil it for at least one minute to kill any remaining pathogens. If you’re at a higher altitude, you may need to boil the water for longer (about 3 minutes) due to the lower boiling point.
Step 10: Drink and Stay Safe
Once you’ve boiled the water and let it cool down, your water should be safe to drink. Enjoy the clean, purified water you’ve made with your emergency filter.
Additional Tips for Emergency Water Filtration
- Multiple Filters: If you have time and resources, use multiple filters for even better results. You can stack more filtration units or repeat the process to further clean the water.
- Disinfecting Water: If you don’t have access to a fire to boil the water, consider using water purification tablets, iodine, or chlorine drops. These chemicals can disinfect the water, killing harmful bacteria and pathogens.
- Maintain the Filter: If you’re using this filter multiple times, it’s important to clean the materials regularly. Charcoal and sand can become clogged with impurities, so be sure to replace or clean them to ensure optimal filtration.
When to Use This Water Filter
This emergency water filter is ideal for situations where you are stranded without clean drinking water or when you need to make water from a natural source (such as a river, lake, or stream) more drinkable. It’s also useful when you’re camping, hiking, or during natural disasters when clean water becomes scarce.
Why Having Water Filtration Skills Matter
In survival situations, water is one of the most important things you need to survive. Without it, your chances of survival are minimal. Knowing how to filter and purify water will not only give you peace of mind but could potentially save your life. By following these simple steps, you can build a functional water filter system that can provide you with clean drinking water when you need it the most.
Final Thoughts
Water filtration and purification are essential skills for any survivalist or camper. Having access to clean drinking water can make all the difference in a survival situation, and with this simple DIY emergency water filter, you can provide yourself with fresh, clean water when you need it most. Whether you’re preparing for outdoor adventures, emergencies, or just learning a new survival skill, this guide gives you a practical way to take control of your water needs. Stay safe, and remember to always carry a purification method when venturing into the wild.
Stay hydrated, stay safe, and share your survival tips with others! 💧🌍
#SurvivalSkills #WaterFiltration #EmergencyPreparedness #WaterPurification #DIYProjects #OutdoorAdventure #CampingHacks #Survivalist