
Gardening has seen a resurgence in popularity as more people turn to home-grown produce and natural beauty to enhance their living spaces. One of the most charming and sustainable ways to create a raised garden bed is by using the traditional wattle technique. This age-old method of weaving branches together not only serves a practical purpose but also adds a rustic aesthetic to your garden. In this comprehensive guide, we will walk you through the process of making a wattle raised garden bed, exploring its benefits, materials needed, and steps involved, all while embracing sustainable gardening practices.
What is a Wattle Raised Garden Bed?
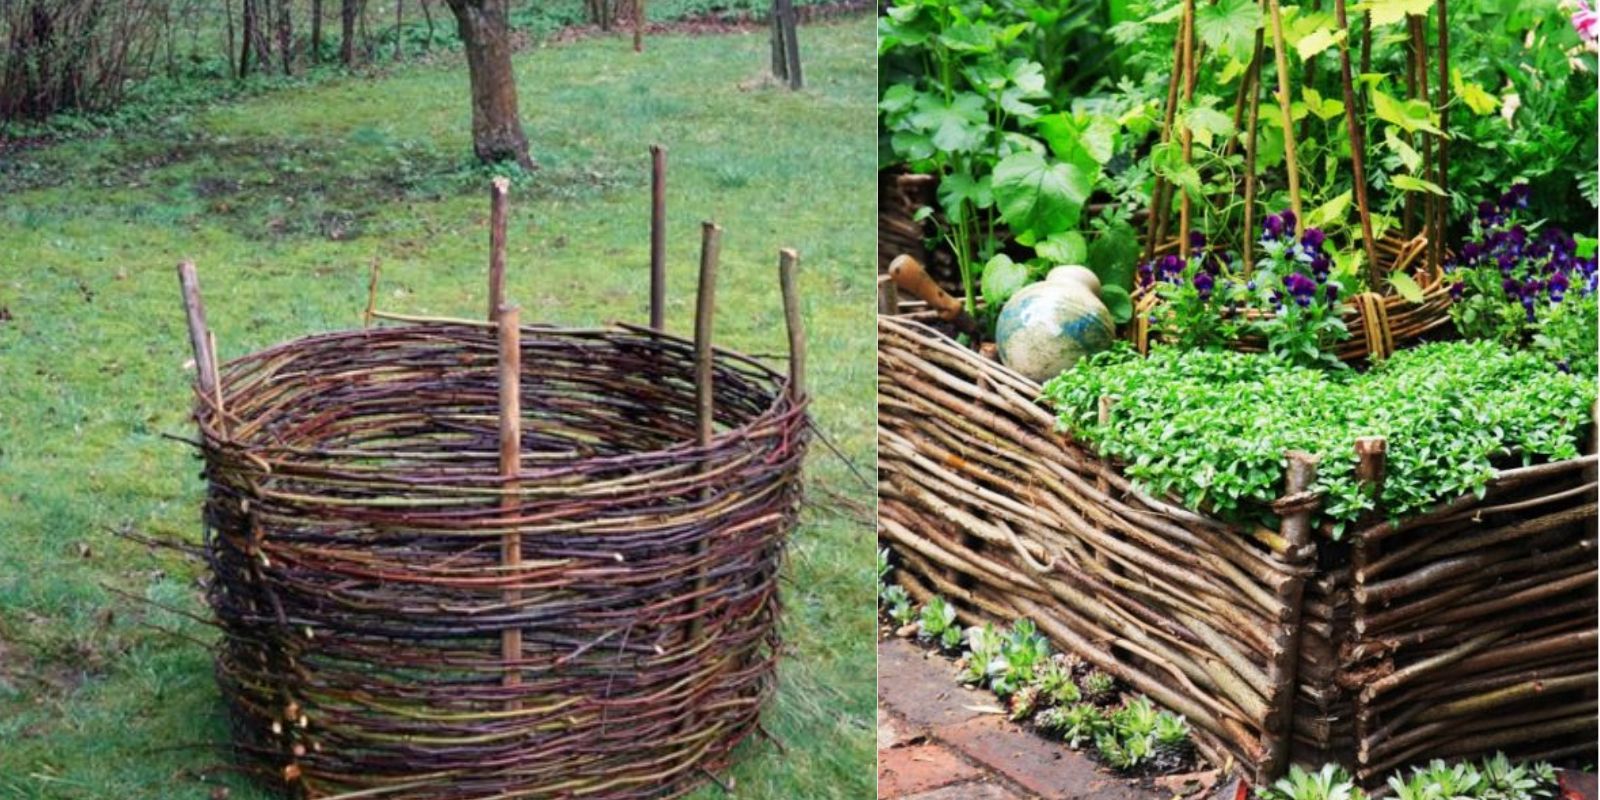
A wattle raised garden bed is constructed from flexible branches or twigs woven together to form a sturdy and visually appealing enclosure for soil and plants. This traditional technique dates back centuries, originating from various cultures around the world. It’s an excellent way to repurpose natural materials, create a unique garden feature, and promote biodiversity in your outdoor space.
Benefits of Wattle Raised Garden Beds
Before diving into the construction process, let’s explore some of the benefits of using a wattle raised garden bed:
- Sustainable Materials: Wattle beds are made from natural materials that are often readily available in your yard or local area, reducing the need for store-bought materials.
- Improved Soil Quality: The organic materials used in wattle beds promote healthy soil aeration and drainage, essential for plant growth.
- Aesthetic Appeal: Wattle beds add a rustic, charming look to any garden, making them an attractive focal point.
- Increased Planting Depth: Raised beds provide a deeper planting area, allowing roots to grow more freely and reducing the risk of soil compaction.
- Better Pest Control: The elevation of the bed can help deter some pests and provides better access for maintenance and harvesting.
Materials Needed
Before you start building your wattle raised garden bed, gather the following materials:
- Flexible branches or twigs: Look for species such as willow, hazel, or vine that can bend easily without breaking.
- Sturdy posts: Choose strong wooden posts (4×4 or 2×4) for the corners of the bed.
- Hand tools: You’ll need a spade or shovel, pruners, a saw (if needed), and a mallet or hammer for driving in the posts.
- Soil: A mix of topsoil, compost, and organic matter to fill your raised bed.
- Optional: Landscape fabric or cardboard to line the bottom of the bed for weed suppression.
Step-by-Step Guide to Building a Wattle Raised Garden Bed
Step 1: Choose a Location
The first step in creating your wattle raised garden bed is to choose an appropriate location. Look for a sunny spot that receives at least six to eight hours of direct sunlight daily. Ensure the area has good drainage to prevent waterlogging, which can harm your plants. Avoid low-lying areas where water tends to accumulate.
Step 2: Determine the Size of Your Bed
Decide on the dimensions of your raised bed. A common size is 4 feet by 8 feet, but you can adjust this based on your available space and preferences. The height of the bed can vary, but 12 to 18 inches is a standard depth that provides ample planting space while remaining manageable for maintenance.
Step 3: Gather Your Materials
Once you’ve chosen the location and size of your garden bed, gather all the necessary materials. Collect flexible branches or twigs, making sure they are long enough to weave around the corner posts. If you’re unsure how much material you need, it’s better to have extra on hand.
Step 4: Prepare the Site
Clear the area where you plan to build your raised bed. Remove any grass, weeds, or debris to create a clean surface. You can also dig down slightly to level the area and remove any large rocks or roots that may interfere with planting.
Step 5: Install the Corner Posts
Using your spade or shovel, dig holes for the corner posts, ensuring they are deep enough to provide stability (about 12 inches deep). Place a corner post in each hole and use a mallet or hammer to drive them securely into the ground. The posts should be evenly spaced to form a rectangular frame.
Step 6: Weave the Wattle
Now comes the fun part—creating the wattle! Start weaving the flexible branches or twigs in and out between the corner posts. Begin at the bottom and work your way up, ensuring that the branches are tightly woven to create a solid structure. The weaving pattern should alternate between branches to maximize stability and visual appeal.
- Begin with the Base: Take a long branch and weave it horizontally between the first two corner posts, then bend it to weave vertically between the next two posts. Continue this pattern, alternating the direction of the branches as you work your way up.
- Fill in the Gaps: Use smaller twigs or branches to fill any gaps in the wattle, ensuring the structure is tight and secure. This step is crucial for maintaining the integrity of the bed and preventing soil erosion.
- Build Up: Continue weaving until you reach your desired height, typically between 18 to 24 inches. Ensure that the wattle is sturdy and evenly woven.
Step 7: Line the Bottom (Optional)
To suppress weeds and prevent soil from falling out of the wattle structure, you may want to line the bottom of the raised bed with landscape fabric or cardboard. This step is optional, but it can help reduce maintenance and promote healthier soil.
Step 8: Fill with Soil
Now it’s time to fill your wattle raised garden bed with soil. Use a mixture of topsoil, compost, and organic matter to create a nutrient-rich environment for your plants. Fill the bed to the top, allowing for some settling as the soil compacts.
Step 9: Plant Your Seeds or Seedlings
Once your wattle raised garden bed is filled with soil, it’s time to plant! Choose a variety of seeds or seedlings based on your preferences and the season. Consider companion planting to maximize space and enhance growth—pairing plants that benefit each other can lead to healthier yields.
Step 10: Water and Maintain
After planting, water your garden bed thoroughly to help settle the soil and promote seed germination. Moving forward, maintain your garden by:
- Watering regularly: Ensure the soil remains consistently moist but not waterlogged. Adjust your watering schedule based on rainfall and temperature.
- Mulching: Apply a layer of organic mulch on top of the soil to retain moisture, suppress weeds, and regulate soil temperature.
- Monitoring for pests and diseases: Regularly check your plants for any signs of pests or diseases. Use organic pest control methods when necessary, such as neem oil or insecticidal soap.
Creative Uses for Wattle Raised Garden Beds
Wattle raised garden beds can be more than just a place to grow vegetables. Here are a few creative ideas to enhance your garden:
- Herb Spiral: Create a herb spiral using a wattle design to incorporate different herbs at various heights, maximizing space and providing visual interest.
- Flower Beds: Fill your wattle raised garden bed with colorful flowers to attract pollinators and enhance the beauty of your outdoor space.
- Children’s Garden: Construct a smaller wattle raised bed for children to cultivate their plants, fostering a love for gardening and nature.
- Vertical Gardening: Utilize the vertical space of your wattle structure to grow climbing plants like peas, beans, or cucumbers, creating a unique and productive garden.
Conclusion
Building a wattle raised garden bed is a sustainable and rewarding project that combines traditional techniques with modern gardening practices. Not only does it enhance the beauty of your garden, but it also provides an excellent growing environment for your plants. By following the steps outlined in this guide, you can create your own wattle raised garden bed and enjoy the benefits of home gardening.
Embrace the charm and functionality of this timeless gardening method, and watch your plants thrive in their new, rustic home. Happy gardening!