
Introduction
Watering a garden can sometimes be tedious, especially if you have multiple plants scattered over a large area. Many traditional irrigation systems are either expensive or consume a lot of water, making them less sustainable in the long run. But what if you could create an efficient, rotating irrigation system with nothing more than a few plastic bottles and a bit of creativity? With just 10 cents or less, this eco-friendly solution allows you to reuse plastic waste and keep your garden hydrated. Whether you’re a novice gardener or a DIY enthusiast, this simple project could revolutionize the way you water your plants.
In this article, we’ll guide you step by step on how to make your own rotating irrigation system using plastic bottles. This cost-effective, water-efficient, and eco-friendly system will keep your plants healthy, while reducing your environmental footprint. Let’s get started!
Why a Rotating Irrigation System?
Before diving into the steps, let’s take a moment to understand the benefits of this system. A rotating irrigation system evenly distributes water to your garden, ensuring each plant receives sufficient hydration without over-saturating the soil. This method is ideal for those looking for an efficient, low-maintenance way to water their plants, as it:
- Saves water: By distributing water evenly, you minimize wastage.
- Cost-effective: You can build this system with almost no cost, using materials you likely already have at home.
- Eco-friendly: By reusing plastic bottles, you contribute to reducing plastic waste and promote sustainability in gardening.
- Low effort: Once set up, this irrigation system does most of the work for you, freeing up time for other gardening tasks.
What You Will Need
Creating a rotating irrigation system is incredibly easy, and most of the materials can be found at home or in your recycling bin. Here’s what you’ll need:
- Plastic bottles: A few 2-liter plastic bottles work best, but smaller ones can also be used.
- A small nail or needle: For poking holes in the bottles.
- String or wire: To attach the bottles to a rod or stick.
- A wooden or metal rod: To serve as the axis for the rotating bottles.
- Scissors or a sharp blade: For cutting the plastic bottles.
- Water source: A garden hose or gravity-fed water system like a water container.
- Supports: Stakes or sticks to anchor the system in your garden.
Step-by-Step Guide to Building the System
Step 1: Collect and Prepare the Plastic Bottles
Begin by gathering your plastic bottles. Ideally, 2-liter bottles are recommended as they provide a larger surface area for water to flow through and sprinkle. Clean the bottles thoroughly to remove any leftover contents.
Step 2: Poke Holes in the Bottles
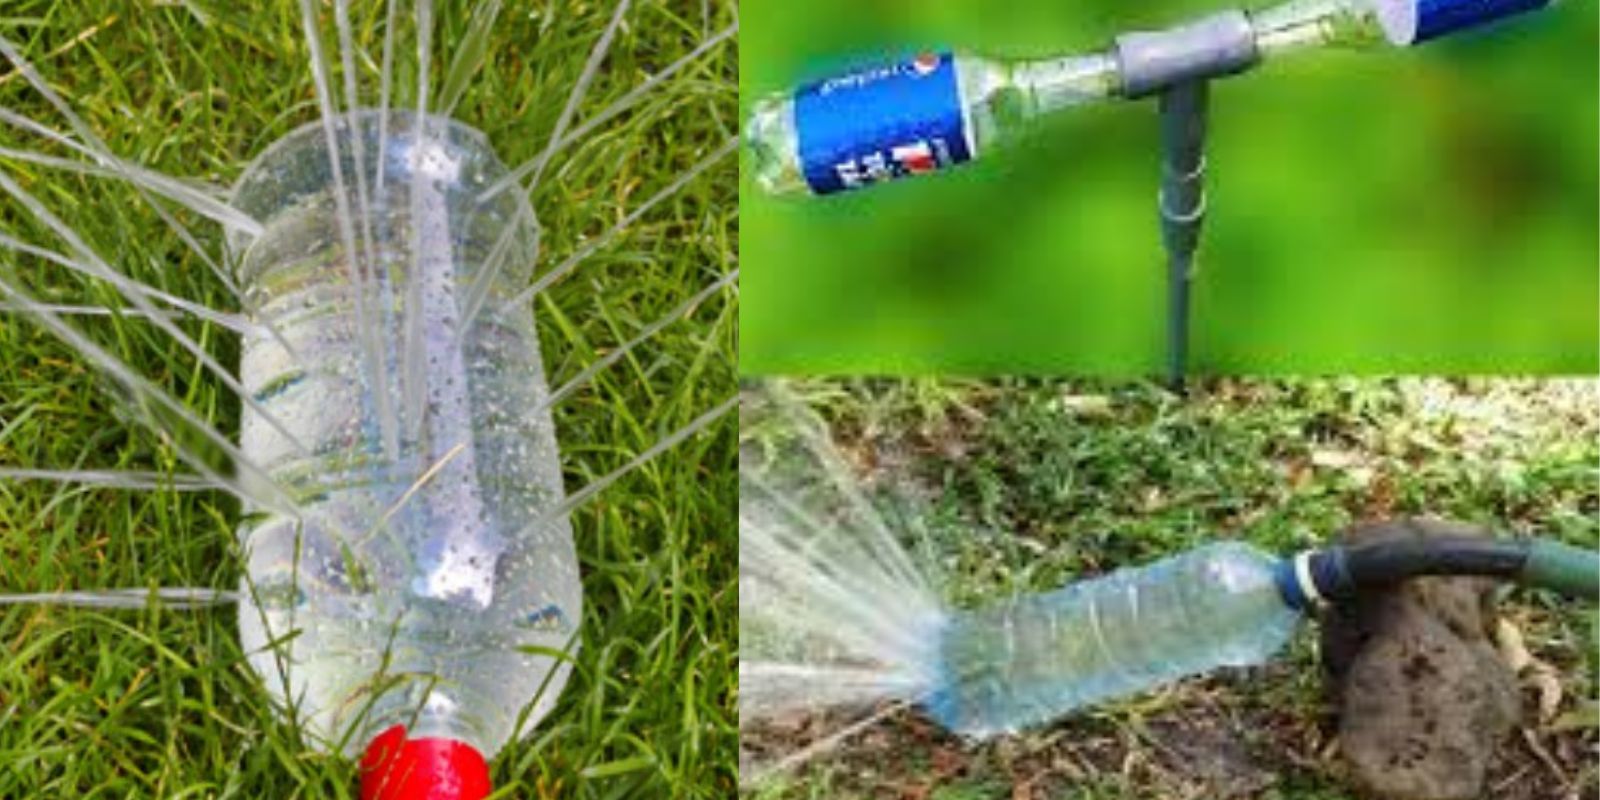
Next, take a small nail, needle, or pin and carefully poke small holes around the entire body of the bottle. These holes will act as sprinklers, allowing water to be distributed evenly throughout your garden. Be sure not to make the holes too large, as this may cause too much water to escape at once.
Step 3: Create the Rotating Mechanism
Now that your bottles are prepped, you’ll need to create the rotating system. This is done by attaching the bottles horizontally to a wooden or metal rod. The bottles should be free to rotate around the rod. Use string or wire to attach the bottles securely, making sure the string allows the bottles to spin when water enters.
Step 4: Set Up the System in Your Garden
Choose a suitable location in your garden to place the rotating irrigation system. The area should have sufficient sunlight and access to a water source like a garden hose or gravity-fed water container. Drive two stakes or sturdy supports into the ground on either side of the garden bed. The rod with the bottles should rest horizontally between these supports, high enough off the ground to allow the bottles to spin freely.
Step 5: Connect to a Water Source
Once the system is in place, connect it to a water source. The simplest method is to position the bottles beneath a slow-flowing garden hose. You can also use a gravity-fed system, where water slowly drips from an elevated container, ensuring the system stays hydrated without overwhelming the plants. As the water fills the bottles, they will rotate and distribute water evenly throughout the garden.
Step 6: Test and Adjust the System
Before leaving the system to run on its own, perform a test run. Turn on the water source and observe how the bottles rotate. Make sure the water is flowing evenly from all the holes and that the bottles are spinning smoothly. If necessary, adjust the placement of the holes or the tension of the string to improve performance.
Step 7: Monitor and Maintain
The beauty of this system is that it requires very little maintenance once it’s up and running. However, be sure to check the bottles periodically for blockages or leaks. If you notice any issues, simply adjust the system or replace the bottles as needed. Over time, the plastic may degrade due to exposure to sunlight, so it’s a good idea to replace the bottles every season to ensure optimal performance.
Why This System Works
The rotating irrigation system is an innovative, low-cost solution for keeping your garden hydrated. As the bottles rotate, they evenly disperse water over a wide area, ensuring that every plant receives a sufficient amount of water. This prevents over-watering or under-watering of specific plants, promoting healthier growth overall.
Additionally, this system saves water by providing a consistent, controlled flow, unlike traditional watering methods which may waste water through runoff or evaporation. Using gravity-fed systems or slow-drip hoses adds to its efficiency, especially in areas prone to water scarcity.
Benefits of Reusing Plastic Bottles
Aside from being a practical solution for your garden, reusing plastic bottles for this irrigation system promotes sustainability. Plastic waste is a significant environmental concern, and repurposing bottles helps reduce the amount of plastic that ends up in landfills or oceans. By giving a second life to materials that would otherwise be discarded, you contribute to a circular economy and minimize your ecological footprint.
Enhancing the System: Advanced Tips
- Drip Irrigation Addition: For an even more efficient system, combine the rotating bottles with a drip irrigation line. The slow-drip system can connect to the bottles, allowing for continuous water flow that maximizes water conservation.
- Solar-Powered Pumps: If you want to automate the water flow, consider using a small solar-powered pump to move water into the system. This way, you can harness renewable energy while ensuring your garden gets consistent hydration.
- Customizable Bottles: Feel free to experiment with different bottle sizes or shapes to fit the needs of your garden. Larger bottles can be used for larger garden areas, while smaller bottles might be ideal for container plants.
Conclusion
Creating a rotating irrigation system using plastic bottles is a simple, cost-effective way to water your garden efficiently. By reusing plastic waste and employing a clever DIY design, you’ll save both time and money while keeping your plants healthy and hydrated. Best of all, this project promotes sustainable living by giving plastic bottles a second life in the garden.
Get started today, and see how this ingenious irrigation system transforms your gardening experience!
Call to Action
Want to keep your garden hydrated effortlessly? Try this eco-friendly and budget-friendly rotating irrigation system and let us know how it works for you! 🌿💧 #DIYIrrigation #SustainableGardening #GardeningHacks #EcoFriendlyLiving #GardeningInnovation #WaterWiseGardening #PlasticBottleReuse #SmartWatering #GardenDIY #GardeningOnABudget