
Introduction
Bumblebees are crucial for maintaining a healthy ecosystem. As some of the best pollinators, they help gardens, crops, and wild plants thrive. However, due to habitat destruction and environmental changes, bumblebee populations are declining. Providing a safe and cozy home for these tiny workers can significantly impact their survival. One simple yet effective way to support them is by making a bumblebee pot—a DIY nesting site that mimics their natural habitat.
In this guide, we will walk you through how to create a bumblebee pot, ensuring these hardworking insects find a comfortable place to rest and reproduce.
Why Do Bumblebees Need a Nesting Pot?
Bumblebees often seek shelter in abandoned rodent holes, compost piles, and crevices in the ground. Unfortunately, with urbanization and landscaping practices, these natural habitats are becoming scarce. By creating a bumblebee pot, you provide them with an alternative, protected environment where they can safely establish a colony.
A bumblebee pot offers several benefits:
- Encourages natural pollination in your garden
- Supports declining bumblebee populations
- Provides a safe nesting space away from predators
- Helps improve plant growth and yield in fruit and vegetable gardens
Materials You Will Need
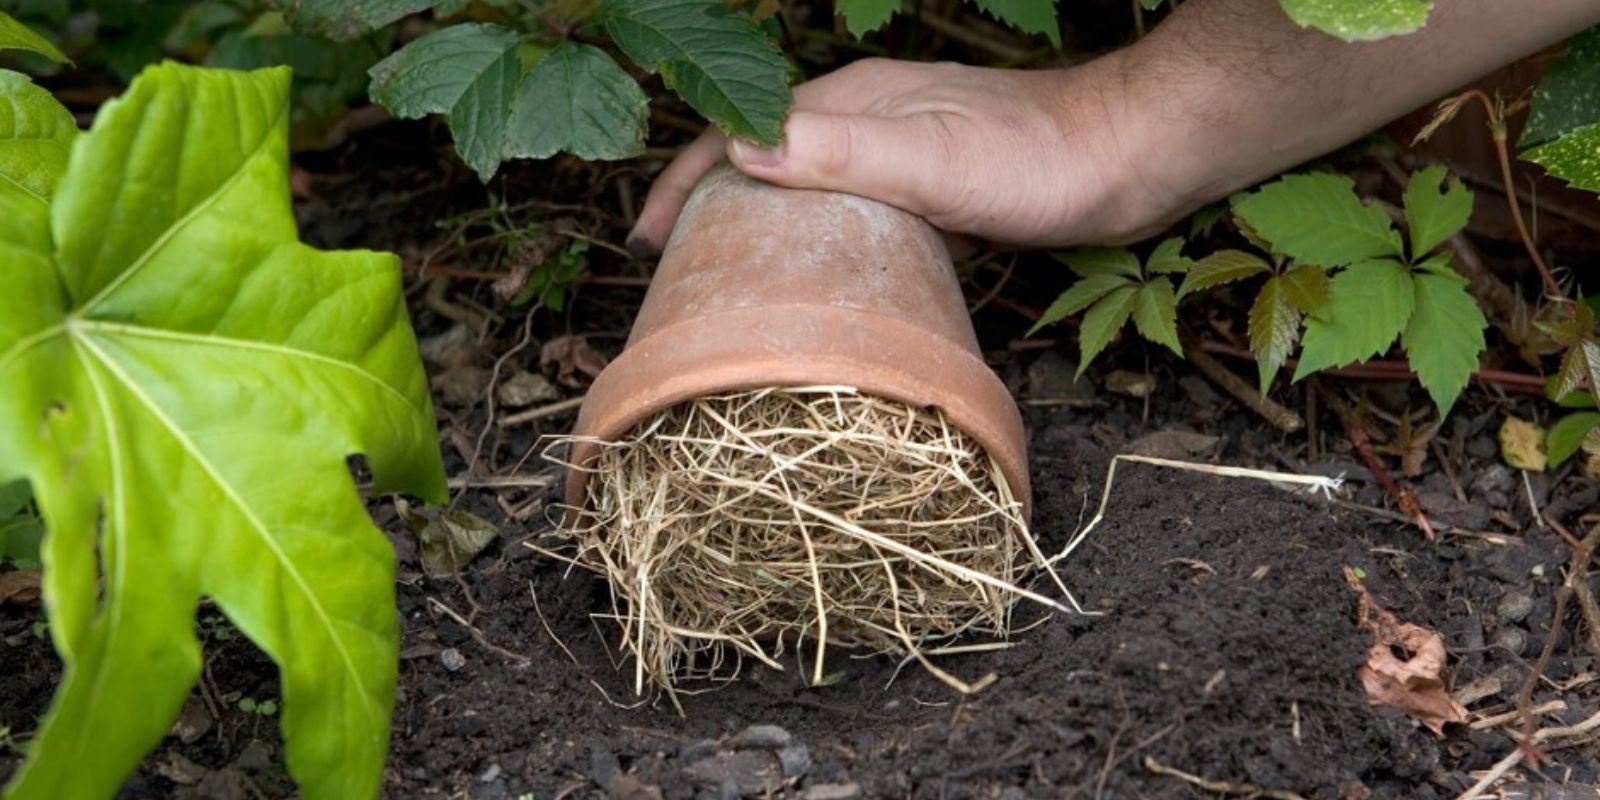
Before you start building your bumblebee pot, gather the following materials: ✔️ A terracotta or ceramic flowerpot (6-8 inches wide, with a drainage hole) ✔️ A small length of tubing (such as a piece of old hose or a bamboo tube, about 6 inches long) ✔️ Nesting material (straw, dried moss, or shredded paper) ✔️ A flat stone or tile (to cover the entrance and protect against rain) ✔️ Soil or mulch (to help blend the pot into the environment) ✔️ A shaded, undisturbed spot in your garden
Step-by-Step Guide to Making a Bumblebee Pot
Step 1: Preparing the Pot
Choose a terracotta or ceramic pot with a hole at the bottom. This hole will serve as an entrance for the bees. Ensure the pot is clean and free from any harmful chemicals.
Step 2: Creating the Entrance Tunnel
Place a small piece of tubing or a short section of an old hose into the drainage hole. This tunnel should be just big enough for bees to enter and exit easily. If you don’t have tubing, dig a small pathway leading into the entrance hole when placing the pot in the ground.
Step 3: Adding Nesting Material
Bumblebees prefer soft, dry nesting material like straw, dried moss, or shredded paper. Loosely pack it inside the pot to provide insulation and comfort.
Step 4: Positioning the Pot
Choose a shady, sheltered area near flowering plants but away from direct human activity.
- Option 1: Place the pot on its side, slightly tilted, with the entrance tube pointing outward.
- Option 2: Bury the pot partially in the ground, leaving only the entrance visible. This method mimics the natural burrows bumblebees use in the wild.
Step 5: Covering and Protecting the Entrance
To prevent rainwater from flooding the nest, place a flat stone, tile, or bark over the entrance, leaving a gap for the bees to pass through. This will help keep the inside of the nest dry and safe.
Step 6: Monitoring the Pot
Check the pot occasionally for signs of activity, but avoid disturbing it too often. If you see bees entering and exiting, your DIY bumblebee home is a success!
Best Locations for a Bumblebee Pot
For the best results, place the bumblebee pot in: 🌱 A shady spot under bushes or near dense vegetation 🌼 An area protected from strong winds and direct sunlight 🌾 Close to flowering plants that attract bees, such as lavender, wildflowers, and herbs 🐝 A space that is away from foot traffic and pets
Additional Tips for Success
✅ Plant bee-friendly flowers near the nest to provide nectar and pollen. ✅ Avoid using pesticides or chemicals around the bumblebee pot. ✅ Provide a water source, like a shallow dish with pebbles, for bees to drink from. ✅ Make multiple pots if you have a large garden to support more pollinators. ✅ Leave old nests undisturbed at the end of the season, as queens may reuse them.
Common Mistakes to Avoid
🚫 Using plastic pots – These can become too hot or trap moisture, leading to mold. 🚫 Placing the pot in a wet or flood-prone area – This can drown the nest. 🚫 Packing the nesting material too tightly – Bumblebees need space to move. 🚫 Checking the pot too frequently – Disturbing the nest may cause the bees to leave.
Conclusion
Creating a bumblebee pot is a simple yet impactful way to support declining pollinator populations. By providing a safe, natural nesting site, you encourage bumblebees to thrive in your garden, ensuring better pollination and healthier plants.
So why not take a few minutes to set up a bumblebee pot today? Your garden—and the bees—will thank you! 🌿🐝
Have you tried making a bumblebee pot? Share your experience in the comments below!
#SaveTheBees #BumblebeeHaven #PollinatorGarden #GardeningForWildlife #OrganicGardening #DIYBeeHabitat