
Introduction:
When it comes to maintaining a healthy garden, one of the most important factors to consider is managing the pests that lurk in the soil. Pests like grubs, root-feeding nematodes, and other harmful soil-dwelling insects can wreak havoc on your plants, eating away at their roots and preventing them from thriving. While traditional pesticides can be effective, they often harm beneficial insects, plants, and the environment.
Luckily, there is a natural, organic solution to this problem: beneficial nematodes. These microscopic organisms are an eco-friendly way to control soil pests and promote a healthier garden. In this article, we’ll explore how to use beneficial nematodes to target grubs and other garden pests, ensuring your plants grow strong and healthy without harming the environment.
What Are Beneficial Nematodes?
Beneficial nematodes are tiny, microscopic roundworms that live in the soil. They are natural predators of many common garden pests, such as grubs, root weevils, and some types of larvae. Unlike chemical pesticides, nematodes work by infecting and killing pest larvae while leaving beneficial insects and plants unharmed.
There are different species of nematodes, each specializing in different types of pests. The most common species used for pest control are Steinernema and Heterorhabditis. These nematodes are commercially available and can be purchased in small quantities for home gardens. They are an excellent choice for organic gardeners looking for a non-toxic way to eliminate soil pests.
Why Use Beneficial Nematodes for Pest Control?
Beneficial nematodes offer a range of benefits for gardeners. Here’s why they are such a popular choice for organic pest control:
- Non-toxic: Unlike chemical pesticides, nematodes do not harm humans, pets, or beneficial insects, making them a safe choice for eco-conscious gardeners.
- Targeted action: Nematodes specifically target harmful soil pests, such as grubs and root-feeding larvae, without affecting other beneficial organisms in the soil.
- Environmentally friendly: Nematodes are part of the natural ecosystem and help maintain the balance of pest and predator populations in the garden.
- Long-lasting effect: Once introduced into the soil, nematodes can continue to work for several weeks, helping to keep your garden free from pests.
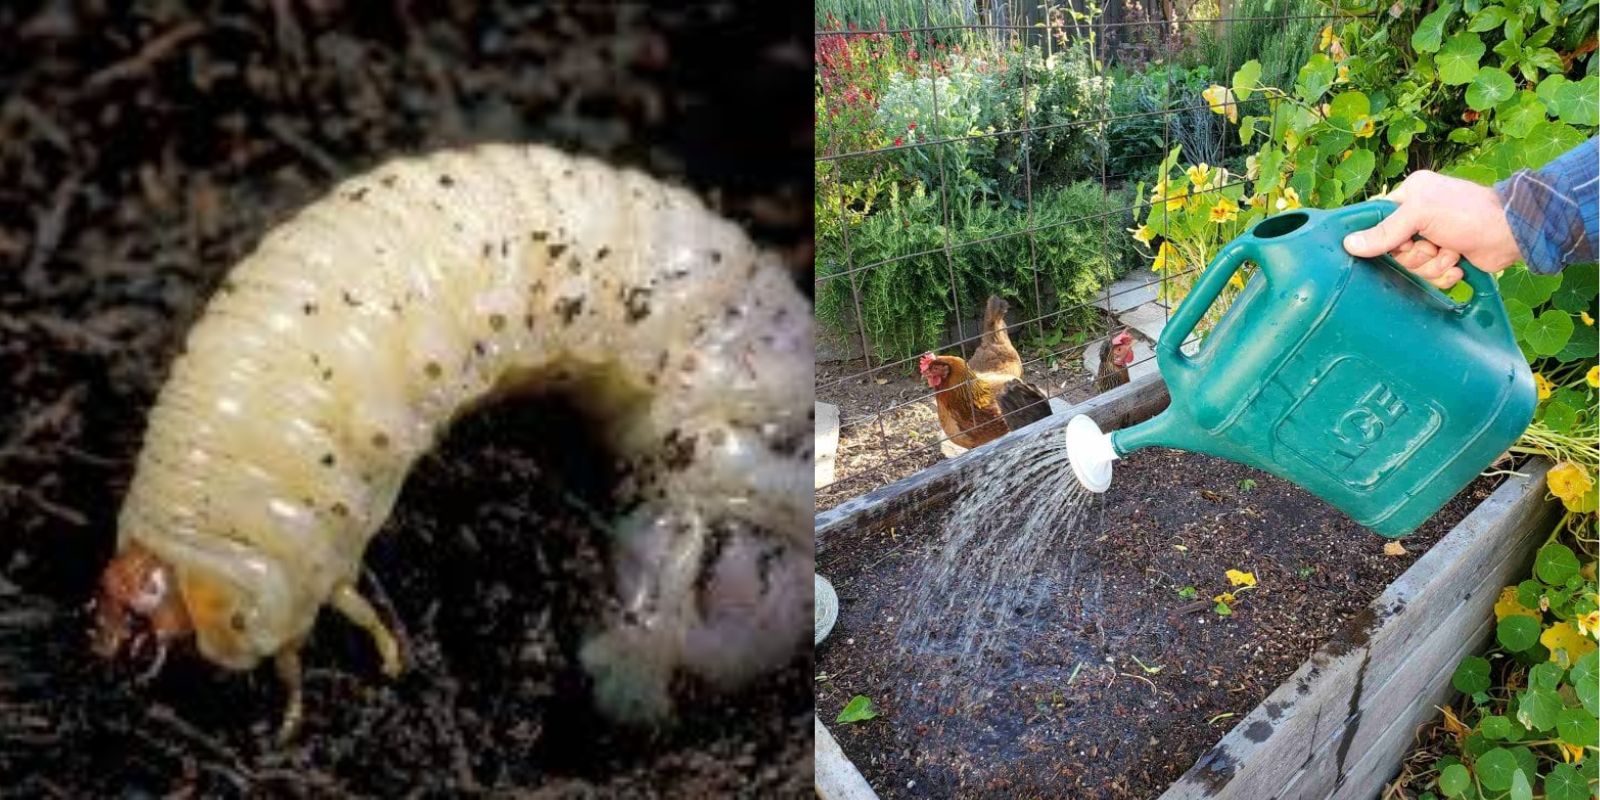
Identifying Soil Pests
Before you can effectively use nematodes, it’s important to identify the pests that are causing trouble in your garden. Grubs and other soil pests often damage plant roots, leading to symptoms such as:
- Wilting plants, even when adequately watered
- Yellowing or browning leaves
- Stunted growth
- Plants that easily pull out of the ground, indicating damaged roots
If you notice these symptoms, it could be a sign of a grub infestation or other root-feeding pests. Grubs are the larvae of various beetles and often appear in the soil in late spring or early summer. Other common soil pests include root weevils, flea beetles, and cutworms.
Step-by-Step Guide: How to Apply Beneficial Nematodes
Using nematodes to control garden pests is a simple and straightforward process. Here’s a step-by-step guide to help you get started:
Step 1: Choose the Right Nematode Species
There are several different species of nematodes, and each targets specific pests. For example, Steinernema species are effective against grubs, while Heterorhabditis species target root weevils and other soil-dwelling pests. When purchasing nematodes, make sure to choose a species that targets the pests in your garden.
Check the label to ensure that the nematodes you purchase are suited for the specific pest you’re trying to eliminate. Many nematode products will list the types of pests they target, making it easier for you to select the right one for your garden.
Step 2: Prepare the Soil
Before applying nematodes, it’s important to prepare the soil. Nematodes need moisture to travel through the soil and find their prey, so water the soil thoroughly a day or two before applying them. This will ensure that the soil is moist but not overly saturated.
Nematodes should be applied in the early morning or evening when the soil is cool and the temperature is lower. This will help prevent the nematodes from being exposed to excessive heat, which can harm them.
Step 3: Mix the Nematodes with Water
Once you have selected the appropriate nematodes and prepared the soil, you’ll need to mix the nematodes with water. Follow the instructions on the product label for the correct amount of water to use.
Nematodes are typically sold in a concentrated form and need to be diluted in water before application. Mix the nematodes gently into the water, as rough handling can kill them. Once the mixture is ready, you can begin applying it to your garden.
Step 4: Apply the Nematodes to the Soil
There are several methods for applying nematodes to the soil. The most common methods are:
- Watering can or sprayer: Use a watering can or sprayer with a fine nozzle to distribute the nematodes evenly across the soil. Make sure to cover the entire area where you suspect pests are present.
- Irrigation system: If you have a drip irrigation system, you can add the nematode mixture to the system and allow it to distribute the nematodes to your plants automatically.
Be sure to apply the nematodes to moist soil, as they need moisture to travel through the soil and reach the pests. It’s also important to apply the nematodes evenly to ensure that all areas of the soil are treated.
Step 5: Keep the Soil Moist
After applying the nematodes, keep the soil moist for several days. Nematodes need moisture to move through the soil and find their prey, so maintaining consistent soil moisture is key to their effectiveness.
You may need to water the soil lightly for a few days following the application, depending on weather conditions. Be sure to avoid overwatering, as this can wash away the nematodes and reduce their effectiveness.
Step 6: Monitor the Results
Once the nematodes have been applied, give them time to work. Nematodes will begin to hunt down pests and kill them by infecting them with a deadly bacteria. The process may take a few weeks, depending on the severity of the infestation.
During this time, continue to monitor your garden for signs of pest damage. You may notice that the plants begin to recover and show new growth as the pests are eliminated.
Step 7: Repeat if Necessary
In some cases, it may be necessary to apply a second treatment of nematodes, especially if the pest infestation is severe. Follow the instructions on the nematode product for any recommended follow-up applications.
Regular use of nematodes can help maintain a healthy garden and keep soil pests under control throughout the growing season.
Conclusion
Beneficial nematodes offer an effective, eco-friendly way to eliminate grubs and other soil pests without harming the environment or beneficial insects. By following the simple steps outlined above, you can improve the health of your soil and protect your plants from harmful pests. Nematodes work naturally with the ecosystem, providing long-lasting pest control that is safe for your garden, your family, and the planet.
Whether you’re a seasoned gardener or a beginner, using nematodes to manage soil pests is an excellent way to maintain a thriving, healthy garden. By choosing the right nematode species, preparing the soil, and following the application process, you’ll be able to tackle pest problems with ease and ensure that your garden flourishes.