
Milkweed is more than just a beautiful addition to your garden—it’s an essential plant for supporting pollinators, particularly monarch butterflies. Monarchs rely on milkweed as the only host plant for their larvae, making it a critical resource in their life cycle. By learning how to harvest and plant milkweed seeds, you can help restore habitats for these butterflies and contribute to the broader effort of protecting pollinators. In this article, we’ll walk you through every step to successfully harvest and plant milkweed seeds, ensuring a thriving butterfly-friendly garden.
Why Milkweed Matters
Before diving into the practical aspects of milkweed propagation, it’s important to understand the role this plant plays in the ecosystem. Monarch butterflies lay their eggs exclusively on milkweed plants. The caterpillars feed on the leaves, which provide all the nourishment they need to grow and eventually form their chrysalises. Unfortunately, the decline in natural milkweed populations due to urbanization and agricultural expansion has contributed to the reduction of monarch butterfly numbers.
By planting milkweed, you’re not only helping monarchs but also supporting a wide variety of pollinators such as bees and other butterflies. Whether you live in a rural area, suburban neighborhood, or even an urban environment, you can plant milkweed in your garden, container, or a nearby green space.
Step 1: When to Harvest Milkweed Seeds
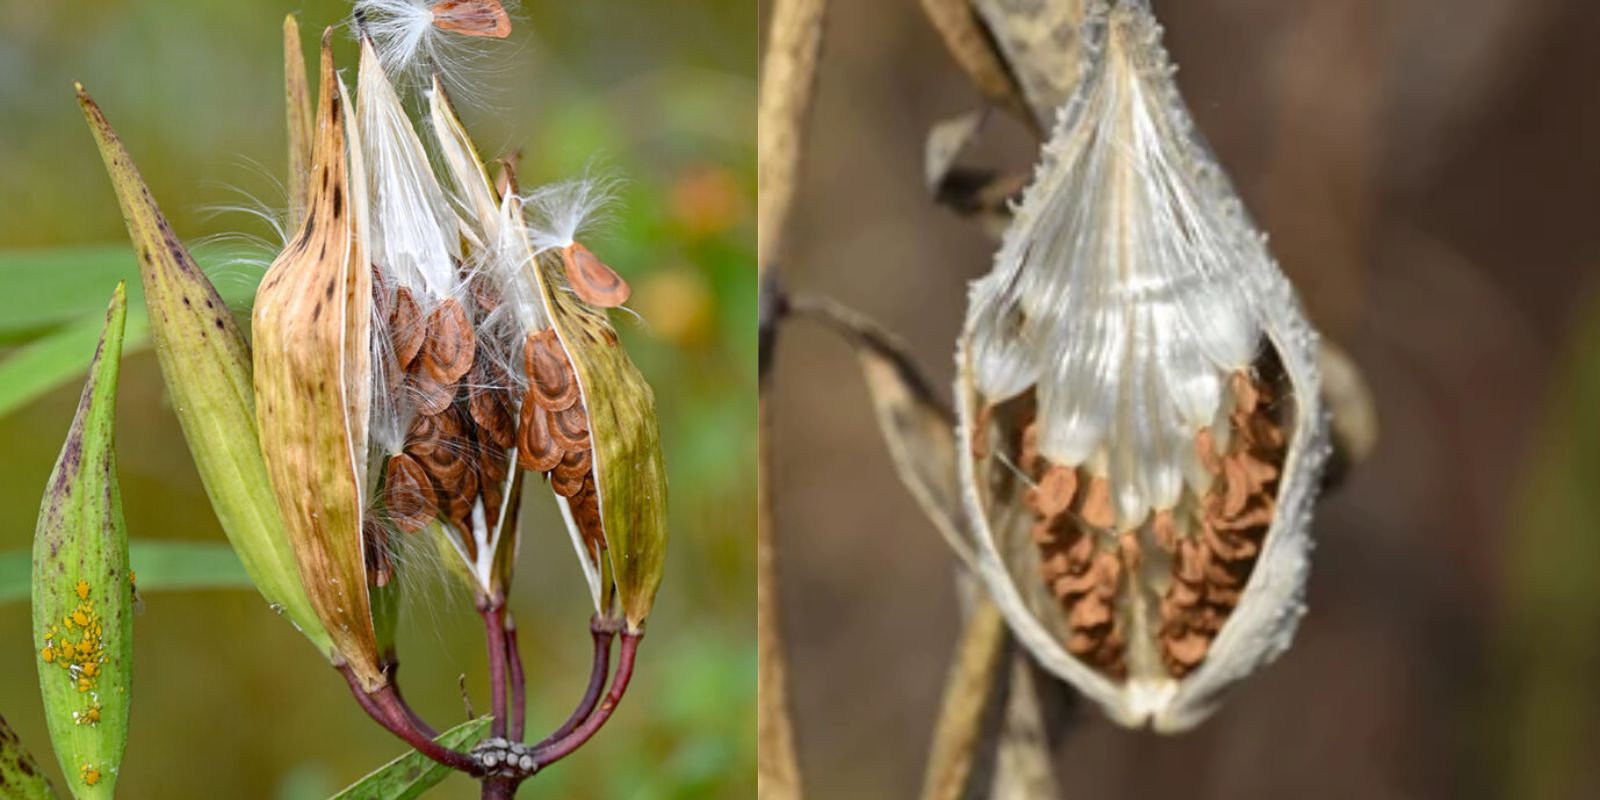
Timing is everything when it comes to harvesting milkweed seeds. You’ll want to wait until the pods have matured and dried out on the plant. This typically happens in late summer to early fall, depending on your region. Mature seed pods will turn brown and start to crack open. Inside, you’ll find silky white fibers known as “floss” that help the seeds disperse naturally through the wind.
Harvest the seed pods only when they are fully dry. If you collect them too early, the seeds may not be viable. Look for pods that are firm but beginning to split at the seam.
Step 2: Collecting the Seeds
Once you’ve identified mature seed pods, gently remove them from the plant. It’s a good idea to wear gloves when handling milkweed, as the sap can be irritating to some people’s skin. Place the pods in a paper bag and bring them inside to continue drying for a few days.
To extract the seeds from the pod, open it carefully and remove the floss, which is attached to the seeds. You can manually separate the seeds from the floss by hand or use a screen to sift them. Some gardeners find it helpful to place the seeds and floss inside a paper bag, shake it vigorously, and then use a mesh screen to separate the two. Make sure you only keep the flat, brown seeds, as green or white seeds are immature and unlikely to germinate.
Step 3: Drying the Seeds
Before planting, it’s crucial to allow the seeds to dry completely. Spread them out on a paper towel or a tray in a cool, dry location for a few days. This ensures the seeds won’t rot when planted. Proper drying also extends the seeds’ viability for storage if you choose to plant them later.
Step 4: Stratifying Milkweed Seeds
Milkweed seeds require a period of cold stratification to break dormancy and trigger germination. This mimics the natural winter conditions the seeds would experience in the wild. There are two main ways to achieve this:
- Natural Stratification (Outdoor Planting):
You can plant milkweed seeds directly in the ground in late fall. As winter sets in, the cold temperatures will naturally stratify the seeds, and they’ll be ready to germinate in the spring. Make sure to choose a well-draining site that gets plenty of sunlight. - Indoor Stratification (For Spring Planting):
If you prefer to start seeds indoors, you can simulate winter conditions by refrigerating the seeds. Place the dried seeds in a damp paper towel, seal them in a plastic bag, and store them in the refrigerator for 30-60 days. After the stratification period, the seeds will be ready to plant.
Step 5: Preparing the Soil and Planting the Seeds
Milkweed grows best in well-draining soil with full sun exposure, although it’s quite adaptable and can thrive in various soil types. To prepare your planting site, clear any weeds and loosen the soil to improve aeration. Milkweed plants do not need rich soil, as they are hardy and accustomed to growing in less fertile conditions.
- For Outdoor Planting:
If you’re planting directly into your garden, scatter the seeds on the soil surface and press them down gently, but don’t bury them. Milkweed seeds need light to germinate, so they should remain on or near the surface. Water the area lightly and keep it consistently moist until the seeds sprout. - For Indoor Planting:
If you’re starting seeds indoors, plant them in seed trays filled with a well-draining potting mix. Place the seeds on top of the soil, press them lightly, and mist the soil with water. Keep the trays in a bright location or under grow lights, maintaining even moisture.
Step 6: Watering and Care
After planting, it’s essential to keep the soil consistently moist but not waterlogged. Milkweed seeds may take a few weeks to germinate, so patience is key. Once the seedlings are established, they are fairly drought-tolerant. However, regular watering during dry periods will encourage healthier growth.
Milkweed plants prefer full sunlight, so be sure to plant them in a location that receives at least 6 hours of direct sun each day. As they grow, you may need to thin out the seedlings to give each plant enough space to spread.
Step 7: Attracting Pollinators
As your milkweed plants mature, they will begin to attract pollinators. Monarch butterflies are particularly drawn to milkweed, as it serves as both a food source and a habitat for their caterpillars. Other butterflies, bees, and beneficial insects will also visit the plant, helping to support the biodiversity of your garden.
In addition to planting milkweed for monarchs, consider adding other pollinator-friendly plants such as bee balm, coneflowers, and black-eyed Susans to create a well-rounded habitat for various species.
Step 8: Maintaining Your Milkweed Patch
Milkweed is a perennial, so once established, it will come back year after year. To keep your milkweed patch healthy, it’s important to monitor for pests and diseases. While milkweed is generally hardy, it can sometimes attract aphids. If you notice a large aphid population, you can spray the plants with a mixture of water and mild soap to deter them.
At the end of the growing season, allow the seed pods to mature and dry out on the plant. This will enable you to harvest new seeds for the following year and potentially expand your milkweed garden.
Conclusion: Making a Difference with Milkweed
By planting and caring for milkweed, you’re taking an active role in supporting monarch butterflies and other pollinators. The simple act of growing milkweed can have a profound impact on the environment by providing vital habitats and food sources for wildlife. Whether you’re an experienced gardener or just starting, milkweed is a rewarding plant that offers both ecological benefits and natural beauty.
Motivation Sentence:
Start your butterfly-friendly garden today by planting milkweed and watching monarchs thrive! 🦋🌱 #Milkweed #SaveTheMonarchs #ButterflyGarden #PollinatorPlants #GardenForWildlife #EcoFriendlyGardening #GrowMilkweed