
Vanilla is one of the most cherished flavors globally, widely used in cooking, baking, and beverages. Yet, many people don’t realize how labor-intensive it is to cultivate vanilla beans and how rewarding it can be to grow them yourself. Vanilla comes from orchids, and with the right conditions, you can grow your own vanilla beans at home, right in your garden or even indoors. Whether you’re looking to grow vanilla for culinary purposes or simply enjoy the beauty of the orchid flower, this guide will walk you through the process of successfully growing vanilla beans.
Understanding Vanilla: The Unique Orchid
Vanilla comes from the seeds of the vanilla orchid, a tropical vine belonging to the Vanilla genus, specifically Vanilla planifolia. While the plant is native to Mexico, it has been successfully cultivated in many tropical regions worldwide, including the islands of the Pacific and parts of Southeast Asia. What makes vanilla so distinct is that it’s one of the few orchid species that produces a usable product—vanilla beans.
In nature, vanilla orchids grow in hot, humid environments with plenty of sunlight. They require specific care to thrive and produce high-quality vanilla beans. Growing vanilla at home can be challenging, but the process is immensely rewarding. Let’s dive into how you can grow your own vanilla beans.
1. Choosing the Right Growing Location
Before you begin, it’s essential to understand that vanilla orchids are sensitive plants that require specific growing conditions to succeed. They thrive in tropical environments, which is why they need a consistent temperature range and high humidity.
- Temperature: Vanilla orchids prefer warm temperatures between 75-85°F (24-29°C). They should not be exposed to temperatures below 50°F (10°C), as cold temperatures can damage the plant. Choose a spot where the temperature is consistent and warm year-round.
- Sunlight: Vanilla orchids need indirect sunlight, as direct sunlight can burn their delicate leaves. A bright, shaded area is ideal. If growing indoors, place the plant near a window with filtered light or use artificial grow lights.
- Humidity: Vanilla orchids are native to humid environments, so maintaining high humidity is crucial. Aim for 80% humidity, and if you’re growing indoors, consider using a humidifier or misting the plant regularly. You can also grow vanilla in a greenhouse, where temperature and humidity can be better controlled.
2. Preparing the Growing Environment
Vanilla orchids are vining plants that need support to grow. When planting vanilla, you’ll need to create a vertical space where the vines can climb.
- Choose the Right Container: Vanilla orchids can be grown in pots, but it’s crucial to select a large container with proper drainage. A pot that’s 12-18 inches in diameter should work well for a small vanilla orchid. Use a container with drainage holes to prevent root rot.
- Support Structure: Since vanilla orchids are climbing vines, they need something to latch onto as they grow. You can install a trellis, plant stake, or a small tree to support the vines. Alternatively, you can use a support system that mimics a vine-like environment, allowing the plant to climb and spread.
- Soil Requirements: Vanilla orchids prefer loose, well-draining, and slightly acidic soil. A mixture of coconut coir, perlite, and orchid bark works best. This combination allows good drainage while maintaining moisture. If you’re growing your vanilla plant in the ground, ensure that the soil is rich in organic matter and has excellent drainage.
3. Planting the Vanilla Orchid
Planting your vanilla orchid is a simple but essential step in ensuring its success. Start by obtaining a healthy cutting or vanilla orchid vine from a reputable nursery or online store.
- Cuttings: Vanilla orchids are typically propagated through cuttings rather than from seeds. Choose a healthy, 12-18 inch vine cutting with a few healthy leaves. You can purchase a cutting or take one from an established vanilla plant.
- Planting in Pots: If growing in pots, place the cutting in your prepared soil mix. Ensure the cutting is securely planted, and the roots are covered but not too deep. You can gently press the soil around the base of the cutting to help secure it.
- Watering: After planting, water the vanilla orchid thoroughly to settle the soil. Make sure the soil is evenly moist, but not soggy. Always allow excess water to drain, as standing water can lead to root rot.
4. Caring for Your Vanilla Orchid
Once planted, your vanilla orchid will need consistent care to thrive. Here are the key elements to pay attention to as your vanilla plant matures.
- Watering: Vanilla orchids like consistent moisture but not soggy roots. Water the plant regularly, allowing the soil to dry out slightly between waterings. If you’re growing the plant indoors, ensure that the air remains humid, and water the plant more frequently during dry periods.
- Fertilization: Vanilla orchids benefit from regular feeding. Use a balanced liquid fertilizer diluted to half strength once a month during the growing season (spring through fall). You can also apply organic fertilizers like compost tea or fish emulsion for extra nutrients.
- Pruning: Pruning helps keep the plant healthy and encourages new growth. Trim back any leggy or dead vines, and remove any flowers that have wilted to keep the plant focused on developing healthy vines and leaves.
- Repotting: As the plant grows, you may need to repot it every couple of years to give it more space. Repotting should be done during the spring when the plant is actively growing.
5. Pollination: Hand Pollination for Vanilla Orchids
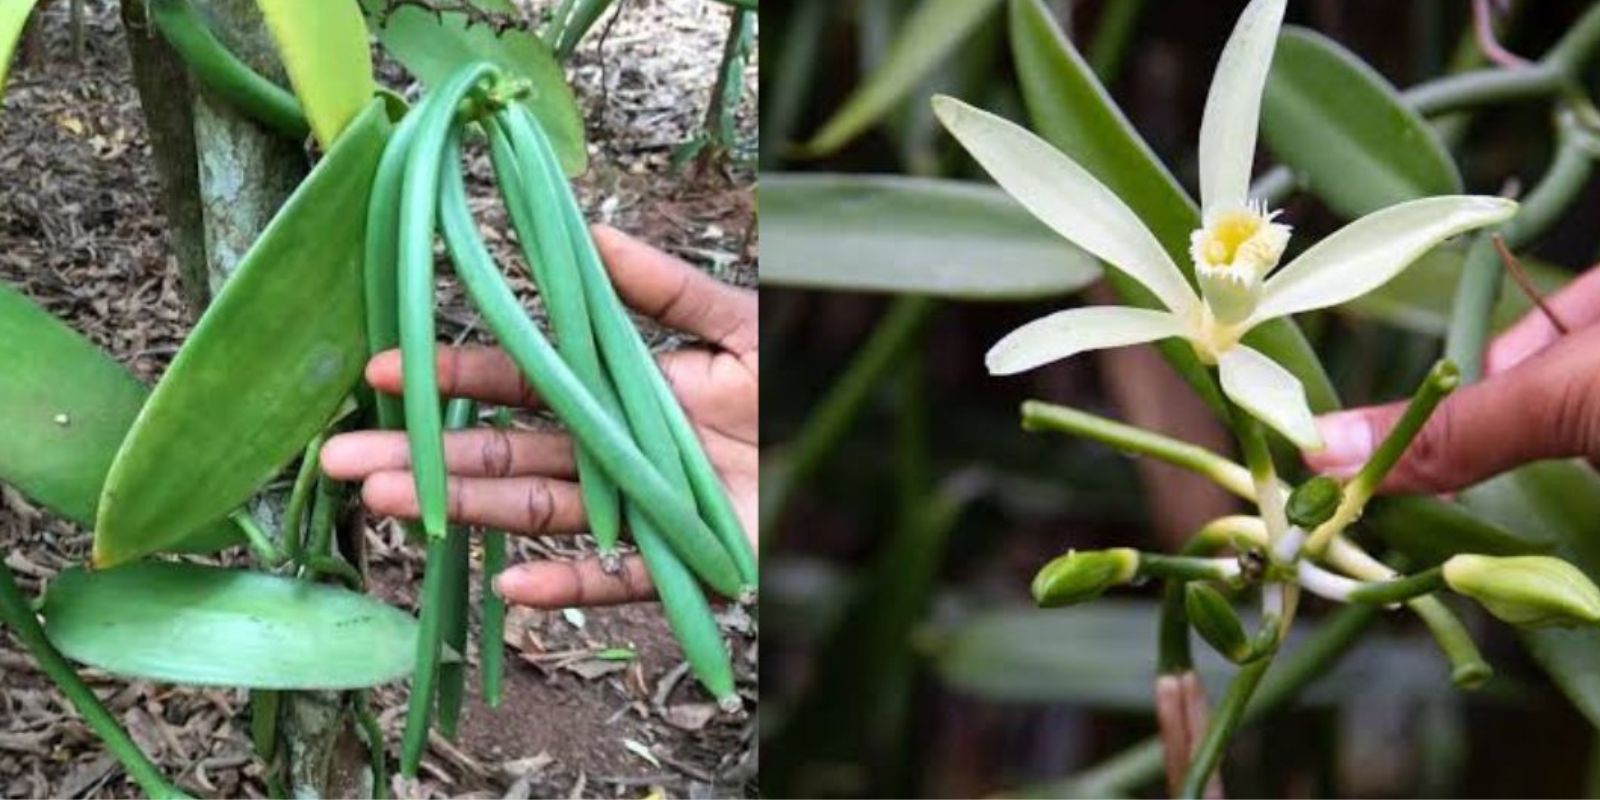
One of the most unique aspects of growing vanilla is pollination. In their native environments, vanilla orchids are pollinated by specific bees or hummingbirds. However, in many parts of the world, these pollinators are absent. This means that you’ll need to hand-pollinate your vanilla orchid flowers to get fruit.
- Hand Pollination Process: The flowers of the vanilla orchid bloom for only one day, so timing is critical. When the flowers open, use a small brush or a toothpick to transfer the pollen from the male part of the flower (the anther) to the female part (the stigma). Gently lift the flap on the flower and use the tool to touch the anther and then the stigma.
- Pollination Timing: Hand-pollinate early in the morning when the flower is fresh. You can pollinate multiple flowers on the same day to ensure a good fruit set. If done correctly, you should see the flower begin to form a seed pod within a few weeks.
6. Harvesting the Vanilla Beans
After about 8-9 months of careful growth and pollination, the vanilla beans will be ready to harvest. The beans are initially green but will turn yellowish at the tip when they are ripe.
- Harvesting Process: Carefully cut the vanilla pods from the vine using sterilized scissors. Be gentle when handling the beans, as they are delicate and can bruise easily.
- Curing the Beans: Vanilla beans require curing to develop their characteristic flavor and aroma. After harvesting, place the beans in a warm, dry location for several weeks. The beans should be wrapped in cloth or placed in a wooden box, allowing them to dry and cure. This process can take up to 3-4 months, during which the beans will become plump and aromatic.
7. Using Your Homegrown Vanilla Beans
Once the vanilla beans are cured, they’re ready to use. Split the beans open to scrape out the seeds, which are often used in baking, cooking, and making vanilla extract. You can also use the entire bean to flavor liquids or store them in sugar to make homemade vanilla sugar.
Vanilla is a prized culinary ingredient, and there’s nothing like the satisfaction of using your own homegrown, hand-pollinated, and hand-cured vanilla beans.
Conclusion
Growing vanilla beans at home is a rewarding and exciting experience. With a bit of patience, care, and the right environment, you can cultivate your own vanilla orchids and harvest fresh, flavorful beans. While the process is labor-intensive, the satisfaction of producing your own vanilla is worth the effort. Whether you’re using it in your favorite recipes, creating your own vanilla extract, or simply admiring the stunning flowers, growing vanilla beans is an achievement any gardener can be proud of.
If you’re up for the challenge, give it a try—and enjoy the fragrant, flavorful rewards of growing your own vanilla!