
Roses are among the most cherished flowers in the world. Whether you’re looking to add them to your garden or gift a loved one with a symbol of love and beauty, growing roses from seed can be an exciting and fulfilling journey. While many gardeners choose to propagate roses through cuttings or grafting, growing them from seed offers a unique sense of accomplishment. This method requires patience, but it’s a great way to experiment with new rose varieties and to watch the entire life cycle of a rose plant unfold.
In this guide, we’ll walk you through everything you need to know about growing roses from seed, from collecting seeds to watching your rose bushes bloom.
Why Grow Roses from Seed?
Before diving into the steps, you might wonder: why bother growing roses from seed when you could buy a plant from a nursery? Growing roses from seed has a few key benefits:
- Unique Varieties: If you grow roses from seed, you might discover a variety that’s never been seen before. Each seed has the potential to produce a unique flower in terms of color, shape, and fragrance.
- Affordability: Seeds are much cheaper than buying mature plants. Plus, it’s an affordable way to fill your garden with many rose bushes.
- Rewarding Process: Watching a rose grow from a tiny seed into a full bloom is immensely satisfying. It allows you to nurture a plant from the very beginning.
How to Grow Roses from Seed
Now that you’re ready to grow roses from seed, let’s break down the process step by step.
Step 1: Collecting Rose Seeds
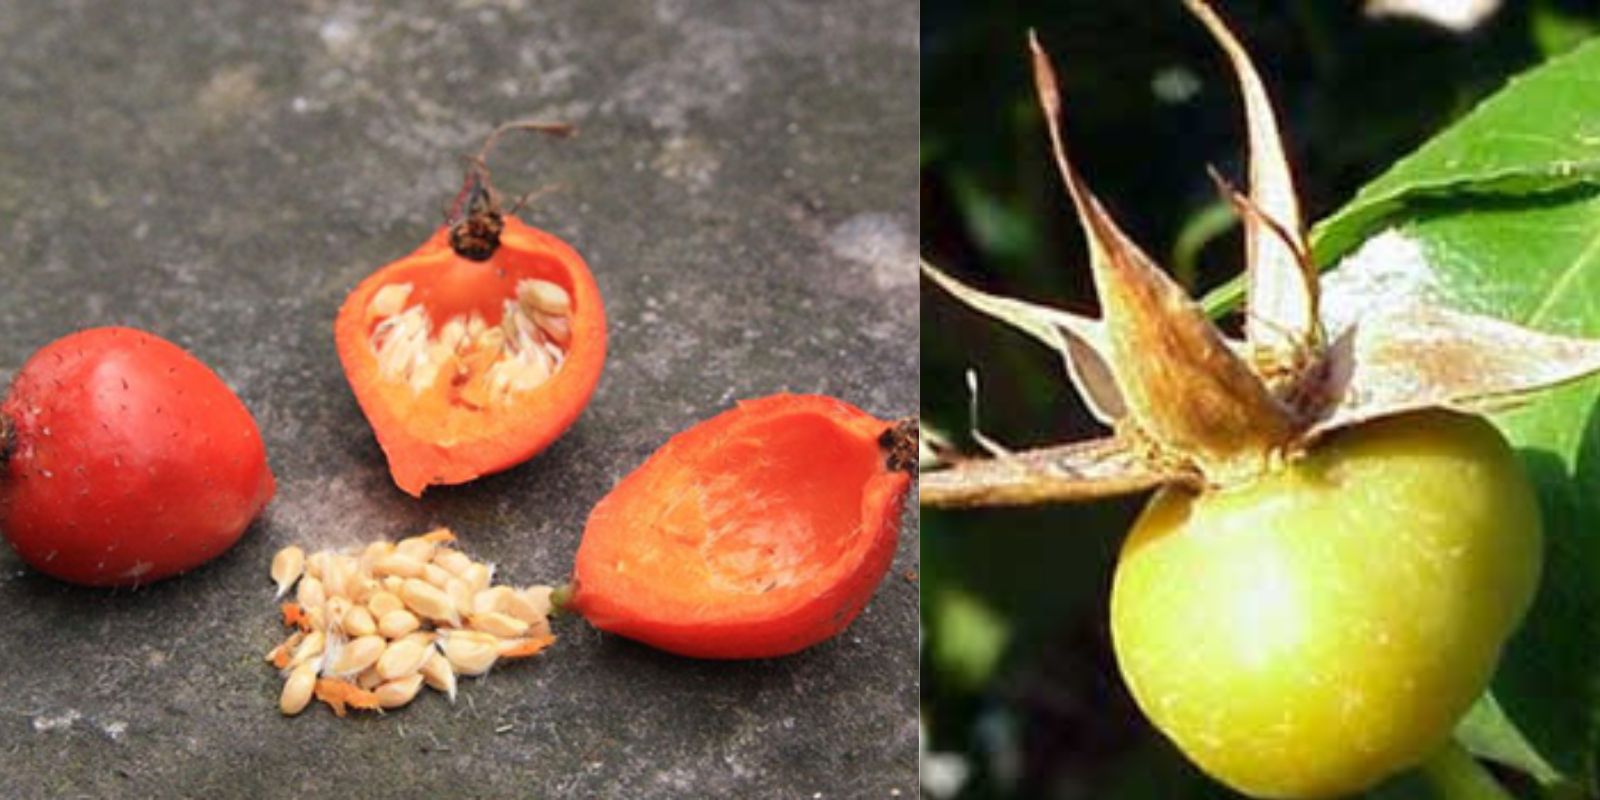
The journey begins with collecting seeds from rose hips. Rose hips are the seed pods that form after the flowers fade. Not every rose variety produces hips, so make sure to choose a plant that does.
- Harvesting: Rose hips typically appear in late summer or fall, after the petals drop. They look like small, round fruits that can range in color from red to orange.
- Timing: Wait until the rose hips have fully ripened and turned soft before harvesting them. This is when the seeds inside are mature.
- Cutting Open: Once the hips are ready, use a sharp knife to cut them open and remove the seeds. Be gentle, as you don’t want to damage the seeds.
Step 2: Preparing the Seeds
Once you’ve collected the seeds, they need to be cleaned and prepared before planting.
- Cleaning the Seeds: Rinse the seeds under cool water to remove any pulp from the rose hips. You can use a sieve to make this easier.
- Stratification: Rose seeds need a cold period to break dormancy. This process is known as stratification and mimics winter conditions.
- Soak the seeds in a solution of half water, half hydrogen peroxide for 24 hours to reduce the risk of fungal growth.
- Place the seeds in a damp paper towel, fold it, and then put it in a plastic bag. Keep the bag in the refrigerator for 6-10 weeks. Make sure to label the bag with the date so you know when the seeds will be ready for planting.
Step 3: Sowing the Seeds
After stratification, the seeds are ready to be planted.
- Seed Trays or Pots: Choose seed trays or small pots with good drainage. Fill them with a light potting mix, such as a seed-starting mix or a combination of peat and sand. The soil should be well-draining, as roses dislike waterlogged conditions.
- Planting Depth: Plant the seeds about 1/4 inch deep, spacing them at least an inch apart. Gently cover them with soil, and be careful not to pack the soil too tightly.
- Watering: Water the soil lightly so that it’s moist but not soaking wet. Use a spray bottle for gentle misting to avoid disturbing the seeds.
- Light: Place the trays in a sunny spot or under grow lights, as rose seeds need plenty of light to germinate. A south-facing window is ideal if you’re growing them indoors.
- Temperature: Keep the temperature around 65°F to 75°F (18°C to 24°C). You may want to use a heat mat under the seed trays to maintain a consistent temperature.
Step 4: Patience for Germination
One of the most challenging aspects of growing roses from seed is the waiting period. Germination can take several weeks or even months, so be patient.
- Checking for Growth: After 4-6 weeks, start checking for signs of sprouting. Be patient; some seeds may take longer to germinate depending on the rose variety and conditions.
- Watering: Keep the soil moist but not waterlogged throughout the germination period. Overwatering can lead to rot or mold.
Once the seedlings emerge, they’ll resemble tiny green shoots pushing their way through the soil.
Step 5: Transplanting Seedlings
When your rose seedlings have developed several sets of true leaves and are a few inches tall, they are ready to be transplanted into larger pots or directly into your garden.
- Choosing the Right Spot: Roses thrive in areas with full sun (6-8 hours of sunlight per day). Ensure the location has well-drained soil rich in organic matter.
- Spacing: Space your young rose plants at least 18-24 inches apart to give them room to grow and allow for air circulation.
- Planting Depth: Dig a hole slightly deeper than the root ball of the seedling, gently place the plant in the hole, and backfill with soil.
- Watering: Water deeply after transplanting and continue to keep the soil moist (but not soggy) as the rose plants establish themselves in their new environment.
Step 6: Caring for Your Roses
Once the seedlings are transplanted, proper care is essential to help them thrive and grow into mature rose bushes.
- Mulching: Apply mulch around the base of the plants to retain moisture and suppress weeds.
- Feeding: Roses are heavy feeders, so apply a balanced fertilizer every 4-6 weeks during the growing season to encourage healthy growth and blooms.
- Pruning: As your roses grow, prune away any weak, dead, or diseased stems to encourage better air circulation and more vigorous growth.
- Pest Control: Keep an eye out for common rose pests like aphids, spider mites, and Japanese beetles. Treat infestations with insecticidal soap or neem oil if necessary.
Step 7: Enjoy the Blooms!
With the right care, your roses will begin to bloom in their second or third year. The sight of beautiful rose flowers that you’ve grown from seed is incredibly rewarding. As the roses bloom, you can continue to prune them to encourage more flowers throughout the growing season.
Growing roses from seed is a slow process but an immensely rewarding one. Every rose that blooms is a testament to your patience and nurturing skills.
Conclusion
Growing roses from seed takes dedication, patience, and attention to detail, but it’s an incredibly fulfilling process that rewards you with unique and beautiful blooms. By following these steps, you can turn tiny seeds into a thriving rose garden, filling your space with vibrant colors and fragrances. So, roll up your sleeves and get started today. Whether you’re an experienced gardener or just starting, growing roses from seed is a challenge worth taking on.
🌹 Start your rose-growing journey today and experience the joy of watching these beautiful flowers bloom right from your hands! 🌹