
Pineapples are more than just a tropical treat. They’re also a unique plant that can be grown right at home, even without soil. Growing a pineapple in water is an easy, rewarding process that allows you to enjoy fresh, home-grown pineapples with little effort. Whether you’re a gardening beginner or an experienced green thumb, this method is perfect for anyone looking to bring a bit of the tropics into their kitchen or home garden.
In this guide, we’ll walk you through the process of growing a pineapple in water, from selecting the right fruit to rooting and transferring it to soil for long-term growth.
Why Grow Pineapples in Water?
Growing pineapples in water is an exciting alternative to traditional soil planting. Here are a few reasons why this method is popular:
- Easy and Inexpensive: You don’t need expensive gardening tools or special soil—just a fresh pineapple and a glass of water.
- Space-Efficient: This method is perfect for indoor gardeners or anyone with limited space. You can start your pineapple plant on a sunny windowsill.
- Fun for All Ages: Watching roots grow in water is fascinating and a fun way to introduce children to the joys of gardening.
- Aesthetic Appeal: Not only will you enjoy fresh pineapples eventually, but the leafy green crown of the plant adds a tropical feel to your home decor.
Now, let’s dive into the process of growing your own pineapple in water at home.
Step 1: Selecting the Perfect Pineapple
The first and most important step to growing a pineapple is selecting the right fruit.
What to Look for:
- Healthy Crown: Choose a pineapple with a green, healthy-looking crown. Avoid any fruits with wilted, brown, or damaged leaves.
- Ripe Fruit: Pick a pineapple that is ripe, but not overripe. The fruit should be firm to the touch with a slight give when pressed.
- Twistable Crown: Check if the crown can be easily twisted off. This makes the process of removing the top smoother.
Step 2: Preparing the Pineapple Top for Rooting
Once you’ve selected your pineapple, it’s time to prepare the top (crown) for rooting in water.
How to Remove the Crown:
- Twist and Remove: Firmly grasp the base of the leafy crown and twist it off the pineapple. Alternatively, you can slice the top of the pineapple off with a sharp knife.
- Peel Away Bottom Leaves: Remove a few layers of the small bottom leaves to expose about an inch of the pineapple stem. This will encourage root growth.
Cleaning the Pineapple Crown:
- Remove Fruit Flesh: If there’s any remaining fruit flesh on the bottom of the crown, carefully trim it away to prevent rotting.
- Let it Dry: Allow the pineapple top to dry out for a day or two. This helps prevent rot once it’s placed in water.
Step 3: Rooting the Pineapple in Water
With your pineapple top prepared, you’re ready to start the rooting process in water.
Steps for Rooting:
- Place in Water: Fill a glass or jar with enough water to submerge the base of the pineapple crown, but make sure the leaves stay above the water.
- Position the Crown: Use toothpicks to suspend the pineapple top if needed, so only the bottom of the stem is submerged in water.
- Sunny Spot: Place the glass in a warm, sunny location. A windowsill that receives plenty of sunlight is ideal.
- Change the Water: Change the water every two to three days to keep it fresh and avoid any bacteria buildup.
Step 4: Encouraging Root Growth
After about two to three weeks, you should start to see roots forming at the base of the pineapple crown.
What to Expect:
- Root Growth: Initially, you’ll see small white roots emerging from the base. Once they grow to about 2-3 inches, your pineapple is ready for the next step.
- Leaf Growth: While roots are developing, the leaves will stay green and begin to grow slightly.
Step 5: Transplanting to Soil
While it’s possible to keep the pineapple growing in water for a while, transferring the plant to soil will allow it to thrive and eventually produce fruit.
Preparing the Soil:
- Well-Draining Potting Mix: Pineapples prefer well-draining soil, so use a mix that contains perlite or sand along with regular potting soil.
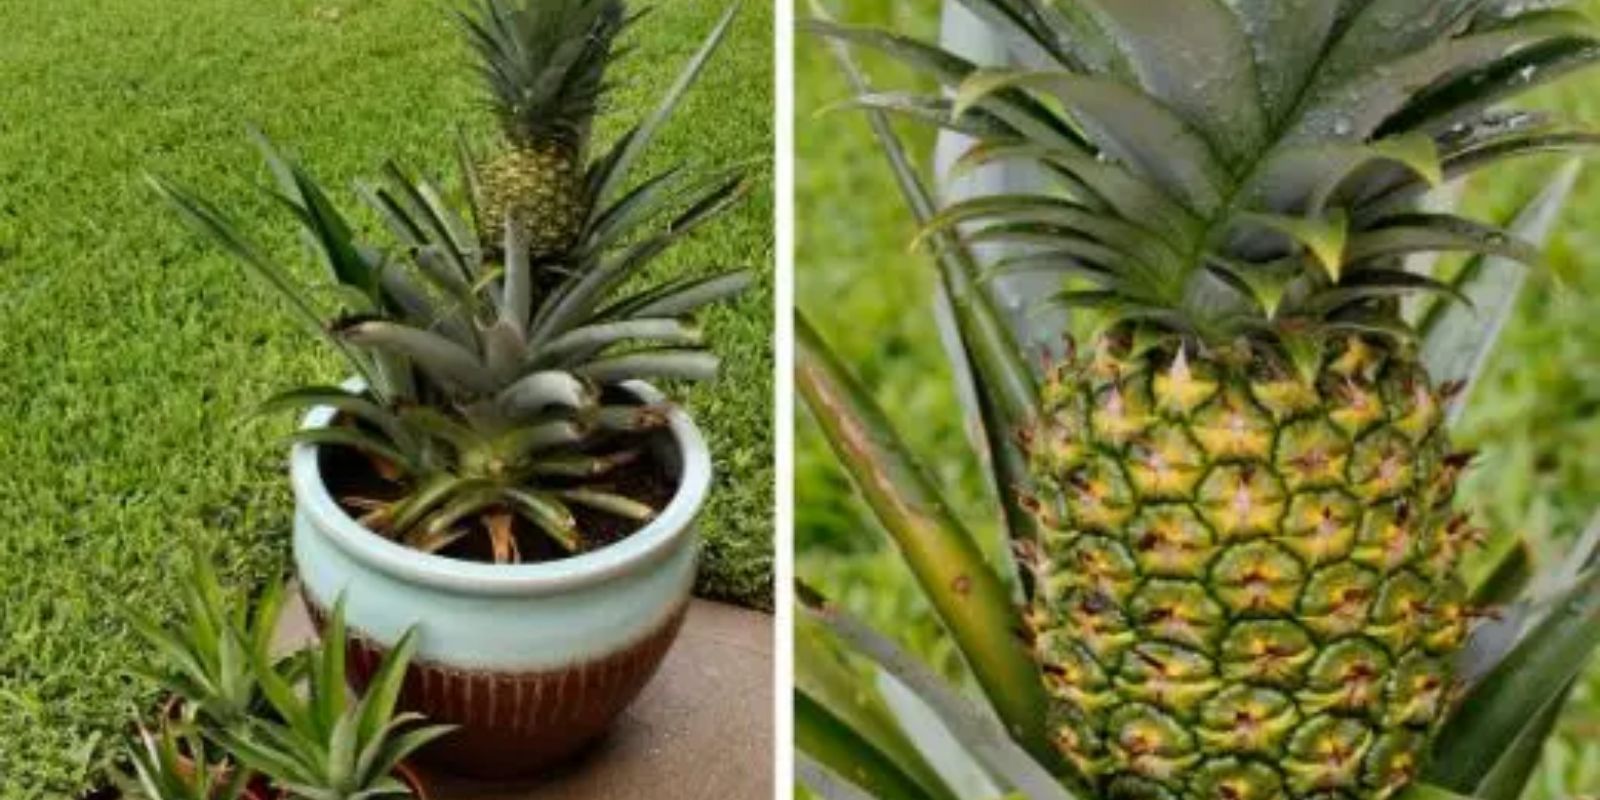
- Container Size: Use a pot that’s at least 8-10 inches wide and deep to accommodate the roots and give the plant space to grow.
- Drainage: Make sure your pot has drainage holes to prevent water from sitting at the bottom, as pineapple roots can rot easily.
Planting the Pineapple:
- Planting Depth: Place the rooted pineapple crown in the center of the pot, burying the roots and the base of the crown about an inch deep.
- Firm the Soil: Gently press the soil around the base to secure the plant, but avoid packing it too tightly.
- Water Lightly: Water the soil lightly to help the roots settle. After this, water only when the top inch of soil feels dry.
Step 6: Providing Optimal Care for Your Pineapple
Now that your pineapple is planted, providing proper care will ensure it grows into a healthy plant that eventually bears fruit.
Sunlight Requirements:
- Full Sun: Pineapples thrive in bright sunlight, so place your plant in a sunny location where it can get at least six hours of direct sunlight daily.
- Temperature: Pineapples are tropical plants, so they prefer warm temperatures between 65°F and 85°F (18°C to 29°C). If you live in a colder climate, consider moving the plant indoors during the winter.
Watering Schedule:
- Moist, Not Wet: Keep the soil consistently moist but not soggy. Overwatering can lead to root rot, so water only when necessary.
- Drying Between Watering: Allow the top inch of soil to dry out between waterings to prevent over-saturation.
Step 7: Fertilizing for Growth
Pineapples benefit from regular feeding during the growing season, which helps boost their development and fruit production.
Best Fertilizers for Pineapples:
- Balanced Fertilizer: Use a balanced, water-soluble fertilizer (such as 10-10-10) every 6-8 weeks during the growing season.
- Compost or Organic Feed: You can also supplement with organic compost or manure to enrich the soil with nutrients.
- Avoid Over-Fertilizing: Too much fertilizer can cause damage to the plant, so be mindful of the application rates.
Step 8: Patience and Harvesting Your Pineapple
Growing a pineapple is a slow process that requires patience. It may take 18 to 24 months for your plant to produce a fruit.
Signs of Fruit Development:
- Flowering: After a year or so, your pineapple plant will begin to produce a central flower spike, which will eventually develop into a small pineapple.
- Ripening: Pineapples take several months to ripen. The fruit is ready to harvest when it turns a rich golden-yellow color and smells sweet.
Harvesting:
- Cut the Fruit: When your pineapple is fully ripe, use a sharp knife to cut the fruit from the plant. The remaining plant will continue to grow and may produce more fruit in the future.
Conclusion: Growing Your Own Pineapple is Fun and Rewarding
Growing a pineapple in water is not only simple but also a rewarding project that offers a taste of the tropics right at home. By following these steps, you can watch your pineapple grow from a leafy crown into a thriving plant that eventually produces sweet, juicy fruit. Whether you’re a novice gardener or an experienced plant lover, this process is both fun and educational, allowing you to enjoy the fruits of your labor—literally!
Ready to give it a try? Start your own pineapple-growing journey today! 🍍🌱