
Okra, also known as “lady’s finger” or “gumbo,” is a warm-season vegetable that thrives in tropical, subtropical, and warm temperate regions. Its tender pods are a favorite ingredient in a variety of cuisines around the world, from gumbo to stir-fries. If you’re looking to add a unique vegetable to your garden, okra is a fantastic choice. This article will guide you through everything you need to know about growing okra—from planting to harvesting.
Why Grow Okra?
Okra is not only a nutritious vegetable but also a resilient one. It’s packed with vitamins A and C, along with fiber and antioxidants. The plant is relatively easy to grow, tolerates drought, and can flourish in poor soil conditions. Plus, okra produces beautiful flowers that can add ornamental value to your garden. Its quick growth cycle also ensures that you’ll be harvesting within just a few weeks of planting.
Step 1: Selecting the Right Variety
There are several varieties of okra, each with different growth habits, pod shapes, and flavors. Here are some popular varieties you can consider:
- Clemson Spineless: A popular choice due to its smooth pods and lack of spines, which makes harvesting easier.
- Red Burgundy: A striking red variety that adds a pop of color to your garden while being just as delicious as green okra.
- Emerald: Known for its long, slender, dark green pods and mild flavor.
- Jing Orange: A unique heirloom variety from China with bright orange pods and a delicious flavor.
Choose a variety that best suits your local climate and personal preferences.
Step 2: Preparing the Soil
Okra thrives in well-drained, fertile soil with a pH level between 6.0 and 6.8. Before planting, prepare your garden bed by loosening the soil to a depth of 12-15 inches. Add organic compost or well-rotted manure to improve soil fertility. Okra does well in slightly acidic to neutral soil, but it can tolerate a wide range of conditions if well-drained.
For container gardening, use a pot that is at least 12 inches deep and wide. Fill it with a well-draining potting mix enriched with compost to give your plants the nutrients they need.
Step 3: Planting Okra Seeds
Direct Sowing in the Garden
The best time to plant okra seeds is after the danger of frost has passed, and the soil temperature reaches at least 65°F (18°C). Okra is sensitive to cold, so planting it too early can hinder germination and growth.
- Sow the seeds about 1 inch deep and 12 inches apart in rows that are spaced 2-3 feet apart.
- Water the seeds immediately after planting to settle the soil.
- Thin the seedlings to 12-18 inches apart once they are 4-6 inches tall.
Starting Indoors
If you live in a region with a shorter growing season, start okra seeds indoors 4-6 weeks before your last frost date. Use seed trays or biodegradable pots and plant the seeds about 1 inch deep. Keep the soil moist and place the trays in a warm, sunny location or under grow lights. Once the seedlings are 4-6 inches tall and the outdoor temperature is consistently warm, transplant them into the garden.
Step 4: Watering and Fertilizing
Okra is a drought-tolerant plant, but regular watering is essential for optimal growth and pod production. Keep the soil consistently moist, especially during the flowering and pod-forming stages. Water the plants deeply once or twice a week, depending on your local weather conditions. Avoid overwatering, as this can lead to root rot.
Fertilize the plants every 4-6 weeks with a balanced fertilizer or organic options like compost or fish emulsion. Avoid high-nitrogen fertilizers, as they can encourage excessive foliage growth at the expense of fruit production.
Step 5: Managing Weeds and Mulching
Okra plants don’t compete well with weeds, especially during the early stages of growth. Regularly weed around the plants to reduce competition for nutrients and water. Using mulch around the base of the plants can help suppress weed growth, retain moisture, and regulate soil temperature.
Organic mulches like straw, grass clippings, or leaves work well. Apply a 2-3 inch layer of mulch around the plants, but keep it away from the stem to prevent rot.
Step 6: Supporting Okra Plants
Some okra varieties can grow quite tall, reaching up to 6-8 feet in height. If your plants become tall or top-heavy, consider staking them to provide extra support. Drive a wooden or metal stake into the ground near each plant and loosely tie the stems to the stakes with garden twine.
Step 7: Controlling Pests and Diseases
While okra is a relatively pest-resistant plant, it can still fall victim to some common garden pests, including aphids, flea beetles, and stink bugs. Here’s how to manage them:
- Aphids: These small insects can cause leaves to curl and distort. Use a strong jet of water to wash them off or apply insecticidal soap.
- Flea Beetles: These tiny beetles chew small holes in the leaves. Floating row covers can help protect young plants.
- Stink Bugs: These bugs feed on the pods, causing them to become misshapen. Handpick stink bugs or use organic neem oil to control infestations.
To prevent diseases like powdery mildew and leaf spots, ensure proper spacing between plants to promote good air circulation. Water the plants at the base to avoid wetting the leaves, and remove any infected foliage immediately.
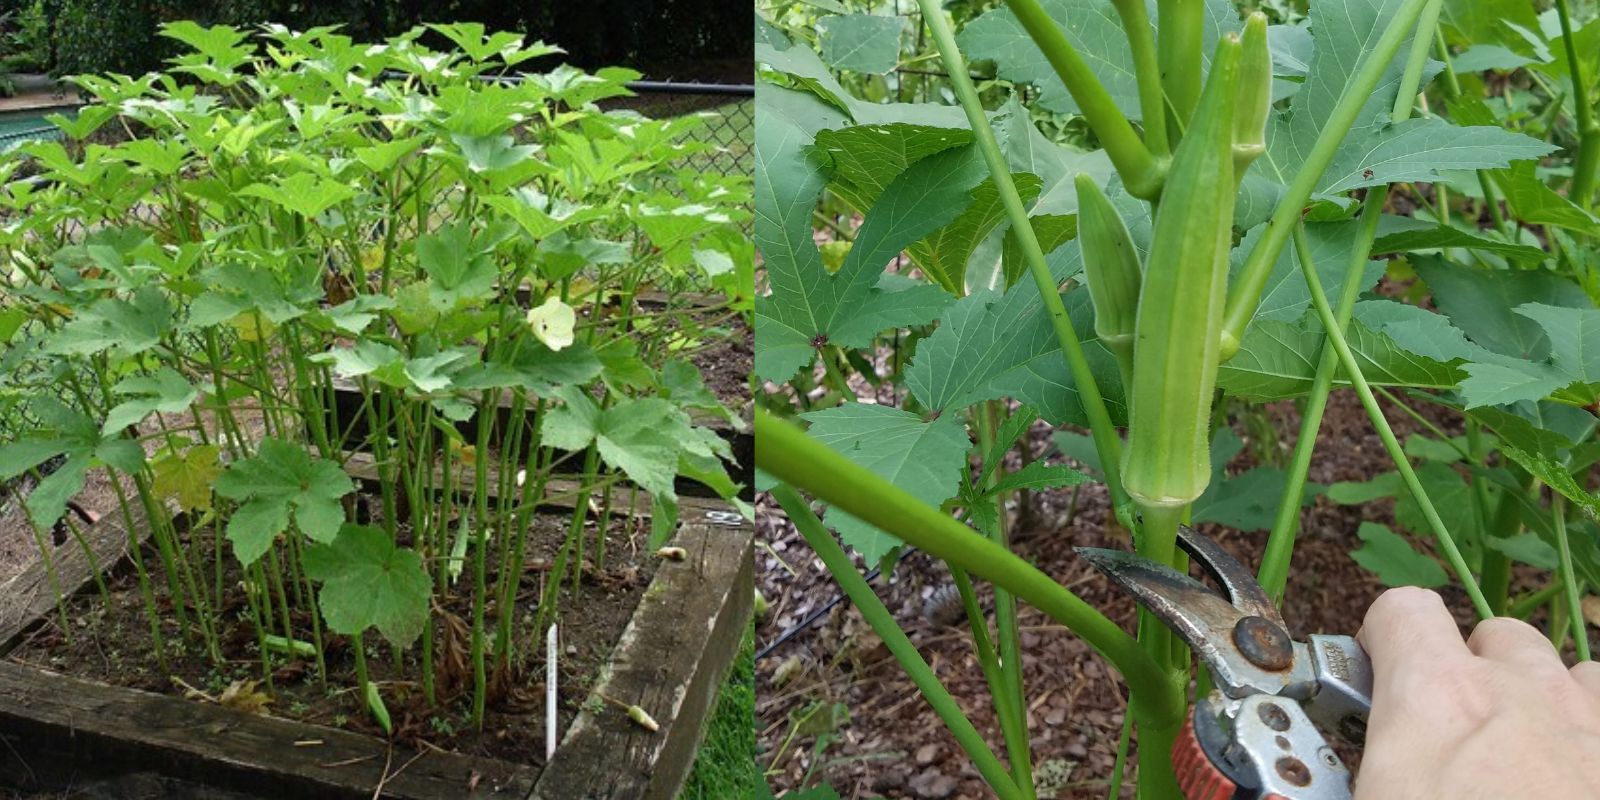
Step 8: Harvesting Okra
One of the joys of growing okra is that it can be harvested multiple times throughout the growing season. Okra pods are ready to be harvested 50-60 days after planting. Harvest the pods when they are 3-4 inches long, as larger pods tend to become tough and woody.
Here’s how to harvest okra:
- Use garden shears or scissors to cut the pods from the plant, leaving a small portion of the stem attached.
- Check the plants every other day, as okra grows quickly, especially in warm weather.
- Be sure to wear gloves when harvesting, as some okra varieties have spiny pods that can irritate the skin.
Step 9: Storing and Using Okra
Fresh okra pods can be stored in the refrigerator for up to a week. To extend their shelf life, you can blanch and freeze the pods. Okra is incredibly versatile in the kitchen and can be used in stews, soups, stir-fries, and even pickled for a unique treat.
Step 10: Saving Okra Seeds
If you’d like to grow okra again next season, save seeds from mature pods. Allow some pods to fully ripen and dry on the plant until they turn brown and brittle. Once the pods are dry, break them open to collect the seeds. Store the seeds in a cool, dry place for planting next year.
Troubleshooting Common Okra Growing Issues
- Poor Germination: If your okra seeds aren’t germinating, the soil temperature may be too low. Make sure the soil is at least 65°F (18°C) before planting.
- Slow Growth: If your plants are growing slowly, they may need more sunlight. Ensure your okra gets at least 6-8 hours of direct sunlight each day.
- Pods Turning Woody: Harvest okra when the pods are young and tender. Once they grow too large, they become fibrous and tough.
Conclusion
Growing okra can be a rewarding experience for both novice and experienced gardeners. With the right preparation and care, you can enjoy a bountiful harvest of this nutritious vegetable throughout the summer. Follow these steps, and soon, you’ll have a thriving okra crop that’s perfect for your favorite recipes.
Happy gardening!