
Mint is one of the most versatile and fragrant herbs you can grow, whether you’re using it for tea, garnishes, or in culinary dishes. It’s easy to grow and doesn’t require much space or special care. However, if you’re short on garden space or looking for an easy way to grow mint indoors, there’s a method that might surprise you: growing mint in a plastic glass. Yes, that’s right—this common household item can be the perfect container for cultivating your mint. The best part? The results will likely exceed your expectations!
In this article, we’ll walk you through a step-by-step guide to growing mint in a plastic glass, exploring the benefits, materials needed, and how you can achieve a thriving mint plant without much hassle.
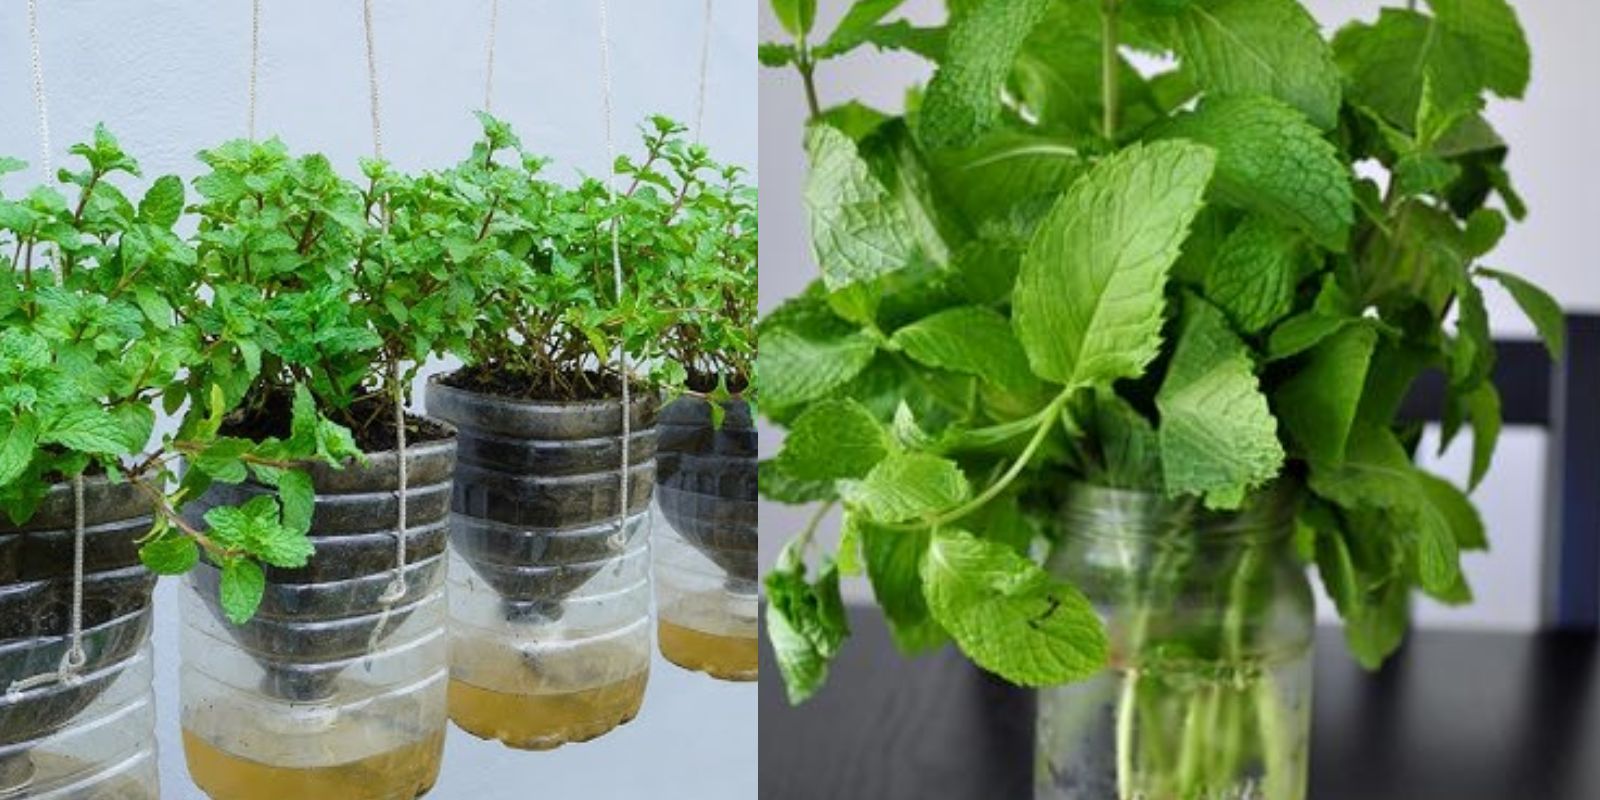
Why Grow Mint in a Plastic Glass?
Growing mint in a plastic glass is an excellent choice for several reasons:
- Minimal Space Required: A plastic glass doesn’t take up much space, making it ideal for small spaces like apartments, balconies, or kitchen windowsills.
- Easy to Handle: Plastic glasses are lightweight, so you can move them around easily to find the best spot for sunlight.
- Low-Cost Setup: Most of us have a few plastic glasses lying around, making this an affordable option. No need to buy fancy pots or containers.
- Perfect for Rooting Cuttings: Mint is often grown from cuttings, which can root easily in a small container. The plastic glass provides just enough room for the roots to establish themselves.
With these benefits in mind, let’s dive into the step-by-step process of how to grow mint in a plastic glass and achieve fantastic results.
Step 1: Gather the Materials You’ll Need
Before you start, let’s gather the materials necessary for this simple mint-growing method. Fortunately, most of these items are common household items, and you likely already have them on hand. Here’s what you’ll need:
- Plastic Glass or Cup: This will serve as your container. It can be any transparent plastic cup, glass, or even an old yogurt container. Make sure it is clear to allow light penetration, and the size should be large enough to accommodate the mint’s root system as it grows.
- Potting Soil: Use a well-draining, lightweight potting mix. Mint thrives in rich, loamy soil with good drainage.
- Mint Cutting or Root: You can either take a cutting from an existing mint plant or buy a rooted mint plant from a garden center.
- Scissors or Pruning Shears: To cut your mint, if using a cutting.
- Small Drill or Nail: You’ll need to create drainage holes at the bottom of the glass to prevent water from pooling and causing root rot.
- Water: A watering can or spray bottle for keeping the soil moist.
Step 2: Prepare the Plastic Glass
Now that you have all your materials ready, it’s time to prepare your plastic glass for planting.
- Drill Drainage Holes: First, take a small drill bit or nail and create several drainage holes at the bottom of the plastic glass. This is essential because mint roots don’t like sitting in stagnant water. Drainage helps prevent overwatering and root rot.
- Clean the Glass: If you’re reusing a plastic container, make sure it’s clean and free from any residue or chemicals. You want your mint to have a fresh, clean environment to grow in.
Step 3: Add Potting Soil
Next, it’s time to fill your plastic glass with soil. Choose a good-quality potting mix that provides enough nutrients for the mint while ensuring proper drainage.
- Fill the Glass: Add enough potting soil to fill about two-thirds of the glass. This leaves ample space for the roots to spread as they grow.
- Pack Gently: Lightly pack the soil to prevent it from becoming too loose or airy, which can lead to water runoff. However, be sure not to compress it too much, as mint needs good air circulation around the roots.
Step 4: Plant the Mint Cutting or Root
Mint can be grown from seeds, but it’s generally easier and faster to propagate it using cuttings. You can take a cutting from an existing mint plant or purchase a small potted mint plant from a local nursery. Here’s how to propagate mint from cuttings:
- Cut a Healthy Stem: If you’re using a cutting, take a healthy 4-6 inch stem from a mature mint plant. Trim just below a leaf node (the small bump where leaves grow).
- Remove Lower Leaves: Strip the leaves from the lower half of the stem, leaving only the top leaves intact. This helps prevent rot when the cutting is placed in the soil.
- Plant the Cutting: Place the mint cutting or root in the center of the glass and cover it with soil. If you’re using a rooted mint plant, simply place the root ball into the soil and cover it gently.
Step 5: Water the Mint
Mint thrives in consistently moist soil, but it doesn’t like being overwatered. After planting your mint cutting, gently water it to settle the soil around the roots.
- Watering Technique: Use a watering can or spray bottle to lightly mist the soil. Be sure not to over-saturate it.
- Maintain Moisture: Continue to water regularly, keeping the soil moist but not soggy. If you’re growing mint indoors, you may need to water more frequently since indoor air tends to be drier.
Step 6: Place the Plastic Glass in the Right Spot
Mint loves sunlight but can tolerate some shade. It’s essential to place your mint in a location where it will get adequate light without being exposed to scorching heat. Here’s what to keep in mind:
- Light Requirements: Place your plastic glass in a sunny spot where it will receive 4-6 hours of indirect sunlight per day. A windowsill is an excellent spot for indoor mint.
- Avoid Direct Sun: While mint enjoys light, too much direct sunlight, especially in hot climates, can scorch the leaves. Be sure to monitor the plant’s growth and adjust the light exposure if necessary.
Step 7: Care for Your Mint Plant
Once your mint is planted in the plastic glass, it’s time to give it the care it needs to thrive. Fortunately, mint is relatively low-maintenance, making it ideal for beginner gardeners. Here are some tips to help your mint plant flourish:
- Prune Regularly: Mint grows quickly, so regular pruning helps keep the plant healthy and encourages new growth. Trim any dead or damaged leaves and cut back excessive growth to keep the plant compact.
- Fertilize Sparingly: Mint doesn’t require much fertilization, but you can feed it a balanced, water-soluble fertilizer every 4-6 weeks during the growing season.
- Repot if Needed: If your mint outgrows the plastic glass, transfer it to a larger container or garden bed. Mint tends to spread rapidly and can become root-bound if left in a small space for too long.
Step 8: Harvest Your Mint
Mint is ready to harvest once it’s grown sufficiently, typically after a few weeks of care. Here’s how to harvest mint properly:
- Harvesting Tips: Trim the mint leaves by snipping them just above the leaf nodes. This encourages more growth and helps the plant stay bushy.
- Use Fresh or Dry: Fresh mint is perfect for cooking, tea, and garnishes. Alternatively, you can dry mint leaves by hanging them upside down in a cool, dry place.
Conclusion
Growing mint in a plastic glass is a simple and effective method that yields fantastic results. Whether you’re limited on space or just looking for a fun and affordable gardening project, this technique will allow you to grow a healthy mint plant in no time. By following these easy steps and taking care of your mint, you’ll soon have an abundant supply of fresh leaves to enjoy all year round.
Ready to start growing your own mint? Try this method and share your results in the comments below! 🌱
#MintGardening #IndoorHerbs #PlantTips #GardeningHacks #HomeGardening #GrowYourOwn #MintLovers #SustainableLiving #HerbGarden #PlantPropagation