
Mango trees (Mangifera indica) are not just known for their delicious, juicy fruits; they also symbolize tropical beauty and a sunny disposition. Growing your own mango tree can be an exciting endeavor, especially if you’re a fan of this beloved fruit. One of the simplest and most rewarding methods of propagating mango trees is through cuttings in water. This article provides a comprehensive, step-by-step guide on how to grow mango trees from cuttings in water, ensuring you have the best chance of success.
Why Choose Water Propagation?
Propagation through water is a favored method for many gardeners due to its simplicity and effectiveness. Here are a few reasons why water propagation is advantageous:
- Visibility: Water propagation allows you to see the root development, ensuring that the cutting is healthy and ready for transplanting.
- Minimal Equipment: This method requires very few materials, making it accessible for anyone, regardless of gardening experience.
- High Success Rate: Many gardeners report a high success rate when rooting mango cuttings in water, as the moisture helps prevent the cutting from drying out.
Step-by-Step Guide to Growing Mango Trees from Cuttings in Water
Step 1: Selecting the Right Mango Tree and Cuttings
The first step in successfully growing a mango tree from cuttings is to select the right source tree and cuttings.
Choosing the Right Tree
- Healthy Specimen: Choose a healthy, disease-free mango tree to take cuttings from. Look for trees that produce quality fruits and have a vigorous growth habit.
- Ideal Time: The best time to take cuttings is during the late spring to early summer when the tree is actively growing. This ensures that the cuttings will be more likely to root successfully.
Taking Cuttings
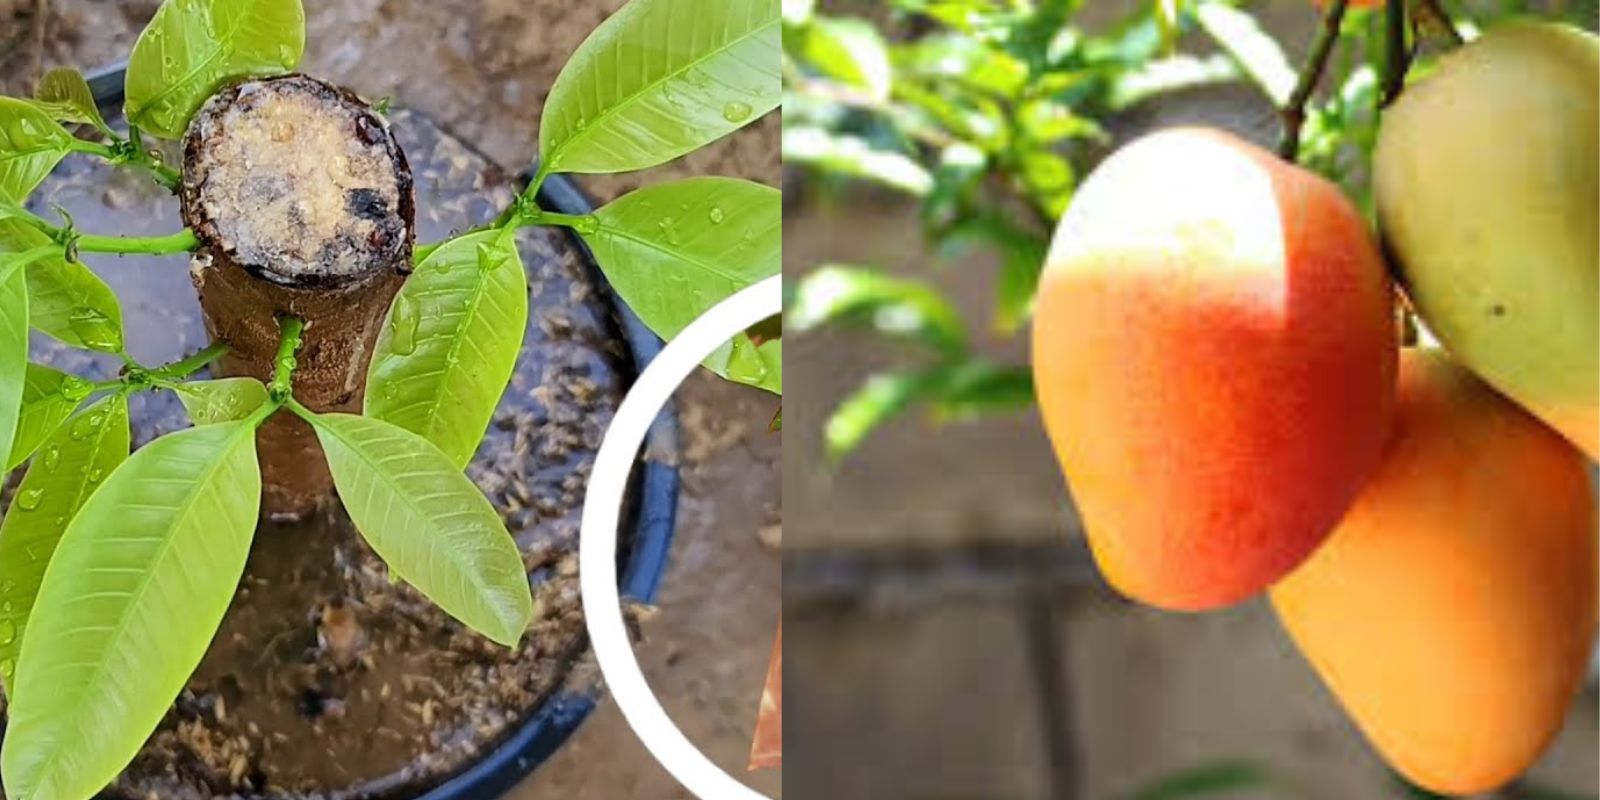
- Select Semi-Hardwood Cuttings: Look for semi-hardwood branches that are 6-12 inches long. These should be firm but not completely hardened.
- Check for Nodes: Ensure the cutting has at least one node (the point where leaves attach to the stem), as this is where the roots will emerge.
- Use Clean Tools: Use a sharp, clean pair of scissors or pruning shears to make a clean cut just below a node.
Step 2: Preparing the Cuttings
Preparation is key to ensuring that your mango cuttings have the best chance of survival.
- Remove Lower Leaves: Carefully remove any leaves from the bottom half of the cutting, as submerged leaves can rot and introduce bacteria into the water.
- Trim Excess: Trim the cutting to about 6-12 inches long, ensuring it has a few leaves remaining at the top.
- Optional: Dip in Rooting Hormone: While not necessary, dipping the cut end of the cutting in rooting hormone can encourage faster root development. This is especially beneficial for tougher cuttings.
Step 3: Placing the Cuttings in Water
Now that your cuttings are prepared, it’s time to place them in water.
- Choose a Container: Select a clean glass or jar that can accommodate the cutting without bending or breaking. A clear container allows you to monitor root development easily.
- Fill with Water: Fill the container with clean, room-temperature water. Ensure that at least one node of the cutting is submerged.
- Positioning: Place the container in a bright location with indirect sunlight. Direct sunlight can overheat the water and damage the cutting.
Step 4: Caring for Your Cuttings
Proper care during the rooting process is essential for successful propagation.
- Change the Water Regularly: Change the water every 3-5 days to keep it fresh and oxygenated. Stagnant water can lead to bacterial growth and rot.
- Monitor for Growth: After about 2-4 weeks, check for root development. You should see small roots emerging from the submerged node.
- Avoid Overcrowding: If you’re propagating multiple cuttings, ensure they are spaced apart to allow adequate air circulation and prevent competition for nutrients.
Step 5: Transplanting Your Rooted Cuttings
Once your mango cuttings have developed a robust root system (around 2-4 inches long), it’s time to transplant them into soil.
- Choose the Right Soil: Use a well-draining potting mix that retains moisture without becoming waterlogged. A mix of potting soil, sand, and perlite can work well.
- Select a Pot: Choose a pot that is at least 6-8 inches in diameter with drainage holes to prevent excess water retention.
- Transplant Carefully:
- Gently remove the cutting from the water, being careful not to damage the roots.
- Make a hole in the center of the potting mix and place the cutting in, ensuring that the node is buried while leaving the leaves above the soil surface.
- Fill in around the cutting and lightly pack the soil to eliminate air pockets.
- Water the Cutting: Water the soil lightly to settle it around the roots. Ensure the soil is moist but not soggy.
Step 6: Providing Proper Care After Transplanting
After transplanting, your mango cutting will need care to thrive and grow into a healthy tree.
- Location: Place the pot in a warm, sunny location that receives at least 6-8 hours of sunlight per day. If indoors, a south-facing window is ideal.
- Watering: Keep the soil consistently moist but allow the top inch of soil to dry out between waterings. Overwatering can lead to root rot.
- Fertilizing: After a few weeks of growth, you can begin to fertilize with a balanced fertilizer or a fertilizer formulated for fruit trees. Follow the package instructions for application rates.
- Pruning: As your mango tree grows, you may want to pinch back the tips of new growth to encourage bushier growth and develop a strong structure.
Step 7: Transitioning to Outdoor Conditions
As your mango tree grows, you may need to transition it outdoors if you plan to grow it in your garden.
- Hardening Off: Before placing your mango tree outside permanently, gradually acclimate it to outdoor conditions. Start by placing it outside for a few hours a day, gradually increasing exposure to sunlight and outdoor temperatures over a week or two.
- Planting Outdoors: Once your tree is hardened off and weather conditions are favorable (after the last frost), you can transplant it into the ground or a larger pot.
- Choose a sunny location with well-draining soil.
- Dig a hole that is slightly larger than the root ball and gently place the tree in, backfilling with soil.
Step 8: Ongoing Care and Maintenance
To ensure the continued growth and productivity of your mango tree, regular maintenance is essential.
- Watering: Continue to monitor soil moisture, especially during dry spells. Mango trees prefer deep watering less frequently rather than shallow watering.
- Mulching: Apply a layer of organic mulch around the base of the tree to retain moisture, suppress weeds, and regulate soil temperature.
- Fertilizing: Continue to fertilize your mango tree during the growing season to promote healthy growth and fruit production. Adjust the frequency based on the tree’s growth rate and overall health.
- Pest Management: Watch for common pests such as aphids and spider mites. Use organic pest control methods, such as insecticidal soap or neem oil, if necessary.
Conclusion
Growing mango trees from cuttings in water is an enjoyable and straightforward process that allows you to expand your garden or enjoy this tropical fruit in your home. By following the steps outlined in this guide—from selecting healthy cuttings to caring for your new mango tree—you’ll be well on your way to enjoying the sweet rewards of your efforts.
So, gather your cuttings and start your mango-growing adventure today! With patience and care, you’ll soon be rewarded with the beauty and deliciousness of homegrown mangoes. Happy gardening! 🍑🌱