
Hibiscus plants, with their large, colorful, and often exotic-looking flowers, are a favorite among gardeners. While growing hibiscus plants from seeds is possible, the process can be slow and sometimes unreliable. A much quicker and more reliable way to propagate hibiscus is through cuttings. By rooting hibiscus cuttings, you can produce new plants that are identical to the parent plant, allowing you to grow a thriving collection of these beautiful flowers. This article will guide you step-by-step on how to grow hibiscus plants from cuttings and share some tips for ensuring success.
Why Propagate Hibiscus from Cuttings?
Propagation through cuttings is a straightforward process that offers several advantages over other methods of growing hibiscus plants:
- Faster Growth: Hibiscus cuttings generally root and establish themselves more quickly than seeds, allowing you to enjoy blooms sooner.
- Cloning: When you take cuttings from a parent plant, you are effectively cloning the plant. This means the new hibiscus will share the same desirable characteristics, such as flower color, shape, and size.
- Cost-Effective: If you already have a healthy hibiscus plant, you don’t need to buy new plants. Simply take a cutting and grow your own!
- Increased Success Rate: Growing from cuttings has a higher success rate compared to starting hibiscus from seeds. With the right conditions, most cuttings will root successfully.
Materials Needed for Hibiscus Propagation
Before you begin the propagation process, it’s important to gather all the necessary materials. Having everything ready will ensure that you don’t need to stop midway to search for supplies. Here’s a list of what you’ll need:
- Healthy Hibiscus Plant: Select a hibiscus plant that is healthy and free from diseases.
- Sharp Pruning Shears or Scissors: Clean, sharp tools are crucial for cutting the plant to avoid damaging the cutting.
- Rooting Hormone: This helps stimulate root growth, although it’s optional. Some gardeners prefer to propagate hibiscus without it, but using rooting hormone can improve your success rate.
- Pot or Container: Choose a small pot or container with good drainage to plant the cutting.
- Well-Draining Potting Mix: A good-quality potting mix designed for cuttings is ideal. You can also make your own mix using sand and perlite.
- Plastic Bag or Plastic Dome: This will help create a humid environment for the cutting to thrive.
- Water Spray Bottle: To mist the cutting and maintain humidity.
Step-by-Step Guide to Growing Hibiscus from Cuttings
1. Select the Right Cutting
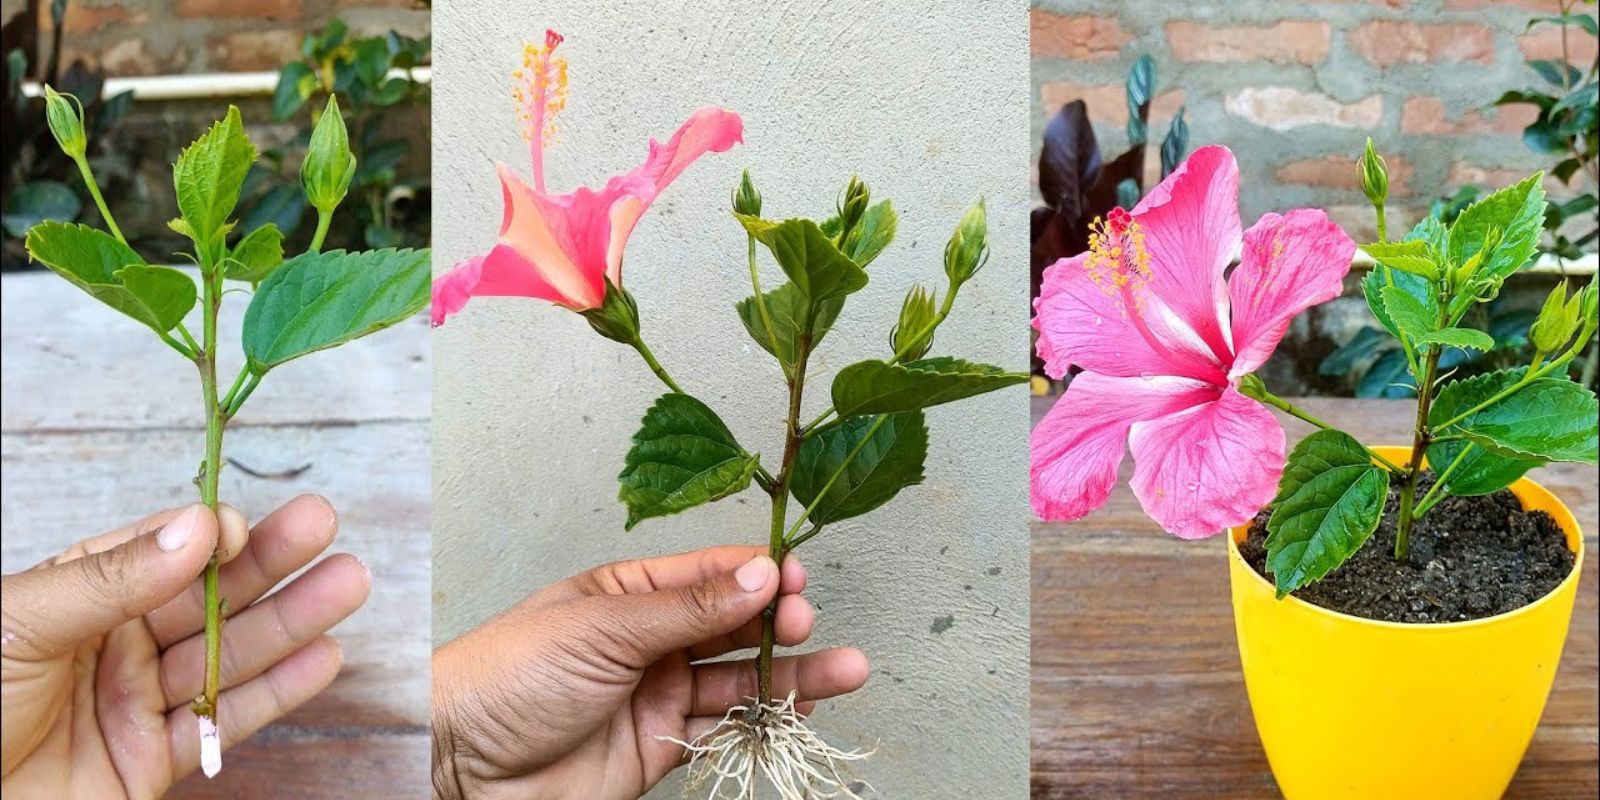
To begin, you need to select a healthy, non-flowering stem from the hibiscus plant. Choose a mature stem that’s about 4 to 6 inches long and has at least two or three leaves. Ensure the stem is free from pests or diseases. The best time to take cuttings is during the warmer months when the plant is actively growing.
- Cut below a leaf node: Make the cut just below a leaf node (the area where the leaf is attached to the stem). This is where roots are most likely to form.
- Avoid flower buds: For better success, do not choose stems with flowers or flower buds as they may interfere with root formation.
2. Prepare the Cutting
After you’ve taken your cutting, it’s time to prepare it for planting. Remove any leaves that are near the cut end, leaving a couple of leaves at the top. If the leaves are large, consider cutting them in half to reduce moisture loss through evaporation.
- Dip in Rooting Hormone (Optional): To encourage faster rooting, dip the cut end of the stem into rooting hormone. Gently tap off any excess. Although rooting hormone isn’t necessary, it can boost success rates, especially for woody plants like hibiscus.
3. Prepare the Pot and Potting Mix
Choose a small pot that has drainage holes. Hibiscus cuttings require well-draining soil to avoid root rot. A mix of perlite, sand, and peat moss works well, or you can use a commercial potting mix designed for cuttings. Fill the pot with the mix and ensure it’s damp but not soggy.
- Water the mix before planting the cutting to ensure the soil is moist. Do not soak the soil completely, as excess water can lead to rot.
- Make a hole in the soil with a pencil or stick to place the cutting in. This will help you avoid disturbing the roots when you insert the cutting.
4. Plant the Cutting
Insert the prepared hibiscus cutting into the hole in the soil, burying the cut end about 2 to 3 inches deep. Gently press the soil around the base of the cutting to keep it upright and stable. Be careful not to crush the cutting in the process.
5. Create a Humid Environment
Hibiscus cuttings need high humidity to root successfully. Cover the pot with a plastic bag, clear plastic dome, or even a plastic bottle with the bottom cut off. This will trap moisture and create a greenhouse-like environment that encourages root growth.
- Ensure proper air circulation by opening the plastic cover a few times each week to prevent mold or fungus from developing.
- Mist the cutting regularly with a spray bottle to keep the humidity levels high. However, avoid over-wetting the cutting, as too much water can cause the cutting to rot.
6. Place in Indirect Light
Place your cutting in a warm location with bright, indirect light. Avoid direct sunlight, as it can cause the cutting to overheat and dry out. A warm windowsill or shaded spot outdoors is ideal. The cutting should be kept at a temperature of about 70°F (21°C).
7. Monitor the Cutting for Roots
Over the next few weeks, keep an eye on your cutting. It will take about 2 to 4 weeks for roots to form. You can check for root development by gently tugging on the cutting—if there’s resistance, roots have started to form. You may also notice new growth at the top of the cutting, which is a good sign that the cutting is establishing itself.
8. Transplant to a Larger Pot or Garden
Once the cutting has developed a strong root system, it’s time to transplant it into a larger pot or your garden. If you plan to keep it in a pot, choose a slightly bigger container to allow for future growth. If you’re transplanting to your garden, make sure the soil is well-drained, and the location receives plenty of sunlight.
- Water the new plant well after transplanting and continue to care for it like you would a mature hibiscus plant.
Tips for Success
- Patience is Key: Rooting hibiscus cuttings can take time, so don’t rush the process. Be patient and allow the cutting to develop roots at its own pace.
- Proper Watering: Water the cutting regularly, but ensure the soil doesn’t become too soggy. Hibiscus roots require moisture but do not tolerate standing water.
- Keep the Environment Stable: Sudden temperature changes can stress the cutting, so keep it in a consistent, warm environment.
- Use Clean Tools: Always use clean, sterilized pruning shears or scissors to take cuttings and reduce the risk of transferring diseases to the plant.
Conclusion
Growing hibiscus plants from cuttings is a rewarding and simple way to propagate these stunning flowers. By following the step-by-step process outlined above, you can successfully grow your own hibiscus plants and enjoy their vibrant blooms year after year. With patience, the right materials, and some care, you’ll soon have a garden full of beautiful hibiscus flowers.
So, gather your materials and get started today—there’s no better time to grow your own hibiscus plants! Don’t forget to share your success with others, and remember, each cutting you root is one step closer to creating a more vibrant and colorful garden.
#Hibiscus #PlantPropagation #GardenTips #DIYGardening #HibiscusLove #GreenThumb #PlantLovers #RootingPlants #FlowerGardening #GardeningCommunity #BloomingGarden