
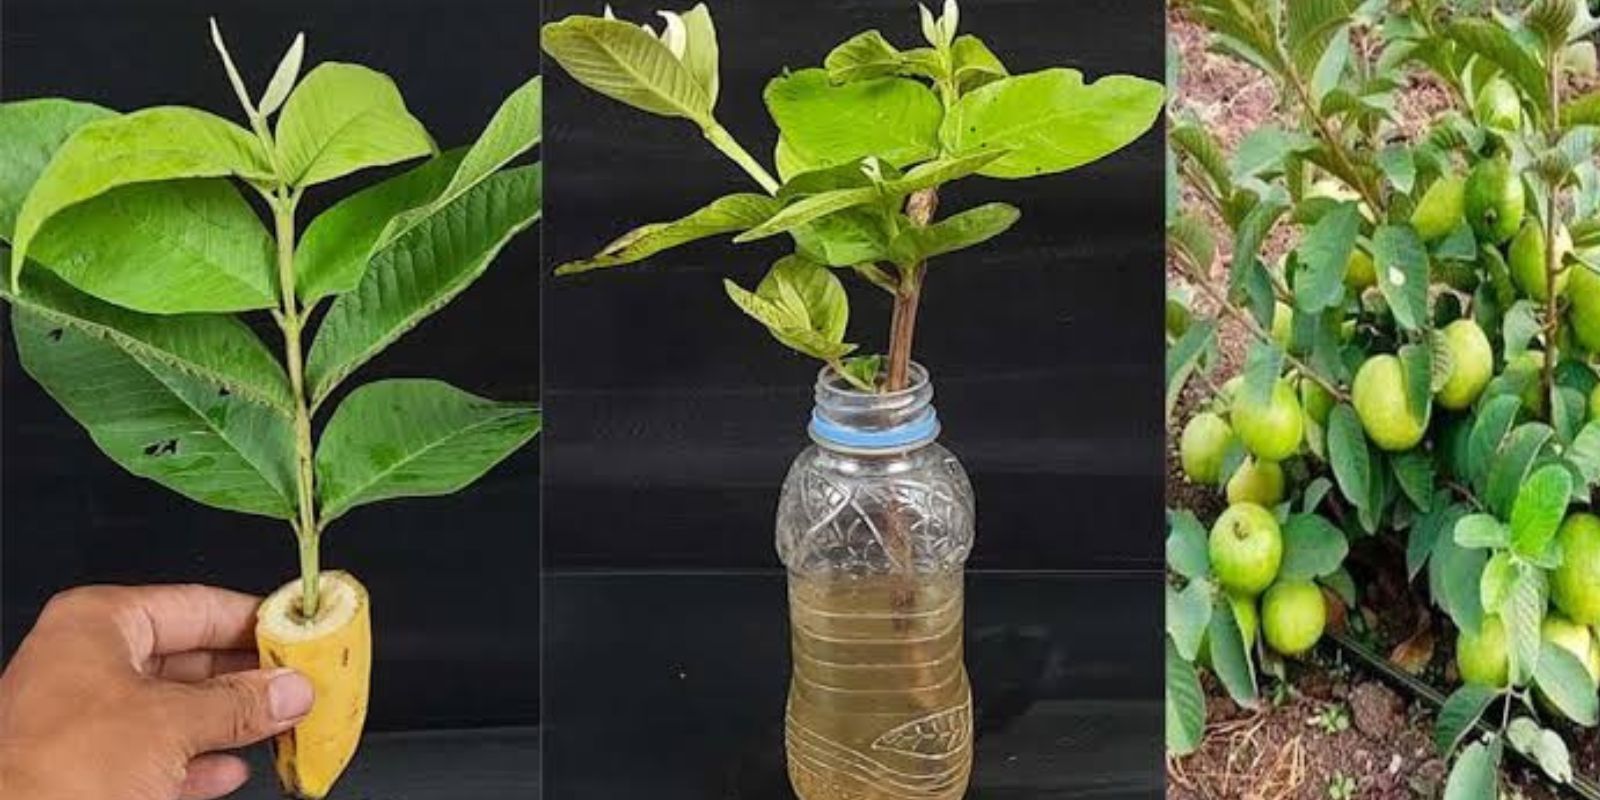
Guava is a tropical fruit that is known for its delightful flavor and numerous health benefits. Whether you want fresh guavas for smoothies or to enjoy in your favorite dishes, you might be surprised to know that you can grow guava trees at home with minimal effort—using nothing but guava leaves. Yes, that’s right! By following a few simple steps, you can propagate your very own guava tree from a guava leaf. In this article, we’ll guide you through the process, from selecting the right leaves to transplanting your guava tree into the ground.
Why Grow Guava Trees from Leaves?
Guava trees are known for being hardy and versatile, making them perfect candidates for home gardening. Growing guavas from leaves is not only cost-effective but also an incredibly rewarding process that allows you to cultivate your own tree without having to spend money on saplings. Additionally, propagating guava from leaves can help you preserve the unique traits of the parent tree, such as fruit size, flavor, and growth habits. This method also ensures that you get a healthy tree as you’re starting from a fresh, strong leaf.
Materials You’ll Need
Before you start growing guava trees from leaves, you’ll need to gather a few basic tools and materials:
- Healthy Guava Leaves: Choose fresh, non-damaged leaves from a healthy, mature guava tree. The leaves should not show signs of disease or insect damage.
- Sharp Scissors or Pruning Shears: You’ll need a clean tool to make precise cuts.
- Rooting Hormone (optional): This is a hormone that helps stimulate the growth of roots from your cutting. While not always necessary, it can speed up the rooting process and ensure better success.
- Well-draining Potting Soil: Guavas thrive in soil that drains well. Choose a light, loose soil mix, or you can use a combination of potting soil and sand.
- Small Pots or Containers: You’ll need containers with drainage holes to plant your cuttings.
- Plastic Bag or Dome: This will help maintain humidity around the cuttings and encourage root growth.
- Watering Can: A gentle watering can will help ensure your cutting stays moist without overwatering.
Step 1: Select Healthy Guava Leaves
The first and most important step in propagating a guava tree from leaves is to select healthy, mature leaves from an established guava tree. Choose leaves that are free from disease, pests, and discoloration. A mature guava leaf is typically about 4-6 inches long. You should look for leaves that are firm, vibrant in color, and not showing any signs of stress.
Avoid using young, tender leaves as they may not have enough energy to support root growth. It’s also best to select leaves that come from a tree that’s known to produce healthy, good-quality fruits.
Step 2: Prepare the Cutting
Once you have selected your guava leaves, it’s time to prepare them for rooting. Use sharp scissors or pruning shears to cut the leaf stem, leaving at least 4-6 inches of the leaf’s stem. The stem should have a clean, sharp cut to reduce the risk of infection.
You may also want to remove any unnecessary leaves or parts of the stem that could make it harder for the cutting to root.
Step 3: Apply Rooting Hormone (Optional)
Rooting hormones are available in many garden centers and can be an excellent tool for promoting root growth in your guava leaf cutting. Although not strictly necessary, applying rooting hormone to the cut end of the leaf stem can help speed up the rooting process and improve your chances of success.
To use the rooting hormone, simply dip the cut end of the stem into the powder or gel and shake off the excess. Be careful not to get any of the hormone on the leaf itself, as this can harm the leaf tissue.
Step 4: Prepare the Potting Soil
For the cutting to thrive, it needs to be planted in soil that retains moisture but also drains well. A well-draining potting mix is ideal for guava cuttings. You can either purchase a pre-made potting mix or create your own by mixing equal parts of potting soil, sand, and perlite. This ensures that the soil will not become waterlogged and will allow proper air circulation around the roots.
Fill a small pot or container with the potting mix. Make sure the container has drainage holes at the bottom so that excess water can escape. A 4-inch pot or a shallow container works best for this purpose.
Step 5: Plant the Guava Cutting
Now it’s time to plant the prepared guava cutting in the soil. Use your finger or a small stick to create a hole in the potting mix. Insert the cutting into the hole and gently press the soil around the cutting to hold it in place. If you applied rooting hormone, the hormone will already be in contact with the soil, encouraging the roots to grow.
After planting, water the cutting gently but thoroughly to ensure the soil is evenly moist. You want the soil to be moist but not waterlogged, as this can lead to root rot.
Step 6: Maintain Humidity and Temperature
Guava cuttings need a warm and humid environment to encourage root growth. To achieve this, you can cover the pot with a plastic bag or a small plastic dome to create a mini greenhouse effect. Make sure the bag or dome doesn’t touch the cutting itself to prevent moisture buildup on the leaf.
Place the container in a location with indirect sunlight. Avoid placing it in direct sunlight, as this can cause the cutting to overheat or dry out. The ideal temperature range for guava propagation is between 75°F to 85°F (24°C to 29°C).
Step 7: Monitor and Water the Cutting
Over the next few weeks, check on your guava cutting daily to monitor its progress. Keep the soil moist, but avoid overwatering, as this can cause the cutting to rot. If the humidity inside the plastic bag or dome becomes too high, remove it briefly to allow some air circulation. After a few days, replace the cover.
In approximately 2-4 weeks, you should start to see signs of root growth. You can gently tug on the cutting to check if it has rooted. If you feel resistance, the roots are forming. Once the roots have developed enough to anchor the cutting, you can begin acclimating the plant to outdoor conditions.
Step 8: Transplant the Guava Tree
Once the guava cutting has developed a strong root system, you can transplant it into a larger container or directly into the ground. Choose a sunny spot with well-draining soil. Guava trees need plenty of sunlight to thrive and produce fruit, so make sure the location receives at least 6-8 hours of sunlight a day.
If you’re growing the tree in a container, make sure it’s large enough to accommodate the tree’s roots as it continues to grow. As your guava tree matures, you can prune it to maintain its shape and encourage healthy growth.
Final Thoughts
Growing a guava tree from leaves is a simple and rewarding process that allows you to propagate a fruit tree without any cost. While it may take time and patience for your tree to grow and mature, the end result—a fresh, homegrown guava—will be well worth the effort. By following these easy steps and providing proper care, you’ll soon have your very own guava tree ready to bear fruit and provide delicious treats for years to come.
Remember that propagating plants from cuttings is an ongoing learning process, and with each attempt, you’ll become more skilled at understanding the needs of your plants. Enjoy the journey, and happy gardening!