
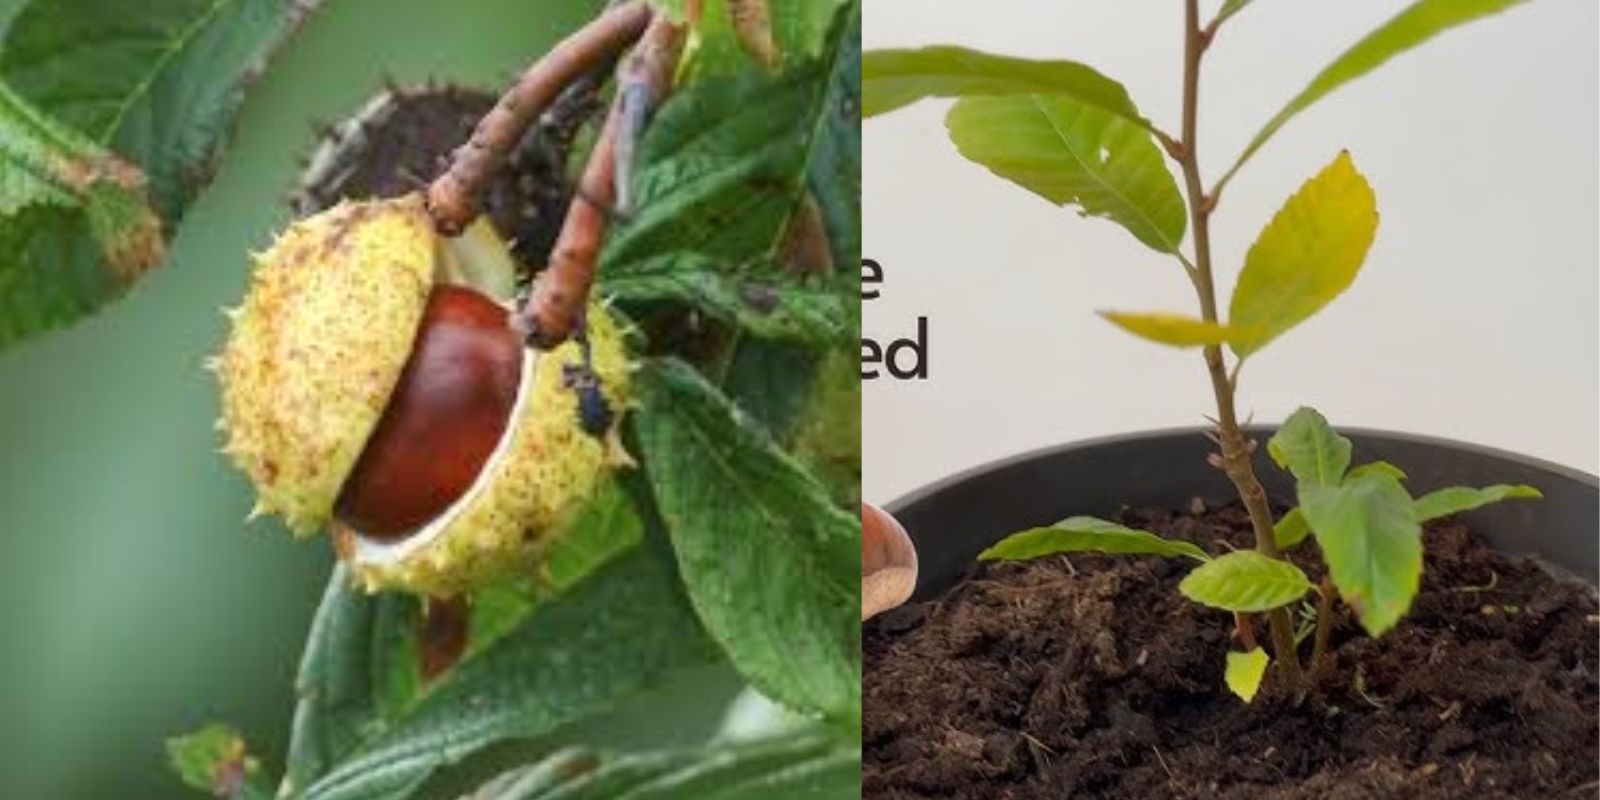
Horse chestnut trees, known scientifically as Aesculus hippocastanum, are beloved for their broad leaves and striking flower spikes that bloom in late spring. These trees, often called “conker trees,” produce beautiful seeds commonly known as “conkers,” which have been traditionally used in children’s games across the UK. For gardeners, though, conkers present an exciting opportunity to grow a stunning tree from scratch.
This guide will walk you through every step needed to successfully germinate horse chestnut seeds and nurture them into thriving young trees.
Why Grow Horse Chestnut Trees?
Horse chestnuts are hardy trees known for their beauty and resilience. Growing them from seed can be incredibly rewarding and is a project that lets you see each stage of a tree’s growth. They’re excellent for adding shade and visual interest to gardens, parks, and landscapes. Plus, growing a tree from a single seed allows you to personally connect with nature’s growth cycle—a fantastic experience for anyone with a passion for gardening.
Materials You’ll Need
To start growing horse chestnut trees from conkers, you’ll need a few basic materials:
- Fresh conkers (gathered from the ground in autumn)
- Water (for soaking and hydrating seeds)
- Plastic bags (to hold the seeds during cold stratification)
- Paper towels
- Small pots (for the initial planting stage)
- Nutrient-rich soil (preferably well-draining potting soil)
- A sunny spot in your home or garden
Step-by-Step Guide to Germinating Horse Chestnut Conker Seeds
Step 1: Collecting Fresh Conkers
Autumn is the ideal time to collect conkers since this is when they naturally fall from the tree. Gather fresh, mature conkers from the ground (never from the tree itself). Select conkers that are large, unblemished, and free of cracks or insect damage. The healthier and more robust the seed, the better your chances of successful germination.
Step 2: Preparing the Seeds for Germination
Once you have collected your conkers, it’s time to prepare them for the germination process.
- Soak the Seeds: Start by soaking the conkers in a bowl of water overnight. This softens the outer shell, making it easier for the seed to begin the germination process.
- Cold Stratification: Horse chestnut seeds require a period of cold temperatures to mimic their natural winter environment, which triggers the germination process. Place your soaked seeds in a damp paper towel and seal them inside a plastic bag. Store this bag in your refrigerator for about 8-10 weeks. This stage is essential, as the seeds won’t germinate without it.
Step 3: Planting the Seeds in Pots
Once the cold stratification period is complete, it’s time to plant your seeds.
- Prepare the Pots: Choose small pots with good drainage. Fill each pot with a well-draining, nutrient-rich potting soil mix. Horse chestnut seeds need ample nutrients for optimal growth, so a high-quality potting soil works best.
- Plant the Seeds: Place each conker about 1-2 inches deep into the soil, pointed side facing downward. Cover the seed with soil, but be careful not to compact it too tightly. This will allow the seedling to emerge easily once it begins to sprout.
- Water the Soil: Gently water the soil until it is evenly moist. Avoid overwatering, as too much moisture can rot the seed. Keep the soil damp but not waterlogged throughout the germination period.
Step 4: Providing Light and Temperature Conditions
Once planted, place your pots in a warm, well-lit area. A sunny windowsill works well, but avoid direct, harsh sunlight that may dry out the soil too quickly. Horse chestnut seeds typically begin to sprout within a few weeks, although this can vary depending on the seed’s condition and environmental factors.
Step 5: Monitoring and Caring for Seedlings
Once your horse chestnut seeds have sprouted, proper care is essential to help them develop into strong seedlings.
- Watering: Keep the soil consistently moist but never soggy. Horse chestnut seedlings are sensitive to both drought and excess water, so moderate watering is key.
- Fertilizing: After the first few true leaves have appeared, consider adding a diluted liquid fertilizer every 3-4 weeks to encourage robust growth. Choose a balanced fertilizer that provides nitrogen, phosphorus, and potassium.
- Temperature: Maintain a stable, warm temperature. While mature horse chestnuts can withstand cold, young seedlings thrive in moderate warmth and are more delicate.
- Thinning: If multiple seedlings emerge in one pot, consider thinning them out by transplanting some to other pots. This reduces competition for nutrients and allows each seedling to grow without crowding.
Step 6: Transplanting Your Seedlings
After a few months, your seedlings will likely outgrow their initial pots and will need to be moved to a larger container or directly into the ground if outdoor conditions allow.
- Choosing a Planting Spot: Horse chestnut trees need plenty of room to grow, so select a planting spot with ample sunlight and space. Keep in mind that these trees can grow up to 40 meters tall over the years, with an expansive canopy.
- Soil Preparation: Prepare the new planting site by loosening the soil and adding compost to enhance nutrient content. Horse chestnuts prefer slightly acidic to neutral pH, so testing the soil may be beneficial.
- Transplanting Technique: Carefully remove the seedling from its pot, taking care not to damage the roots. Plant the seedling at the same depth it was in the pot, covering its roots and base with soil. Water the newly transplanted tree generously to settle it in its new spot.
Step 7: Long-Term Care for Horse Chestnut Trees
Once transplanted outdoors, your young tree will need care as it continues to mature.
- Watering: During dry periods, water your young horse chestnut tree deeply to keep the roots hydrated. Mature trees typically need less watering, but young trees benefit from consistent moisture.
- Mulching: Apply a layer of mulch around the tree base to retain soil moisture and regulate temperature. This will also help prevent weed growth.
- Pruning: While young, minimal pruning is required. However, pruning becomes important as the tree grows, especially for shaping and maintaining the health of the canopy.
- Protection from Pests: Watch for common pests, such as horse chestnut leaf miners or aphids. These pests can damage foliage, so consider using organic pest control methods if you notice an infestation.
Common Challenges and Tips
Even with the right preparation, growing horse chestnut trees from conkers can present challenges. Here are some troubleshooting tips:
- Low Germination Rates: Not all conkers will germinate, even with proper stratification. To increase your chances, plant multiple seeds at once.
- Seedling Rot: Overwatering or planting in poorly draining soil can lead to root rot. If your seedlings begin to wilt despite regular watering, check the soil for excess moisture and ensure the pot drains well.
- Insect Damage: Young trees are vulnerable to pests like caterpillars and aphids. A gentle spray with water can dislodge these pests, and neem oil works as a natural pesticide.
Growing a horse chestnut tree from seed isn’t just about the end result; it’s a journey that requires patience and a bit of nurturing. Watching your conker sprout and mature is immensely satisfying, as it brings you closer to nature and provides an opportunity to contribute positively to the environment.
Final Thoughts and Motivation
From tiny conker to towering tree, the life cycle of a horse chestnut is inspiring. As you nurture your seed into a young tree, you’re not just growing a plant—you’re creating a legacy that can be appreciated for generations. Imagine the day when this small seedling is a giant, shading and beautifying your garden.
Join the journey and plant your conker today! 🌳✨ #TreePlanting #GardeningJoy #GreenThumbChallenge #NatureInspired #GrowYourOwn #ConkerChallenge #PlantATree #ViralGardening #SustainableFuture