
Garlic (Allium sativum) is a versatile and essential herb that has been used for centuries, not only for its culinary benefits but also for its medicinal properties. Growing garlic indoors is a fantastic way to have a fresh supply of this pungent and flavorful herb at your fingertips year-round. Whether you’re living in an apartment with limited outdoor space or simply prefer the convenience of harvesting fresh garlic from the comfort of your home, this guide will walk you through everything you need to know to grow garlic indoors successfully.
Why Grow Garlic Indoors?
Garlic is one of the easiest plants to grow indoors and requires minimal space. It’s a low-maintenance crop that thrives in containers, making it perfect for small living spaces like apartments or city homes. Growing garlic indoors also allows you to control the environment, ensuring that the plants receive optimal conditions year-round. Freshly harvested garlic has superior flavor compared to store-bought garlic, and growing it yourself ensures that you have a steady supply at your disposal.
Additionally, garlic is known for its numerous health benefits. It is packed with antioxidants and has been shown to support the immune system, reduce blood pressure, and even improve heart health. By growing garlic indoors, you can easily incorporate these health benefits into your diet while enjoying the satisfaction of home gardening.
Choosing the Right Garlic for Indoor Growing
Before you begin planting garlic indoors, it’s essential to choose the right variety. Garlic generally falls into two categories: hardneck and softneck.
- Hardneck garlic produces a stiff stem, known as a scape, and has a stronger flavor. This variety is often preferred for its robust taste and is ideal for cooler climates.
- Softneck garlic is the more common variety in grocery stores. It has a milder flavor and a more flexible stem, which makes it perfect for braiding. Softneck garlic tends to be better suited for warmer climates.
When choosing garlic for indoor growing, it’s best to opt for softneck varieties like ‘California Early’ or ‘Artichoke,’ as they are more adaptable to indoor environments and grow well in containers.
Selecting the Right Container
Garlic needs a good-sized container to grow properly. While you don’t need to use an oversized pot, it should be deep enough to accommodate the garlic cloves’ root system. A container with a depth of at least 8–10 inches (20–25 cm) is ideal.
The container should also have adequate drainage holes to prevent water from accumulating at the bottom, which can lead to root rot. You can use a variety of containers, such as traditional plant pots, grow bags, or even recycled containers like plastic bottles. Just make sure the container is large enough to allow for the cloves to grow comfortably.
Preparing the Soil
Garlic thrives in well-draining, loose soil with a slightly acidic pH. A potting mix designed for vegetables or herbs works well, or you can make your own by combining equal parts of potting soil, perlite, and compost. The key is to ensure that the soil has good drainage, as garlic doesn’t like to sit in waterlogged conditions.
Avoid using garden soil, as it may contain pests or diseases that could harm your garlic. If you don’t have access to a specific potting mix for vegetables, a general-purpose potting soil combined with some organic compost can also work well.
Planting Garlic Indoors
Once you have your container and soil ready, it’s time to plant your garlic. Here’s a step-by-step guide:
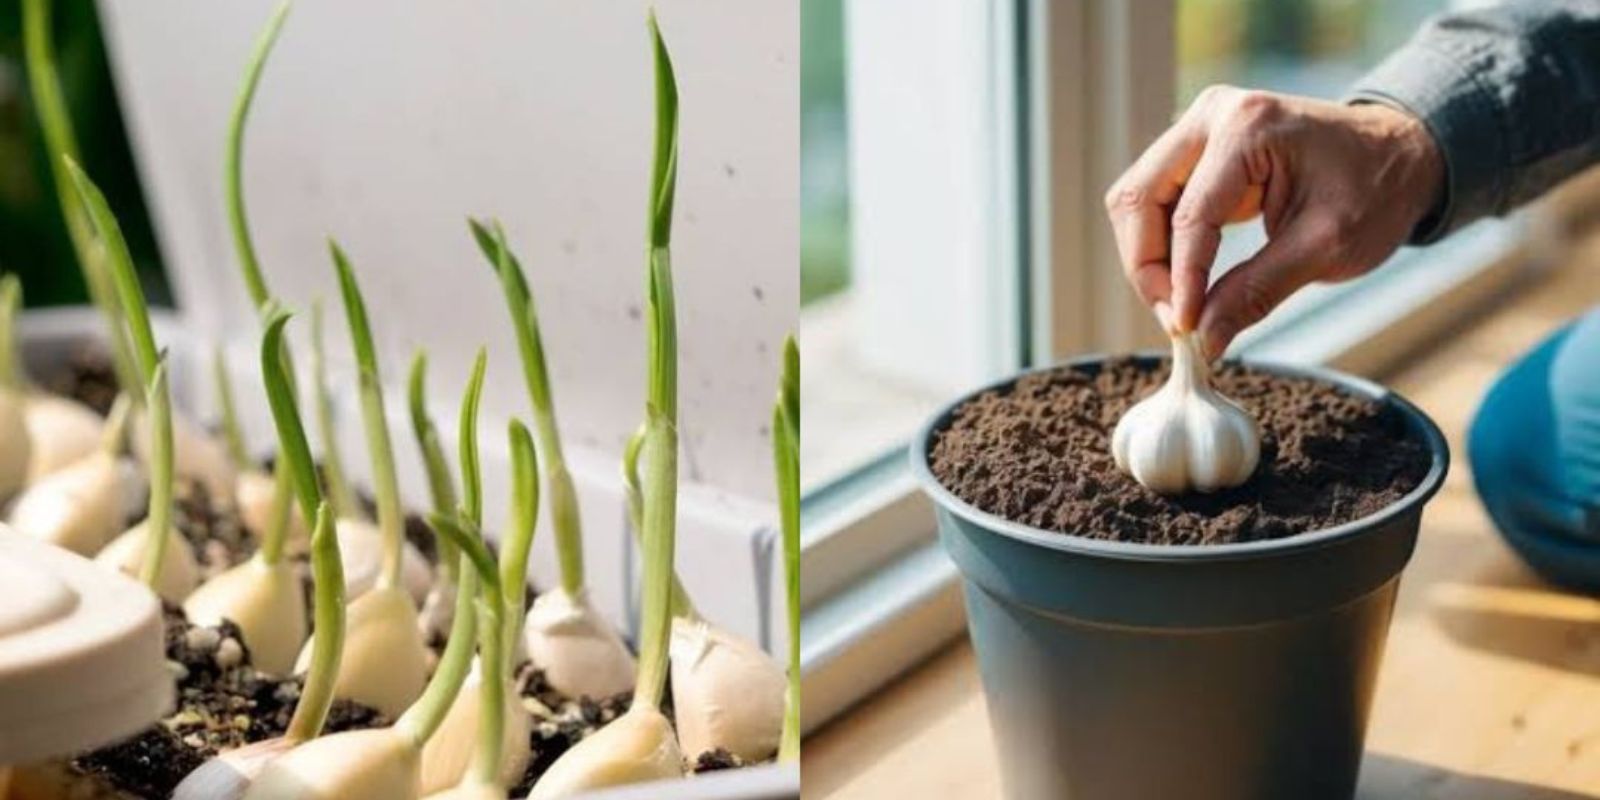
- Separate the Cloves: Start by breaking apart a garlic bulb into individual cloves. Each clove will grow into a new garlic plant, so make sure to select large, healthy cloves for the best results. Leave the papery skin intact on each clove.
- Prepare the Container: Fill your container with the prepared soil, leaving about 1–2 inches of space at the top. Firm the soil gently with your hands to eliminate air pockets, but don’t pack it too tightly.
- Plant the Cloves: Plant the garlic cloves with the pointed end facing upward. Space them about 3–4 inches apart to give each plant enough room to grow. Press the cloves gently into the soil, leaving the tips just barely covered with soil.
- Watering: After planting the cloves, water the soil thoroughly to help settle it around the garlic. Be careful not to overwater, as garlic doesn’t like to sit in soggy soil. Keep the soil evenly moist but not drenched.
Creating the Ideal Growing Conditions
Garlic requires plenty of sunlight to grow well, so it’s essential to place your container in a sunny location, such as a south-facing windowsill, where it can get at least 6 hours of direct sunlight each day. If natural light is limited, consider supplementing with a grow light. A full-spectrum LED grow light set on a timer for 12–14 hours per day can mimic the sun’s rays and help your garlic grow faster and healthier.
Garlic grows best in cooler temperatures, ideally between 55°F and 75°F (13°C to 24°C). Keep your indoor growing area in this temperature range for the best results. If the room temperature is too high, you can use a fan to improve air circulation and prevent overheating.
Watering and Fertilizing Garlic
Garlic has relatively low water needs, especially compared to other plants. During the growing season, water the garlic when the top of the soil feels dry to the touch. Be sure to water the plants at the base to avoid wetting the leaves, as damp foliage can lead to disease.
In terms of fertilization, garlic doesn’t need much in the way of heavy feeding. However, you can apply a balanced, slow-release fertilizer once a month to promote healthy growth. Avoid over-fertilizing, as too much nitrogen can cause the garlic to grow lush tops but produce small bulbs.
Caring for Garlic as It Grows
As your garlic begins to grow, it will develop long, slender green leaves. These leaves should be left undisturbed, as they are essential for the garlic’s photosynthesis and overall health.
- Pruning: Pruning garlic is not necessary, but you can remove any yellow or dead leaves to keep the plant looking tidy.
- Pests and Diseases: Garlic is generally pest-free, but it can be susceptible to fungal diseases like rust or downy mildew. If you notice any discolored or damaged leaves, remove them immediately. Make sure the soil is well-drained to avoid fungal growth.
Harvesting Your Garlic
Garlic can take anywhere from 6 to 9 months to reach maturity. The best indicator that your garlic is ready to harvest is when the leaves start to yellow and die back. The bulbs should feel firm when gently squeezed, and the papery skin should be dry.
To harvest, carefully dig up the bulbs with a small shovel or hand trowel. Be gentle to avoid damaging the bulbs. After harvesting, let the garlic cure in a cool, dry place for about 2–3 weeks. This curing process allows the outer skin to dry and harden, which helps preserve the garlic for long-term storage.
Once cured, you can store your garlic in a cool, dark place. Hardneck garlic will last for about 3–6 months, while softneck garlic can last up to 8 months.
Troubleshooting Common Problems
- Yellowing Leaves: If your garlic’s leaves turn yellow prematurely, it could be a sign of overwatering, poor drainage, or a lack of sunlight. Ensure the plant is receiving enough light and that the soil is draining well.
- Small Bulbs: Small bulbs can result from too much nitrogen or overcrowding in the container. Make sure to give each clove enough space to grow.
Conclusion
Growing garlic indoors is a fun and rewarding project that can be done by gardeners of all experience levels. With the right care and attention, you’ll be able to harvest fresh, homegrown garlic from your kitchen and enjoy its culinary and health benefits year-round. Whether you’re an experienced gardener or a beginner, growing garlic indoors is a great way to bring the flavors of the garden into your home.
By following the steps outlined in this guide, you can successfully grow garlic indoors and enjoy fresh, flavorful garlic in your cooking. So why not give it a try? Start with just a few cloves, and soon you’ll be harvesting your very own garlic crop!