
Garlic is a staple in kitchens around the world, known for its robust flavor, health benefits, and versatility in cooking. While it’s readily available at any grocery store, did you know that growing your own garlic at home is incredibly simple? Whether you want to enjoy a fresh supply of garlic for your culinary creations or experience the satisfaction of homegrown produce, garlic is an excellent plant to start with.
In this article, we’ll cover two easy methods to grow garlic at home: water germination and direct planting. Both methods require minimal effort, and you don’t need much space to get started. By the end, you’ll be ready to start growing your own garlic and enjoy the benefits of fresh, homegrown bulbs.
Why Grow Garlic at Home?
Before diving into the growing methods, you might wonder: why should I grow garlic at home? The answer is simple. Garlic is not only easy to grow, but it also offers several advantages:
- Freshness: Freshly harvested garlic tastes far superior to store-bought garlic, with more intense flavor and aroma.
- Cost-Effective: Growing garlic saves money in the long run, especially if you cook with garlic regularly.
- Health Benefits: Garlic is packed with nutrients, including vitamins C and B6, manganese, calcium, and iron. It is also known for its anti-inflammatory, anti-bacterial, and antioxidant properties.
- Sustainability: Growing your own garlic reduces reliance on commercial garlic production and packaging, contributing to a more sustainable lifestyle.
Now, let’s explore the two easiest methods for growing garlic at home.
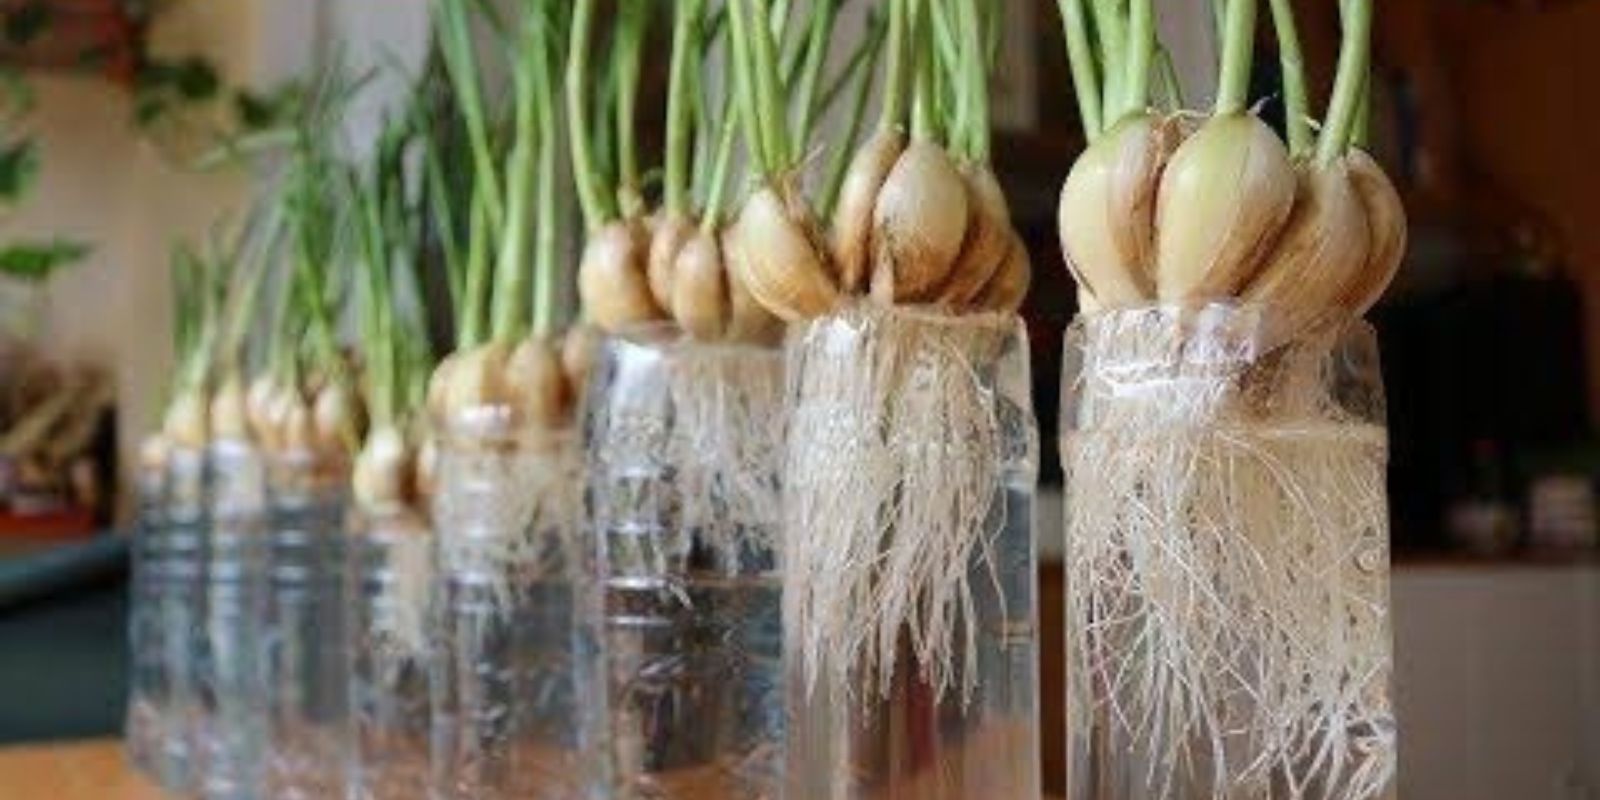
Method 1: Water Germination for Garlic
Water germination is a straightforward way to start growing garlic indoors. It allows you to watch the garlic sprout from the base of the bulb and is an excellent option if you don’t have access to outdoor space or prefer to start growing your garlic indoors.
Step-by-Step Guide:
1. Choose a Healthy Garlic Bulb
Select a bulb of garlic that is firm and free of blemishes or rot. You can use any garlic bulb from the store, but it’s best to choose organic garlic, as it’s less likely to have been treated with chemicals that could affect growth.
2. Peel the Outer Layers
Carefully peel away the outer layers of the garlic bulb. Make sure you keep the individual cloves intact, still attached to the base of the bulb. You’ll be working with the entire bulb rather than individual cloves, so leave the cloves connected to the base.
3. Set Up a Shallow Water Container
Choose a shallow container—like a small dish, bowl, or glass—that’s wide enough to hold the bulb securely. The garlic bulb should sit in the water with just the base submerged, while the cloves and tops should remain above the waterline. Be sure to change the water regularly, ideally every 2-3 days, to prevent stagnation and bacterial growth.
4. Place in Indirect Light
Position your container in a spot with indirect sunlight, such as near a window. Avoid placing it in direct sunlight, as this can cause the bulb to overheat and dry out. The warmth and light will encourage the garlic to sprout.
5. Watch for Roots and Shoots
After about 1-2 weeks, you should start to see roots growing from the base of the garlic bulb and green shoots emerging from the top. This is a sign that your garlic is germinating and getting ready to be transplanted.
6. Transplant to Soil
Once the roots and shoots are established, and the plant is about 2-4 inches tall, it’s time to transplant your garlic into a pot or garden bed. Choose a container with good drainage and fill it with well-draining, fertile soil. Plant the garlic bulb with the base in the soil, leaving the shoots exposed. Place the pot in a sunny location where the garlic can continue to grow.
Method 2: Direct Planting of Garlic
If you have outdoor space or a sunny balcony, direct planting is a great option. Growing garlic directly in the soil can be done in most climates, and it’s a more traditional method for those looking to harvest a larger quantity of garlic. Garlic requires full sun and well-draining soil to thrive, so it’s important to choose a planting location that meets these needs.
Step-by-Step Guide:
1. Choose the Largest Cloves
When selecting garlic for planting, use the largest cloves from a healthy bulb. Smaller cloves may produce smaller bulbs, while larger cloves are more likely to yield bigger garlic heads at harvest time. It’s also important to avoid using pre-packaged garlic from the store, as it may be treated with chemicals to prevent sprouting.
2. Prepare the Soil
Garlic prefers well-draining, loamy soil that is rich in organic matter. If your soil is heavy clay or poorly draining, amend it with compost or organic matter to improve its structure. Garlic also prefers a slightly acidic to neutral pH (around 6.0 to 7.0). Test the soil before planting and adjust if necessary.
3. Plant the Cloves
Plant the individual garlic cloves with the pointed side facing up, about 2 inches deep and 4-6 inches apart. You want to give each clove plenty of space to grow, as garlic bulbs can get quite large. Space rows of garlic 8-12 inches apart if planting multiple rows.
4. Water Well
Water the garlic cloves thoroughly after planting to help them settle into the soil. Keep the soil moist, but not soggy, throughout the growing season. Garlic does not like to be waterlogged, so ensure that the soil has good drainage.
5. Mulch for Moisture Retention
After planting, apply a layer of mulch—such as straw, leaves, or grass clippings—around the base of the garlic plants. Mulch helps retain moisture, suppress weeds, and regulate soil temperature.
6. Continue to Care for the Plants
Garlic is relatively low-maintenance but does require some attention as it grows. Ensure the soil stays moist, and keep an eye out for weeds. You may want to remove any flower stalks (called scapes) that emerge in the middle of the growing season, as they divert energy from the garlic bulb’s growth.
7. Harvesting
Garlic typically takes about 8-9 months to mature, depending on the climate. You’ll know it’s time to harvest when the leaves begin to turn yellow and dry out. Gently dig up the bulbs using a garden fork or shovel, being careful not to damage the bulbs. Allow the garlic to cure in a cool, dry place for several weeks before storing it.
Tips for Growing Garlic Successfully
- Choosing Garlic Varieties:
There are two main types of garlic: hardneck and softneck. Hardneck garlic tends to have a stronger flavor and is better suited for colder climates, while softneck garlic is milder and more suited for warmer areas. Choose the variety that best fits your climate and taste preferences. - Plant in the Fall (for Direct Planting):
Garlic is typically planted in the fall before the first frost, allowing the cloves to establish roots during the winter and grow into full bulbs by the following summer. However, if you’re growing garlic indoors through water germination, you can start at any time of the year. - Companion Planting:
Garlic can be planted alongside other plants like tomatoes, peppers, and carrots. Its strong scent can help repel pests, making it a great companion plant in vegetable gardens.
Conclusion: Enjoy Fresh, Homegrown Garlic!
Whether you opt for the water germination method or direct planting, growing garlic at home is a fun and rewarding experience. Not only will you enjoy the satisfaction of harvesting your own garlic, but you’ll also have access to a fresh, flavorful ingredient that will elevate your cooking.
By following these simple steps, you can grow garlic easily, even if you don’t have a lot of space. Plus, the process is environmentally friendly and cost-effective, giving you the chance to enjoy homegrown garlic all year long.
So, grab some healthy garlic cloves and start your journey to growing your own fresh garlic today!