
Plumeria, also known as frangipani, is a tropical plant beloved for its stunning, fragrant flowers that evoke images of sunny, tropical beaches and lush, exotic gardens. The flowers come in a variety of colors, including white, yellow, pink, and orange, and are often associated with the warm climates of Central America and the Caribbean. Growing plumeria in your own garden or home can add a touch of elegance and fragrance that is sure to captivate anyone who passes by. Whether you want to propagate it from cuttings or care for a plant in a pot or garden, this comprehensive guide will help you nurture your plumeria from start to finish.
Introduction to Plumeria (Frangipani)
Plumeria, commonly referred to as frangipani, is a tropical shrub or small tree native to the Caribbean, Central America, and Mexico. The plant is highly valued for its showy, fragrant blooms, which have a unique, pleasant scent that is often associated with Hawaiian leis. Plumeria plants can grow up to 8 meters tall, though they are typically much smaller in pots. The flowers are characterized by their fleshy petals that come in a wide range of colors, from pure white and yellow to various shades of pink, red, and orange.
Though plumeria plants require warm, sunny climates to thrive, they can be grown in containers and brought indoors during the cooler months in regions with harsh winters. When properly cared for, plumeria can flourish year after year, providing a constant supply of blooms for your garden or home.
How to Propagate Plumeria from Cuttings
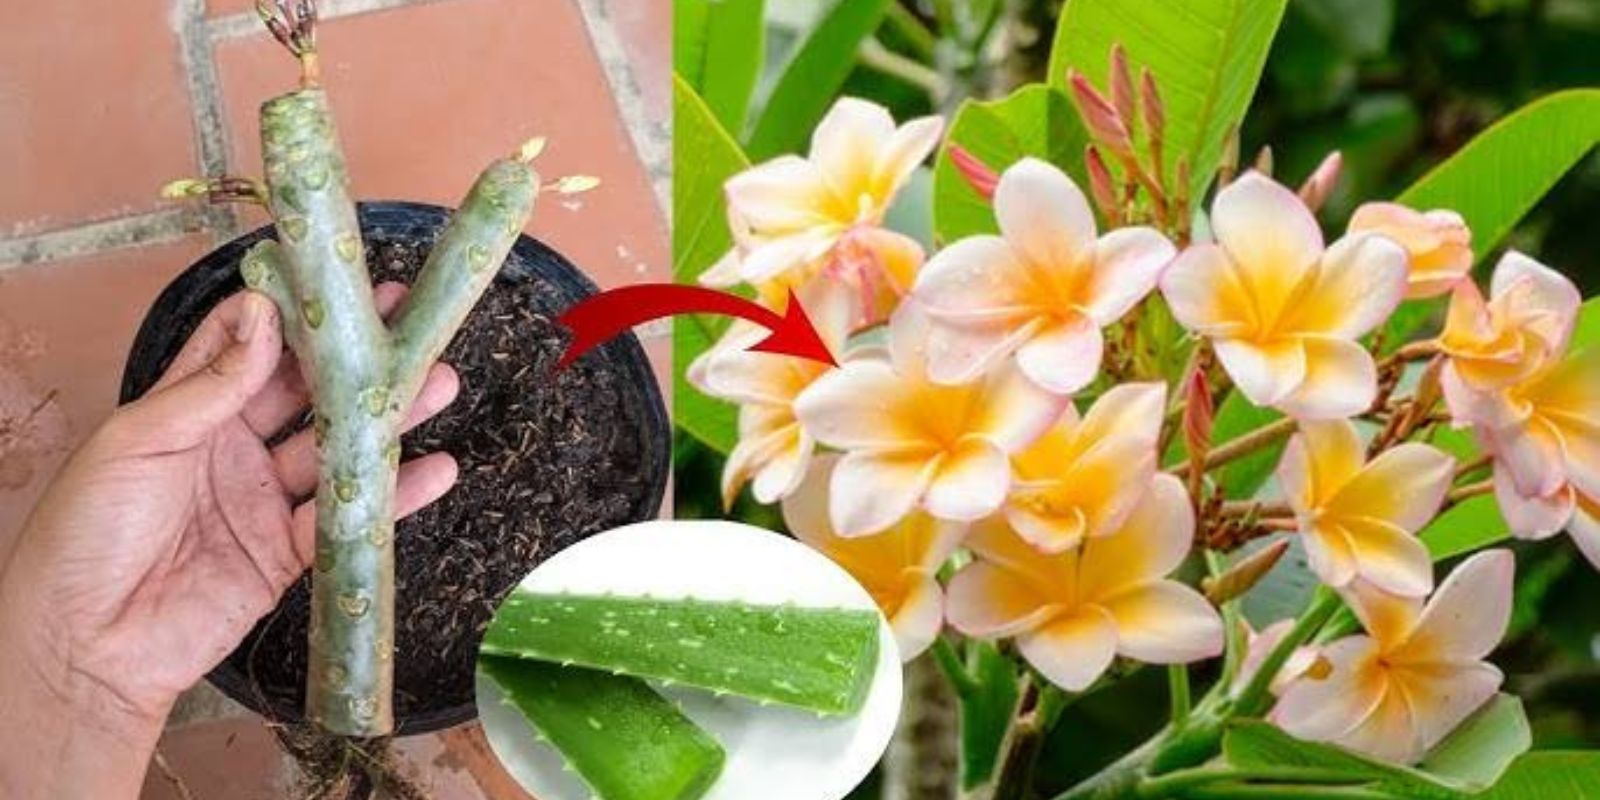
Growing plumeria from cuttings is one of the most popular methods for propagating this beautiful plant. While it can take some patience, the process is relatively simple, and many gardeners find success in growing plumeria from cuttings rather than from seeds. Follow these steps to propagate plumeria from cuttings:
Step 1: Take a Cutting
Begin by selecting a healthy, mature plumeria plant from which you can take cuttings. Use a sharp, sterile pruning shears or knife to cut a young, non-flowering stem. The cutting should be about 12 to 18 inches long and should not contain any flowers. Ideally, take cuttings in mid-autumn, as this is when the plant is in its dormant phase.
Step 2: Prepare the Cutting
Remove most of the leaves and any flower buds from the cutting. You want to leave just a small portion of the stem with a few leaves at the top. This helps conserve the plant’s energy while it focuses on root development. The cutting should have a clean, smooth base that can easily be planted.
Next, let the cutting dry out for about 4-7 days in a warm, dry place. This allows the cutting to form a callous over the cut end, which will help prevent rot once it is planted in the soil.
Step 3: Prepare the Potting Mix
Plumeria thrives in well-draining, sandy soil. Use a mix of potting soil, compost, and sand in equal proportions to create a soil blend that mimics its native environment. The pot or container you use should have drainage holes to allow excess water to escape. This is essential for preventing root rot, which plumeria is prone to in overly moist conditions.
Step 4: Plant the Cutting
Once the cutting has dried and the callus has formed, you can now plant it. Place the base of the cutting into the potting mix, burying it about 2-3 inches deep. Press the soil gently around the cutting to ensure it stays upright. It’s important to avoid over-watering at this stage; lightly water the soil to moisten it, but avoid soaking it.
Step 5: Provide Proper Conditions for Rooting
Plumeria cuttings require warmth, humidity, and plenty of light to develop roots. Place the cutting in a warm, sunny location, but avoid direct sunlight for the first few weeks as the plant adjusts. Keep the soil lightly moist but not soggy, and be patient as it can take several weeks for the cutting to root and begin to grow.
Step 6: Transplant When Ready
Once the cutting has developed roots and small leaves, it is time to transplant it into a larger pot or directly into your garden. Gently remove the rooted cutting from the pot and place it in its new home. For potted plants, continue to use a well-draining potting mix, and for garden planting, make sure the soil is loose and well-drained.
Growing Plumeria in Pots
If you’re short on space or live in a cooler climate, growing plumeria in a pot is a great option. The plant thrives in containers, where it can be moved indoors during the winter months to protect it from frost. Here’s how to grow plumeria in pots:
Step 1: Choose the Right Pot
Select a pot that is wide and deep enough to accommodate the root system of the plumeria as it grows. Ensure the pot has drainage holes to allow excess water to escape. Plumeria plants do not like standing water, so proper drainage is essential.
Step 2: Planting the Plumeria
Fill the pot with a well-draining soil mix, such as a combination of potting soil, compost, and sand. Place your plumeria cutting or small plant in the center of the pot, making sure that the base of the stem is level with the top of the soil. Gently press the soil around the base to secure the plant in place.
Step 3: Watering and Light
Water the plant sparingly, allowing the soil to dry out between waterings. Overwatering can lead to root rot, so make sure to let the soil dry out completely before watering again. Place your plumeria in a sunny location where it will receive at least 6 hours of direct sunlight per day. Plumeria thrives in bright, warm conditions.
Step 4: Repotting
As the plant grows, it may outgrow its pot. Be prepared to repot your plumeria every few years to give it enough space for its root system. When repotting, choose a pot that is 2-3 inches larger in diameter than the current one to allow for continued growth.
Planting Plumeria in the Garden
If you’re fortunate enough to live in a warm climate, you can plant plumeria directly in your garden. These tropical plants thrive in sunny, well-drained soils and can be a beautiful addition to any landscape. Here’s how to plant plumeria in your garden:
Step 1: Select the Right Location
Plumeria plants require full sunlight to thrive. Choose a sunny location in your garden where the plant will receive at least 6-8 hours of direct sunlight daily. The soil should be well-draining to prevent water from accumulating around the roots. If you have heavy, clayey soil, consider planting your plumeria in a raised bed or using pots for better drainage.
Step 2: Planting the Plumeria
Dig a hole that is large enough to accommodate the root system of your plumeria plant. Place the plant in the hole, making sure that the root ball is level with the surrounding soil. Fill in the hole with soil, gently pressing it down around the base to secure the plant.
Step 3: Watering and Mulching
Water the newly planted plumeria thoroughly after planting to help settle the soil around the roots. Apply a layer of mulch around the base of the plant to help retain moisture and regulate soil temperature. However, be sure to keep the mulch away from the stem to prevent rot.
Plumeria Care and Maintenance
Plumeria is relatively low-maintenance, but it still requires proper care to ensure it thrives and blooms year after year. Here are some essential care tips for plumeria:
1. Watering
Water plumeria regularly during the growing season, typically in spring and summer. Allow the soil to dry out between waterings to prevent root rot. In the cooler months, you can reduce watering as the plant enters a dormant phase.
2. Fertilizing
Plumeria plants benefit from regular feeding, especially when they are actively growing. Use a slow-release, balanced fertilizer in spring and summer. During the dormant months, reduce fertilizing to give the plant a break.
3. Pruning
Prune your plumeria in early spring to remove dead or damaged branches and encourage new growth. Cut back any leggy or diseased stems to improve the plant’s appearance and promote better airflow.
4. Disease Prevention
Plumeria is susceptible to diseases like rust, fungal infections, and pests such as mealybugs and aphids. Keep an eye out for any signs of pests or disease and treat the plant with organic fungicides or insecticides as needed.
5. Protecting from Cold
Plumeria is not frost-tolerant and should be protected during the colder months. If you live in a region with freezing temperatures, bring your plumeria indoors or provide winter protection by covering it with a frost cloth.
Conclusion
Growing and caring for plumeria can be a highly rewarding experience. With its beautiful, fragrant flowers and tropical charm, plumeria can elevate any garden or indoor space. Whether you’re propagating from cuttings, growing in a pot, or planting directly in the garden, following these simple steps and care tips will help ensure your plumeria thrives for years to come. With a little patience and attention, you’ll be rewarded with gorgeous blooms that will brighten your home and garden.
Are you ready to grow your own plumer
ia? Share your experiences, tips, or any questions you have about growing this tropical beauty!