
Oak trees are one of the most iconic trees, known for their strength, longevity, and majestic beauty. Whether you’re passionate about gardening or simply want to add some green to your yard, growing an oak tree from an acorn is a rewarding and fulfilling project. Although it requires patience, the process is not as difficult as you might think. In this comprehensive guide, we’ll walk you through the entire journey of growing an oak tree, from collecting acorns to watching your tree reach its full potential.
Why Grow an Oak Tree?
Before diving into the steps, it’s essential to understand why growing an oak tree is such a rewarding experience. Oak trees are not only a symbol of strength and endurance but also play a crucial role in the ecosystem. They provide habitat and food for numerous wildlife species, improve air quality, and help combat soil erosion with their expansive root systems.
Additionally, growing your own oak tree can be incredibly satisfying, especially as you witness the small acorn turn into a towering tree over many years. Oaks are known for their slow growth, so this is a long-term project, but one that can ultimately offer shade, beauty, and a sense of accomplishment.
Step 1: Collecting Acorns
The first step in growing an oak tree from an acorn is, of course, collecting acorns. This process can be done in the fall when the acorns have fully matured. Depending on the species of oak tree, acorns will typically fall from the tree between late September and early November.
When collecting acorns, make sure to:
- Look for Healthy Acorns: Choose acorns that are fully developed and free from cracks, holes, or mold. A good acorn should be firm to the touch.
- Test for Viability: One of the best ways to check whether an acorn is viable is to place it in water. If the acorn sinks, it is likely healthy and can be used for planting. If it floats, discard it, as it’s likely to be damaged or empty.
Once you’ve gathered your acorns, it’s time to prepare them for planting.
Step 2: Preparing the Acorns
After collecting your acorns, it’s crucial to prepare them before planting. One of the most important steps in preparing your acorns is to stratify them. Stratification is the process of mimicking winter conditions, which helps the acorns break dormancy and begin to germinate when it’s time to plant them. Oak trees typically require a period of cold exposure before they can sprout.
Here’s how to stratify your acorns:
- Soak the Acorns: Before placing the acorns in the refrigerator, soak them in water for about 24 hours. This helps to loosen any debris and allows the acorn to absorb moisture, which is essential for germination.
- Refrigerate the Acorns: After soaking, place the acorns in a plastic bag with a small amount of moist soil or sand. This mixture helps maintain the moisture level while preventing mold from forming. Store the bag in the refrigerator for 30 to 60 days. This cold treatment mimics the winter season and prepares the acorns for sprouting.
During the stratification period, be sure to check on your acorns occasionally. If the soil or sand becomes too dry, lightly moisten it to maintain the right humidity level.
Step 3: Planting the Acorns
Once the stratification period is complete, it’s time to plant your acorns. At this point, you’ll want to transplant them into a pot with good, well-draining soil. Here’s how to do it:
- Choose the Right Container: Select a small to medium-sized pot (about 6 inches deep) that has drainage holes. The pot should provide enough space for the acorn to develop its roots but not be so large that it retains too much moisture.
- Prepare the Soil: Oak trees prefer slightly acidic, well-draining soil. Use a mixture of potting soil, sand, and perlite to create a loose and airy soil blend that will prevent water from pooling around the roots.
- Plant the Acorn: Plant the acorn about 1 to 2 inches deep into the soil, with the pointed end facing down. You can plant multiple acorns in one pot, but make sure they are spaced apart to allow for root growth.
- Water the Acorns: After planting, water the soil thoroughly. Keep the soil moist, but not soggy. Overwatering can lead to root rot, which can harm the acorn. The soil should remain consistently moist throughout the germination process.
Once planted, place the pot in a warm, sunny location. Oak trees need sunlight to begin germinating, so make sure the pot receives at least 6 hours of sunlight per day.
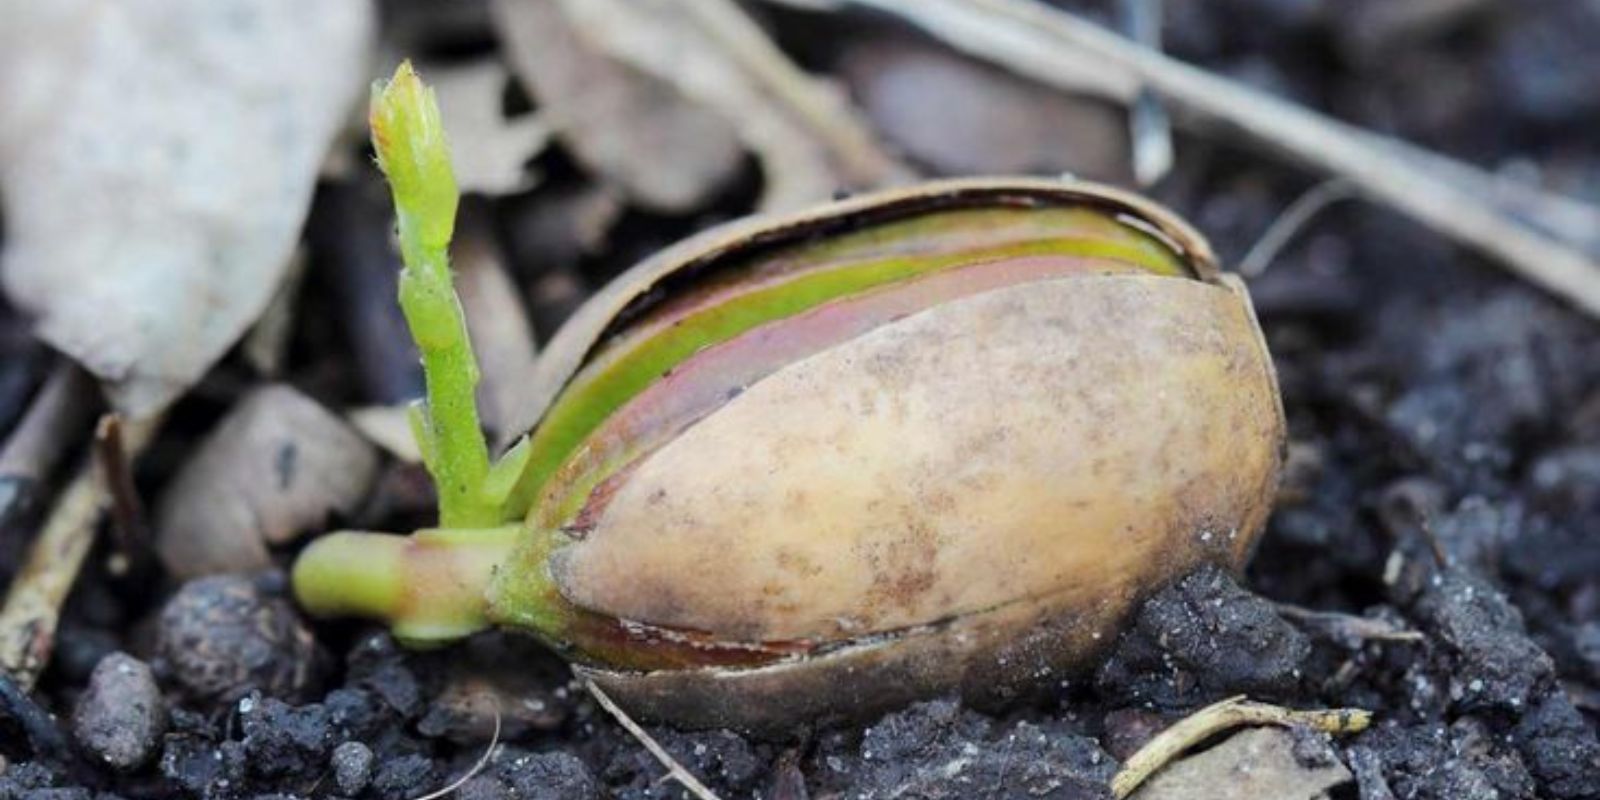
Step 4: Germination and Growth
After planting, the acorns will begin to germinate. Germination typically takes anywhere from 2 to 8 weeks, depending on the temperature and moisture levels. During this period, the acorn will start to sprout a small root system, followed by the appearance of a stem and leaves.
Here’s what to expect as the acorn begins to grow:
- First Signs of Growth: Once the acorn has germinated, you’ll see a small root push through the soil. This root system is crucial, as it will anchor the plant and begin absorbing water and nutrients.
- Leaf Growth: After the root develops, a small shoot will emerge from the top of the acorn, followed by leaves. At this stage, the oak sapling will be fragile, so handle it carefully.
- Maintain Moisture: Keep the soil consistently moist during the germination phase, ensuring that the sapling receives enough water to support its growth.
Step 5: Transplanting Your Oak Tree
As the oak sapling continues to grow, it will eventually need more space. Once the tree has developed several leaves and the roots have grown sufficiently, it’s time to transplant it into a larger pot or, if the weather allows, into the ground.
- Transplanting to a Larger Pot: If you plan to keep your oak tree in a pot, move it to a larger container once it outgrows its initial pot. Be sure to use well-draining soil and provide ample space for the roots to expand.
- Transplanting Outdoors: If you live in an area with mild winters, you can transplant your oak sapling directly into your yard. Choose a sunny location with well-drained soil, and be sure to space the tree far enough from structures and other trees to allow for its mature size.
When transplanting, be gentle with the young tree’s roots. Handle it by the root ball and try to avoid disturbing the root system too much.
Step 6: Caring for Your Oak Tree
Once planted, your oak tree will require regular care to thrive. Here’s how to care for your young oak:
- Watering: Oak trees are relatively drought-tolerant, but young trees need regular watering, especially during dry spells. Water deeply to encourage deep root growth, but allow the soil to dry slightly between watering sessions.
- Fertilizing: Oak trees don’t require heavy fertilization, but you can add a balanced slow-release fertilizer in the spring to support their growth.
- Pruning: While oak trees generally need little pruning, you can remove any dead or damaged branches to help the tree grow strong and healthy.
Step 7: Patience and Time
Oak trees are slow-growing, and it may take several years for your tree to mature. However, with patience, you will eventually see your tree grow into a strong, towering oak. Over time, the tree will provide shade, beauty, and environmental benefits to your yard.
Conclusion
Growing an oak tree from an acorn is a slow but incredibly rewarding process. By collecting healthy acorns, preparing them for germination, and nurturing them through their early stages of growth, you’ll eventually have a magnificent tree that will stand as a symbol of strength and longevity in your garden. Though it takes time, the benefits of growing your own oak tree are worth the wait.
Plant an acorn today, and you’ll be growing a tree that will stand the test of time for generations to come!
#OakTree #GardeningTips #TreePlanting #GrowAnOak #NatureLovers #EcoFriendly #SustainableLiving #ViralGardening #PlantingForTheFuture #GreenThumb #BackyardTrees #GrowYourOwn #LongTermGardening #SustainableGardening #GardeningCommunity