
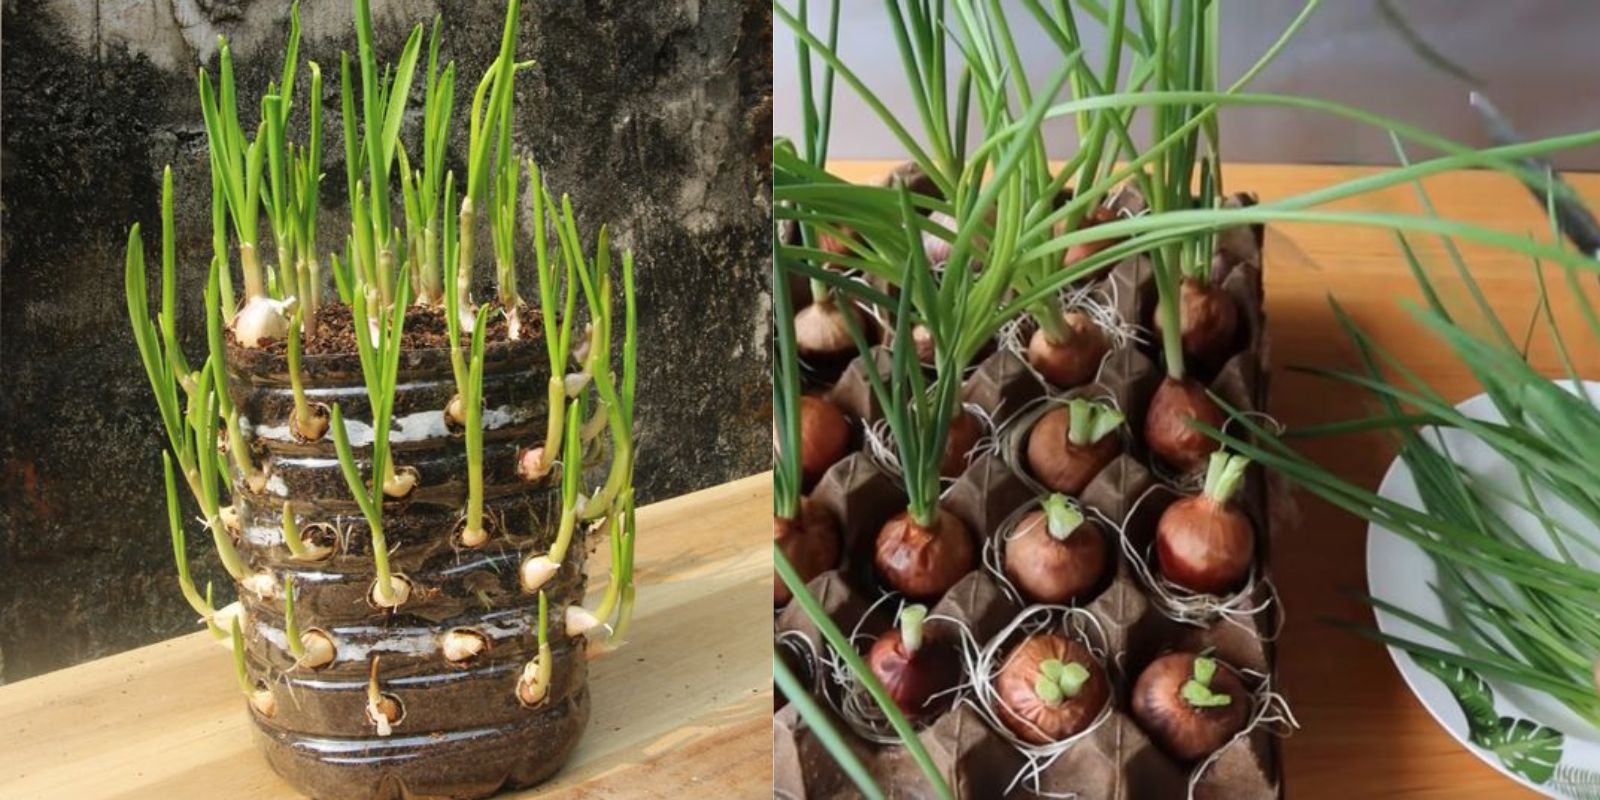
Growing your own vegetables not only adds freshness to your meals but also brings a sense of accomplishment and sustainability to your gardening efforts. Among the myriad of vegetables you can cultivate, onions stand out for their versatility and essential role in cooking. The good news is that you can easily grow an endless supply of onions using plastic bottles, a method that maximizes space and minimizes waste. In this comprehensive guide, we’ll delve into the benefits of growing onions in plastic bottles, the materials you’ll need, and a detailed step-by-step process to ensure a bountiful harvest.
Why Grow Onions?
Onions are a staple in kitchens around the world. They add flavor, aroma, and depth to countless dishes. Here are a few compelling reasons to grow your own onions:
- Cost-Effective: Onions are relatively inexpensive to purchase, but growing your own can save you money over time, especially if you have a continuous supply.
- Freshness: Homegrown onions are fresher and tastier than store-bought varieties, enhancing your culinary creations.
- Variety: Growing your own allows you to experiment with different onion varieties, from sweet onions to pungent red onions.
- Sustainability: By using recycled plastic bottles, you’re not only reducing waste but also creating a sustainable gardening practice.
The Benefits of Using Plastic Bottles
Using plastic bottles for gardening has become a popular trend for several reasons:
- Space Efficiency: Plastic bottles can be placed on balconies, patios, or small gardens, making them ideal for urban gardening.
- Water Retention: The closed environment of the bottle helps retain moisture, reducing the frequency of watering.
- Soil Control: You can easily control the soil quality and drainage, which is essential for healthy root development.
- Recycling: This method promotes recycling and repurposing, aligning with eco-friendly practices.
Materials You Will Need
Before we dive into the step-by-step process, let’s gather the necessary materials:
- Plastic Bottles: Any size will work, but larger bottles (1-2 liters) are preferable for growing multiple onions.
- Potting Soil: A high-quality, well-draining potting mix is essential for healthy onion growth.
- Onion Sets or Seeds: Choose your favorite varieties. Onion sets are small, immature onions that are easy to plant and grow quickly.
- Scissors or a Utility Knife: For cutting the bottles.
- Marker or Labeling Tape: To label the varieties of onions if you’re planting different types.
- Watering Can: For watering your plants.
Step-by-Step Guide to Growing Onions in Plastic Bottles
Step 1: Prepare the Bottles
The first step in your onion-growing journey is to prepare the plastic bottles.
- Clean the Bottles: Thoroughly wash the plastic bottles to remove any residue or labels. This ensures that no harmful chemicals affect your plants.
- Cut the Bottles: Using scissors or a utility knife, carefully cut the bottles in half. The top part can be discarded or reused for other gardening purposes. You’ll be using the bottom half for planting.
- Create Drainage Holes: Using a sharp object, poke several drainage holes in the bottom of each bottle. This is crucial to prevent waterlogging, which can lead to root rot.
Step 2: Fill with Soil
Now that your bottles are ready, it’s time to fill them with soil.
- Choose the Right Soil: Use a high-quality potting mix that retains moisture but drains well. A mix designed for vegetables is ideal.
- Fill the Bottles: Pour the potting soil into the bottom half of the bottles, filling them about two-thirds full. Leave enough space for planting the onions and covering their roots.
- Pack the Soil: Gently press down on the soil to remove any air pockets, ensuring a solid foundation for the onion roots.
Step 3: Plant Onion Sets or Seeds
With your bottles filled with soil, it’s time to plant the onions.
- Select Your Onions: Choose onion sets or seeds based on your preference. Onion sets are easier for beginners, while seeds offer more variety.
- Planting Onion Sets: If using sets, push each onion into the soil, leaving the tip exposed. Space them about 2-3 inches apart to allow for proper growth.
- Planting Onion Seeds: For seeds, create small holes in the soil about half an inch deep. Place 2-3 seeds in each hole and cover lightly with soil.
- Label the Bottles: If you’re planting different varieties, use a marker or labeling tape to indicate which type of onion is in each bottle.
Step 4: Water and Care
Once your onions are planted, proper care will ensure a successful harvest.
- Watering: Use a watering can to gently water the soil after planting. Keep the soil consistently moist but not soggy. The closed environment of the bottle will help retain moisture.
- Sunlight: Place the bottles in a location that receives plenty of sunlight—at least 6-8 hours a day is ideal for healthy growth.
- Fertilizing: After a few weeks, consider applying a balanced, water-soluble fertilizer to promote vigorous growth. Follow the package instructions for dosage.
- Monitoring Growth: Keep an eye on your onions as they grow. Remove any weeds that may compete for nutrients, and check for pests or diseases.
Troubleshooting Common Issues
Even with the best intentions, you may encounter some challenges while growing onions in plastic bottles. Here are some common issues and how to address them:
- Yellowing Leaves: This could indicate overwatering or nutrient deficiencies. Ensure proper drainage and consider adding fertilizer.
- Pests: Keep an eye out for common pests like aphids or onion maggots. Use organic insecticides or neem oil as a treatment.
- Slow Growth: If your onions aren’t growing as expected, ensure they are receiving enough sunlight and that the soil is not compacted.
Harvesting Your Onions
After several weeks of care, your onions will begin to grow tall and lush. Here’s how to know when they’re ready to harvest:
- Timing: Onions are usually ready for harvest when the tops begin to yellow and fall over, typically 3-4 months after planting.
- Checking Size: Gently dig around the base of the onions to check their size. They should be firm and have a good diameter.
- Harvesting: Carefully pull the onions from the soil, being mindful not to damage the bulbs. Shake off excess soil.
- Curing: Allow harvested onions to cure in a dry, cool place for a few days. This helps them store better and enhances their flavor.
Storing Your Onions
Proper storage can prolong the life of your harvested onions:
- Drying: Ensure onions are fully dry before storing to prevent mold.
- Cool, Dark Place: Store onions in a cool, dark place with good air circulation, such as a pantry or cellar.
- Avoid Plastic Bags: Use mesh bags or baskets to store onions, as they need to breathe.
Tips for Continuous Harvests
To achieve an endless supply of onions, consider these additional tips:
- Stagger Planting: Plant onions in intervals every few weeks to ensure a continuous harvest throughout the growing season.
- Use Different Varieties: Grow a mix of onion types, such as green onions, sweet onions, and storage onions, to diversify your harvest.
- Regrow from Scraps: If you have leftover onion roots from cooking, you can regrow them by placing them in water or soil.
Conclusion
Growing an endless supply of onions in plastic bottles is an easy and rewarding gardening project that anyone can undertake. By utilizing recycled materials and following the simple steps outlined in this guide, you’ll enjoy the freshness of homegrown onions while contributing to a sustainable gardening practice.
Whether you have a sprawling garden or a small balcony, this method allows you to maximize your space and enjoy a bountiful harvest. So, gather your materials, start planting, and relish the satisfaction of growing your own food. Happy gardening! 🧅🌱
Feel free to share your onion-growing experiences or ask questions in the comments below! #GrowYourOwnOnions #SustainableGardening #PlasticBottleGarden #UrbanFarming #EcoFriendlyGardening