
Growing your own peach tree from a seed is a satisfying and rewarding experience that brings the joy of homegrown fruits to your garden. While it may take a few years for the tree to bear fruit, the process itself is quite manageable and requires patience, care, and a little know-how. In this article, we will explore how to successfully grow a peach tree from a seed, step by step. From preparing the seed to transplanting your young tree, this guide will provide all the essential information for your home gardening journey.
Why Grow a Peach Tree from a Seed?
Peach trees are known for their sweet, juicy fruit, and growing one from a seed is an excellent way to start a sustainable gardening project. While it may take several years for your peach tree to mature enough to produce fruit, the satisfaction of growing it from scratch is well worth the wait. Furthermore, starting a tree from a seed is a low-cost way to enjoy fresh, homegrown peaches while learning valuable gardening skills. It’s also a fantastic way to engage with nature and witness the life cycle of a fruit tree firsthand.
Step 1: Prepare the Peach Pit
The first step in growing a peach tree from a seed is preparing the peach pit itself. Here’s what you need to do:
Choose the Right Peach
Start with a ripe, organic peach. Make sure that the peach is fully ripe for the best chance of success. Organic peaches are recommended because they are less likely to have been treated with chemicals that might affect seed germination.
Clean the Pit
Once you have your peach, remove the pit from the fruit. You can easily do this by cutting the peach in half and twisting the halves apart. The pit should be removed from the fruit and thoroughly cleaned to remove any pulp. Once cleaned, set the pit aside to dry for 1-2 days. This helps to prevent mold growth during the stratification process.
Optional: Crack the Pit
If you want to speed up the germination process, you can gently crack the hard outer shell of the peach pit. This step is optional but can increase the chances of successful germination. Be careful when cracking the pit to avoid damaging the seed inside. You can use a small hammer or nutcracker to break open the shell.
Step 2: Stratify the Seed
Peach seeds need a period of cold stratification to break dormancy, simulating the natural winter conditions they would experience in the wild. This process is crucial for successful germination.
Cold Stratification Process
To cold-stratify your seed, place it in a plastic sandwich bag with a small amount of damp paper towels or sand. The moisture should be enough to keep the seed moist, but not so much that the seed becomes waterlogged. Seal the bag and place it in the refrigerator for 4-8 weeks. This period mimics the winter cold that the seed would naturally experience before germinating.
Step 3: Plant the Seed
After the cold stratification process, the seed is ready to be planted. Here’s what you need to do:
Prepare the Soil
Choose a well-draining, slightly acidic soil mix for planting the peach seed. A good quality potting mix combined with a bit of sand or perlite will work well to ensure proper drainage. If you’re planting directly in your garden, choose a spot that has well-drained, slightly acidic soil.
Plant the Seed
Once you have the soil prepared, it’s time to plant the seed. Dig a small hole about 5-8 cm deep and place the seed inside. Make sure the seed is oriented with the pointed end facing down. Cover the seed with soil and water it generously. After planting, place the pot or garden bed in a sunny location. Peach trees need at least 6-8 hours of direct sunlight daily to grow well.
Watering
Water the seed thoroughly after planting. Keep the soil moist, but not soggy. Over-watering can lead to root rot, so it’s essential to maintain the right moisture balance. A well-draining container is key to preventing excess water from accumulating.
Step 4: Care for the Seedling
Once the seed is planted, you’ll need to care for the seedling to ensure it grows strong and healthy.
Temperature
Peach seeds need a warm environment to sprout. Keep the temperature between 21-24°C (70-75°F). If you are growing your seed indoors, place the pot in a warm location, such as near a sunny windowsill or under a grow light. Outdoor temperatures in spring and summer will generally provide the warmth the seedling needs.
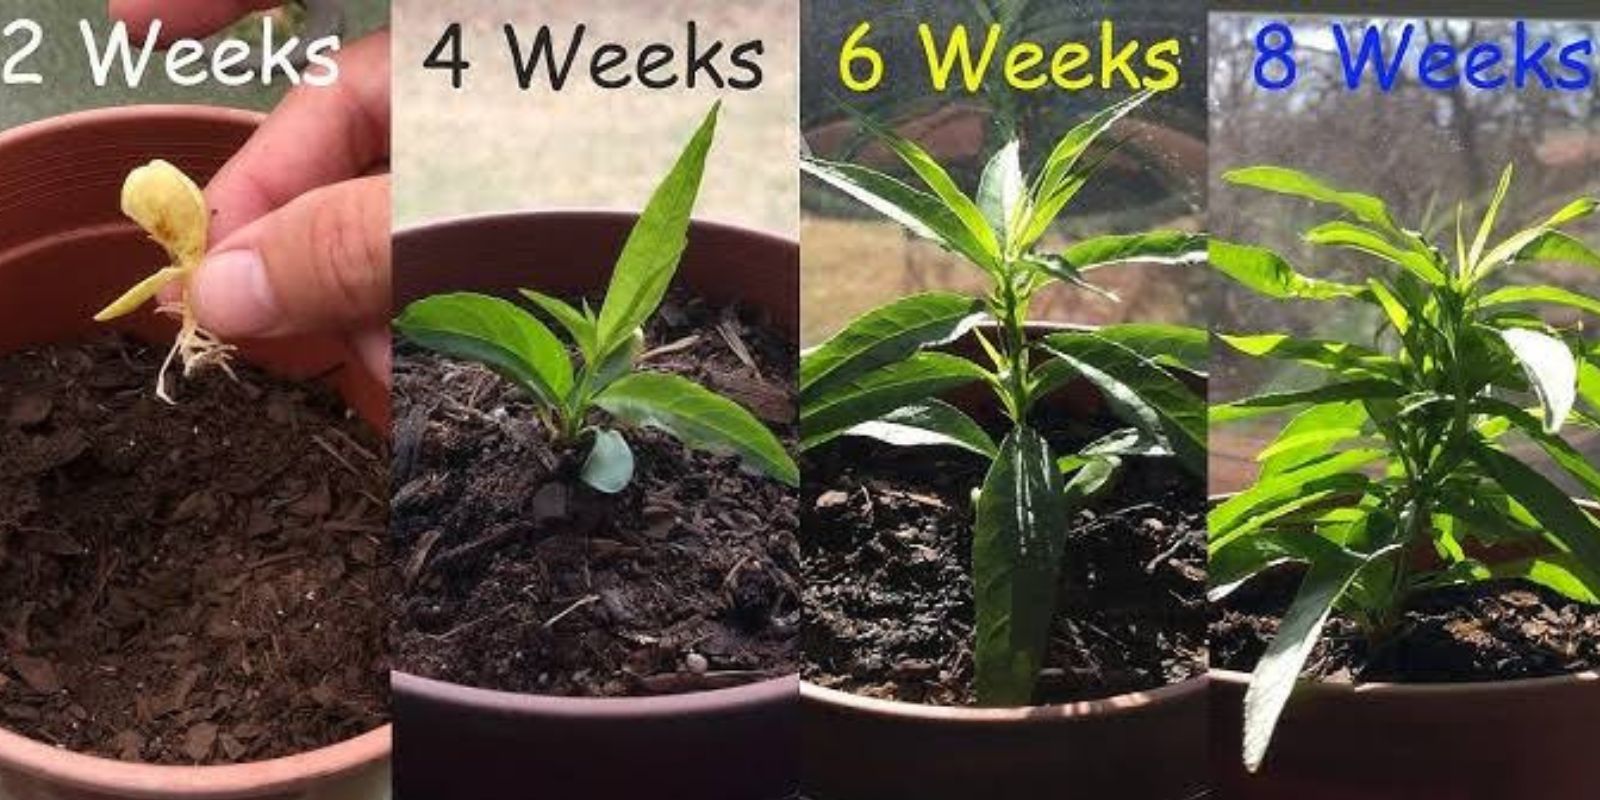
Germination Time
Germination can take anywhere from a few weeks to several months. Be patient, as it’s not uncommon for peach seeds to take longer to sprout. Keep the soil consistently moist but not soggy, and make sure the seed gets plenty of sunlight. If the seed has not sprouted after a few months, it’s worth checking to see if it has rotted or if conditions need to be adjusted.
Growing the Seedling
Once the seed germinates, you will see a small seedling begin to emerge. Continue providing plenty of sunlight and water. As the seedling grows, you may need to transfer it to a larger pot to ensure that the roots have enough space to develop. Be sure to keep the soil moist, but allow the top layer to dry out slightly between waterings.
Step 5: Transplanting the Seedling
After a few months of growth, your seedling will likely be ready for transplanting. Here’s how to do it:
When to Transplant
You can transplant the seedling into a larger pot or directly into your garden once it reaches a few centimeters in height and has developed a strong root system. The best time to transplant is in spring, after the last frost. This ensures that the tree has enough time to acclimate before the warmer summer months.
Transplant Location
Choose a sunny, well-drained spot for transplanting your peach tree. Peach trees need full sunlight, so pick a location where they will get 6-8 hours of sun each day. If you’re transplanting into the ground, ensure that the soil is loose and well-draining, as peach trees do not thrive in heavy, clay-like soils.
Step 6: Long-Term Care and Maintenance
Now that your peach tree is transplanted, it’s time to provide the long-term care necessary to help it grow strong and healthy.
Watering
Water your peach tree regularly, especially during dry spells. Young trees need consistent moisture, but be careful not to over-water. Peach trees do not like their roots to sit in water, so make sure the soil drains well. As the tree matures, you can reduce the frequency of watering.
Fertilization
Fertilize your peach tree during the growing season with a balanced fertilizer. Use a slow-release fertilizer or an organic option to provide essential nutrients. Apply the fertilizer in the spring and again in mid-summer to promote healthy growth and fruit production.
Pruning
Pruning is important to ensure that the tree develops a strong structure. Regularly trim any dead or weak branches, and train the tree to grow in a shape that is conducive to good airflow and fruit production. You may also need to thin the tree in later years to ensure that it can support the weight of the fruit.
Patience and Reward
Growing a peach tree from a seed takes time and dedication, but with patience, the reward is sweet. In a few years, you will be able to enjoy fresh, homegrown peaches straight from your garden. Remember that each step in the process—from preparing the seed to transplanting and nurturing the young tree—is an opportunity to learn and grow as a gardener.
With proper care, your peach tree will thrive, and you will be able to reap the benefits of your hard work. Happy gardening!
#PeachTree #GardeningTips #HomegrownFruit #SeedToTree #GardeningJourney #FruitTree #OrganicGardening #GardeningCommunity