
If you’ve ever enjoyed a juicy, sweet nectarine and wondered if you could grow your own tree, the good news is: you absolutely can! Growing a nectarine tree from seed is a simple, cost-effective way to start a fruit tree in your garden, and it’s a project that anyone can try—whether you’re an experienced gardener or a complete beginner.
Not only does growing a nectarine tree from seed allow you to produce your own delicious fruits, but it also brings the joy of watching your tree grow from a tiny seedling to a full-grown fruit tree. In this article, we’ll walk you through the entire process of growing a nectarine tree from seed, from extracting the seed to transplanting your tree into the ground.
Why Grow a Nectarine Tree from Seed?
Before we dive into the how-to steps, you might be wondering why you should grow a nectarine tree from seed instead of purchasing a young tree from a nursery. There are a few reasons why growing a nectarine tree from seed is a great choice:
- Cost-Effective: Growing a tree from seed is free, and all it takes is the fruit from your kitchen or a few nectarines from a grocery store. You can save a lot of money compared to purchasing a sapling from a nursery.
- Fun and Educational: Growing fruit trees from seed is a fun and educational experience. Watching the tree grow and develop will teach you about plant biology and patience. It’s also a great project for kids or anyone interested in learning more about gardening.
- Unique Trees: While trees grown from seed may take a few years to bear fruit, they can offer you unique, one-of-a-kind trees with different fruit characteristics. You might even end up with a tree that produces nectarines with slightly different flavors or sizes.
- Sustainability: Starting a nectarine tree from seed is a step toward growing your own food and becoming more self-sufficient. Plus, it helps reduce the need for store-bought saplings and plastic packaging, making it a more sustainable option for gardeners.
Step-by-Step Guide to Growing a Nectarine Tree from Seed
Now that you’re convinced, let’s get started! Below is a step-by-step guide to growing a nectarine tree from seed for free.
Step 1: Gather Your Materials
Before you begin, you’ll need the following materials:
- A ripe nectarine (preferably organic)
- A small knife or nutcracker (to crack open the pit)
- A paper towel or coffee filter
- A zip-top plastic bag or container
- A pot with well-draining soil (for later)
- Water and a bright location (for growing)
Step 2: Extract the Seed
The first step in growing a nectarine tree from seed is to extract the seed from the nectarine. Here’s how you do it:
- Pick a Ripe Nectarine: Choose a nectarine that is ripe and ready to eat. The fruit should be juicy and sweet, with no bruises or imperfections.
- Cut the Fruit: Slice the nectarine in half, and remove the pit (the stone inside the fruit). Be careful not to damage the pit when cutting.
Step 3: Clean and Dry the Seed
After you’ve removed the seed from the fruit, it’s important to clean it thoroughly to remove any leftover fruit flesh. Here’s how to do it:
- Clean the Seed: Use warm water to clean off any remaining fruit pulp from the pit. You can gently scrub it with your fingers or a soft cloth to ensure all residue is gone.
- Dry the Seed: Allow the seed to dry completely for a couple of days. This will help prevent mold growth and make it easier to crack the seed open in the next step.
Step 4: Stratify the Seed (Cold Treatment)
Nectarine seeds, like many fruit tree seeds, require a period of cold stratification to break dormancy and stimulate germination. This mimics the natural winter conditions the seed would experience in the wild. Here’s how to stratify your nectarine seed:
- Wrap the Seed in a Paper Towel: Take a damp paper towel and wrap it around the seed. Make sure the towel is moist, but not soaking wet.
- Place the Seed in a Plastic Bag or Container: After wrapping the seed, place it in a zip-top plastic bag or an airtight container. Seal it to create a moist environment.
- Refrigerate the Seed: Put the bag or container in your refrigerator for about 4 to 6 weeks. During this time, the seed will undergo stratification, which will prepare it for germination.
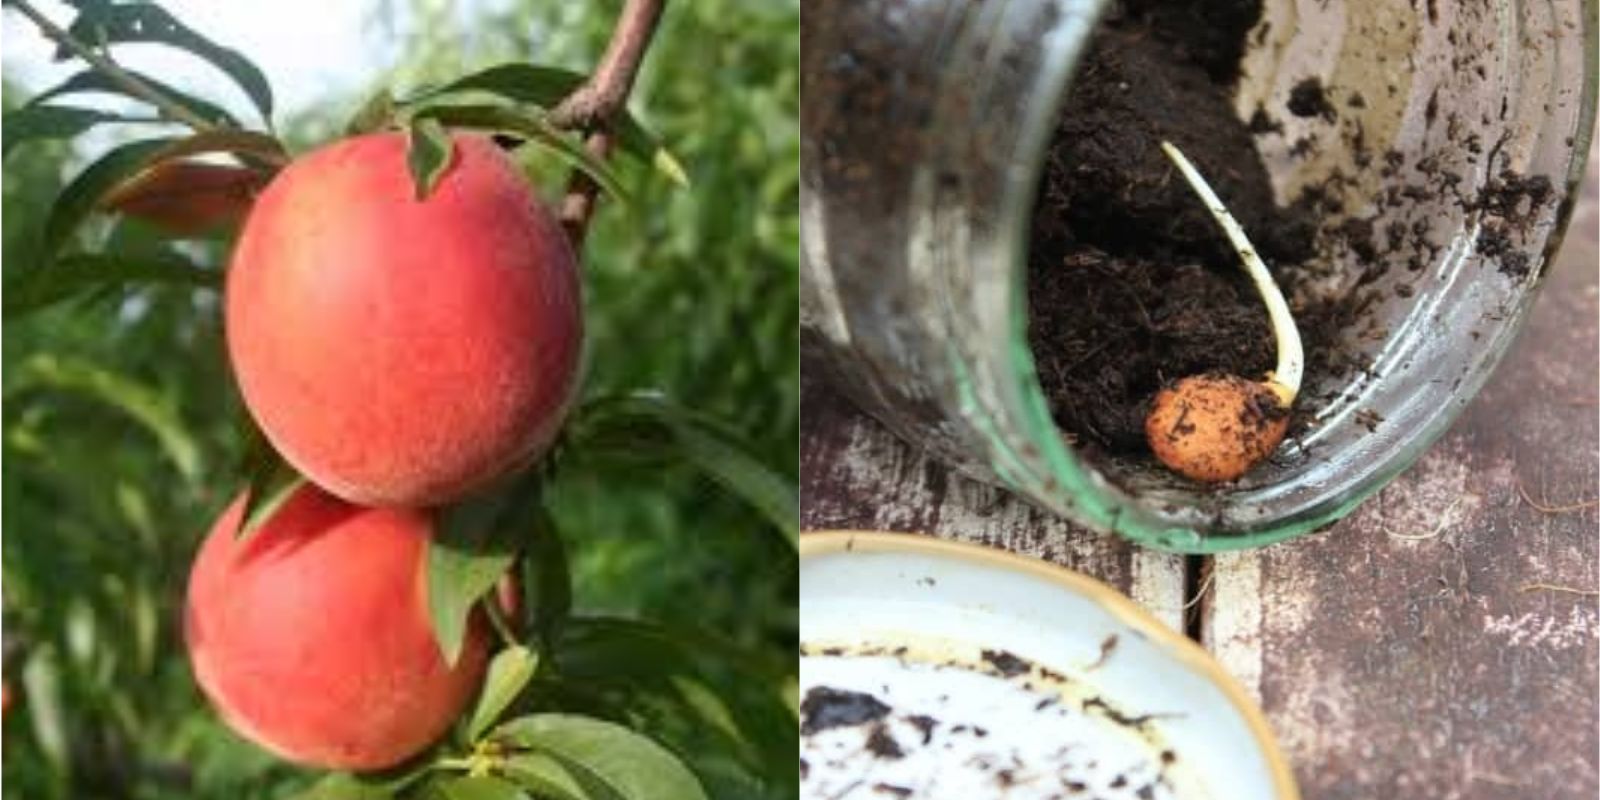
Step 5: Crack Open the Seed
After the cold stratification period is over, the seed will be ready to be planted. But before you plant it, you need to crack open the hard pit to reveal the actual seed inside. Here’s how:
- Crack the Pit Open: Use a small knife, nutcracker, or even a hammer to gently crack the hard pit. Be careful not to crush the seed inside. You should end up with a small, almond-like seed.
- Remove the Seed: Once the pit is cracked, remove the inner seed. It should be soft and slightly brownish, and now you’re ready to plant it.
Step 6: Plant the Seed
Now that you’ve prepared the seed, it’s time to plant it. Here’s what you need to do:
- Fill a Pot with Well-Draining Soil: Choose a small pot (about 4-6 inches in diameter) and fill it with well-draining soil, such as a potting mix designed for seed starting or a mixture of sand and compost.
- Plant the Seed: Place the seed about 1 inch deep into the soil and cover it gently with soil. Make sure the seed is positioned with the pointed side facing down, as this is the side that will sprout first.
- Water the Soil: Gently water the soil to moisten it, but make sure it’s not soggy. The soil should remain consistently moist, but not waterlogged.
- Place in a Bright Location: Set the pot in a warm, bright location with indirect sunlight. The seed will need light to help it germinate, but direct sunlight may be too intense for the tiny seedling.
Step 7: Wait for Germination
Patience is key at this stage! The seed will take time to germinate, typically around 2 to 3 weeks, though it can sometimes take longer.
- Monitor the Seed: Keep an eye on the pot and ensure the soil remains moist but not waterlogged. You can cover the pot with a plastic wrap or clear lid to maintain humidity and warmth, but make sure it has some ventilation to avoid mold.
- Look for Signs of Growth: When the seed begins to sprout, you’ll see a small green shoot pushing up through the soil. This is the beginning of your nectarine tree!
Step 8: Transplant the Seedling
Once your seedling is large enough (around 3-4 inches tall) and has developed a few leaves, it’s time to transplant it.
- Choose a Larger Pot: If you plan to keep the tree in a pot for now, transplant it into a larger container with drainage holes. You can also plant it in your garden if you live in a suitable climate.
- Plant in Full Sun: Nectarine trees need full sun to grow well. Make sure to place your tree in an area where it will receive at least 6-8 hours of sunlight daily.
- Water and Care: Keep watering your tree regularly, and be sure to fertilize it once it’s established to encourage healthy growth.
Step 9: Care for Your Tree
As your tree grows, continue to care for it by pruning and watching out for pests. Keep an eye on the health of the tree, and in a few years, you may be able to harvest your very own homegrown nectarines!
Conclusion
Growing a nectarine tree from seed is a fun and rewarding gardening project that requires patience, dedication, and a little bit of know-how. While it might take a few years before your tree produces fruit, you’ll be able to enjoy the process of nurturing it from seed to tree. Plus, there’s nothing quite like the satisfaction of eating a nectarine grown by your own hands.
So, why not give it a try? You can start your nectarine tree from seed for free and enjoy the rewards of homegrown fruit in the future! Happy gardening!