
Lemon trees are not only a beautiful addition to any garden, but they also provide fresh, tangy fruit that can be used in a variety of recipes and drinks. If you’ve ever dreamed of having your own homegrown lemons, there’s a simple way to start your journey: growing a lemon plant from a cutting in a potato.
Using a potato to root a lemon cutting is an innovative gardening technique that makes it easy to propagate your favorite citrus tree. The method works by utilizing the potato’s natural moisture and nutrients, which help stimulate root growth in the cutting. This article will guide you step by step through the process of propagating a lemon plant from a cutting in a potato, providing you with all the tips and tricks you need for success.
Why Grow a Lemon Tree from a Cutting?
Before we dive into the step-by-step process, let’s first explore why propagating a lemon tree from a cutting is such a great idea.
- Cost-Effective: Instead of purchasing a new lemon tree from a nursery, propagating your own from a cutting can save you money while still giving you a healthy plant.
- Faster Results: Starting from a cutting allows you to skip the seed germination process, meaning you’ll have a tree that’s already growing faster than one started from seed.
- Maintain Traits: When you propagate from a cutting, the new plant will be genetically identical to the parent tree, meaning it will have the same characteristics, such as fruit flavor and tree size.
- Fun and Educational: Plant propagation is an enjoyable process that can teach you more about how plants grow and reproduce. Plus, it’s a fun way to watch a new tree take root and thrive right before your eyes!
The Benefits of Using a Potato for Rooting
You might be wondering, “Why use a potato?” Well, the potato acts as a natural rooting medium for the lemon cutting, providing several benefits:
- Moisture Retention: Potatoes have a high water content, which helps maintain moisture around the cutting and encourages root growth.
- Nutrient Supply: Potatoes are rich in carbohydrates, which act as a natural source of energy for the cutting. This helps to nourish the roots as they begin to form.
- Stability: Potatoes provide a stable base for the cutting to stand upright, which can prevent the cutting from shifting in the soil or water, ultimately giving it a better chance of success.
By using this simple technique, you’re making the most of nature’s resources to promote healthy, strong roots for your lemon tree.
Materials You Will Need
Before you start, gather the following materials to ensure the success of your lemon propagation project:
- Healthy Lemon Cutting: A 4-6 inch cutting from a mature, healthy lemon tree with at least 2-3 leaves.
- Firm Potato: A large potato with a firm texture. Make sure it’s free from rot or blemishes.
- Sharp Knife: To create a hole in the potato.
- Small Pot or Container: For planting the potato and cutting once the root system begins to form.
- Potting Mix: Well-draining soil to plant the potato and cutting in once it’s rooted.
- Plastic Bag or Clear Plastic Container: To create a greenhouse-like effect and maintain humidity around the cutting.
- Rooting Hormone (Optional): While not necessary, rooting hormone can encourage faster and more successful root development.
- Water: To keep the cutting hydrated during the rooting process.
Step-by-Step Guide to Growing a Lemon Plant from a Cutting in a Potato
Now that you have your materials ready, let’s walk through the steps of propagating a lemon tree from a cutting in a potato.
Step 1: Select and Prepare the Lemon Cutting
Choose a healthy lemon tree for your cutting. The best time to take a cutting is during the spring or early summer when the plant is actively growing.
- Cutting Size: Use a sharp, clean knife or scissors to cut a 4-6 inch piece from the end of a branch. The cutting should be taken from a non-flowering or non-fruiting branch to ensure the best chance of success.
- Remove Excess Leaves: Trim the lower leaves from the cutting, leaving just one or two leaves at the top. This will help prevent the cutting from losing moisture while rooting.
- Optional Rooting Hormone: If you choose to use rooting hormone, dip the bottom of the cutting into the hormone powder. This step can help speed up the rooting process, but it’s not essential.
Step 2: Prepare the Potato
Choose a large, firm potato that’s free from soft spots or blemishes. A larger potato will provide more moisture and nutrients, supporting the cutting for a longer period.
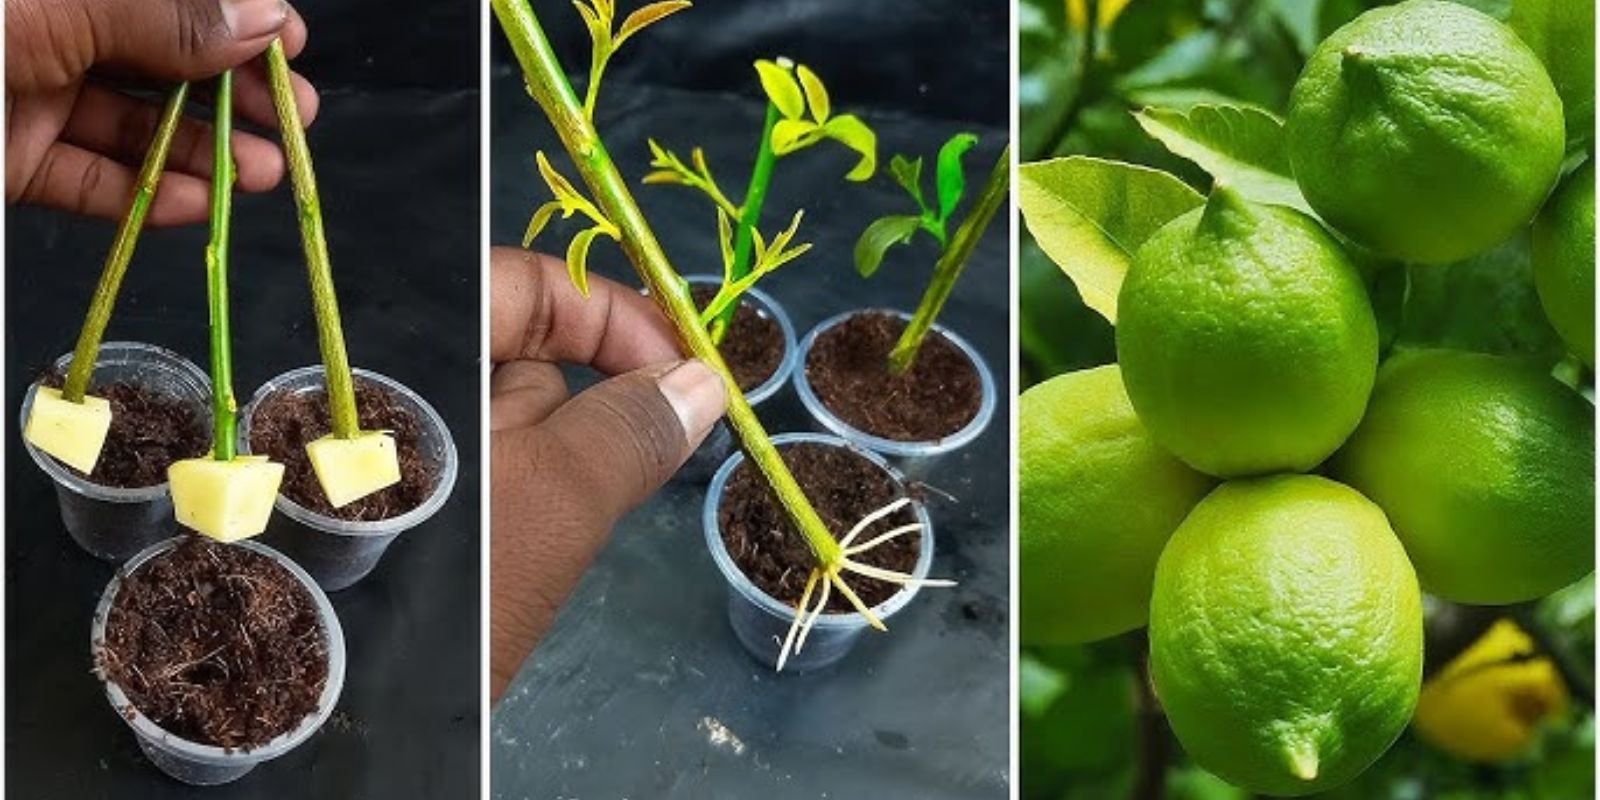
- Create a Hole: Use a sharp knife to create a hole in the center of the potato. The hole should be large enough to snugly fit the bottom of your lemon cutting, but not so large that it doesn’t hold the cutting in place.
- Insert the Cutting: Insert the cutting into the potato, making sure that the cutting is secure. The base of the cutting should sit comfortably inside the potato, ensuring it won’t move around too much.
Step 3: Place the Potato and Cutting in a Pot
Once the cutting is secured in the potato, it’s time to place it in a pot.
- Choose a Small Pot: Select a small container with drainage holes for your cutting. The pot should be large enough to accommodate the potato and cutting but not too large that it allows too much moisture to escape.
- Fill with Soil: Fill the pot with a well-draining potting mix. Leave enough room at the top to place the potato and cutting.
- Insert the Potato: Bury the potato and cutting in the soil so that the potato is mostly submerged, with the top of the cutting exposed above the surface.
Step 4: Create a Humid Environment
Lemon cuttings thrive in a humid environment, which helps to encourage root growth. To create this environment:
- Cover with Plastic: Place a clear plastic bag over the pot or use a clear plastic container to cover the cutting. This will help trap moisture and warmth, mimicking the conditions of a greenhouse.
- Ensure Indirect Light: Place the pot in a location that receives indirect sunlight. Direct sunlight can scorch the cutting, so it’s best to keep it in a warm, but shaded area.
- Maintain Moisture: Keep the soil damp but not soaking wet. The potato will naturally release moisture, so be mindful not to overwater.
Step 5: Wait for Roots to Form
After 2-4 weeks, check the cutting for signs of root growth. During this period, the cutting will begin to develop roots from the base of the stem.
- Observe Growth: Once the cutting has developed a strong root system, you will start to see new growth at the top of the cutting. This is a sign that the plant is successfully rooting and ready for transplantation.
- Care for the Cutting: Continue to keep the cutting in a humid environment and water it regularly to ensure it stays healthy.
Step 6: Transplant the Cutting
Once the cutting has rooted and new growth has appeared, it’s time to transplant it into a larger pot or your garden.
- Choose a Larger Pot: Select a pot that’s large enough to accommodate the growing roots. Make sure it has drainage holes to prevent waterlogging.
- Prepare the Soil: Use a well-draining potting mix to give your new lemon tree the best chance of success.
- Transplant Carefully: Gently remove the potato and cutting from the original pot and place it in the new one. Be careful not to disturb the roots too much.
Conclusion
Propagating a lemon plant from a cutting in a potato is a simple and fun way to grow your own lemon tree at home. With a few easy steps, you can create a new plant that will reward you with fresh lemons for years to come. Not only is this method cost-effective, but it also gives you a chance to experiment with plant propagation and learn about the growth process firsthand.
Give this technique a try, and soon you’ll be the proud owner of a thriving lemon tree that you grew from scratch. Happy gardening!
#LemonTree #PlantPropagation #GardeningTips #DIYGardening #CitrusTree #HomeGardening #GrowYourOwn #GreenThumb #LemonLovers #SustainableGardening #GardeningCommunity #PlantLovers #HealthyPlants