
Introduction
Grafting is a time-honored horticultural technique that allows gardeners to combine different plant varieties into one. When it comes to roses, grafting can produce a single bush with flowers of various colors, creating a visually stunning display. This article will walk you through the detailed steps of grafting a rose bush, explaining the process, tools needed, and tips for success. Whether you’re a novice gardener or an experienced green thumb, this guide will help you enhance your garden with a unique, multicolored rose bush.
Understanding Grafting
Grafting involves joining the tissues of two plants so they grow as one. The plant providing the root system is called the rootstock, while the plant providing the stems and flowers is known as the scion. Successful grafting requires careful selection and precise technique to ensure the two plants integrate seamlessly.
Benefits of Grafting Roses
- Diverse Colors: Combining multiple rose varieties on a single bush offers a colorful array of blooms.
- Increased Resilience: Grafting can improve disease resistance by using a hardy rootstock.
- Enhanced Growth: A strong rootstock can promote better growth and flowering in the scion.
- Space Efficiency: Enjoy multiple rose varieties in a small space by grafting them onto one bush.
Tools and Materials Needed
- Sharp grafting knife or blade
- Grafting tape or rubber bands
- Rootstock (a healthy rose bush)
- Scions (healthy branches from different rose varieties)
- Pruning shears
- Sterilizing solution (to disinfect tools)
Steps to Graft a Rose Bush
- Choose the Rootstock:
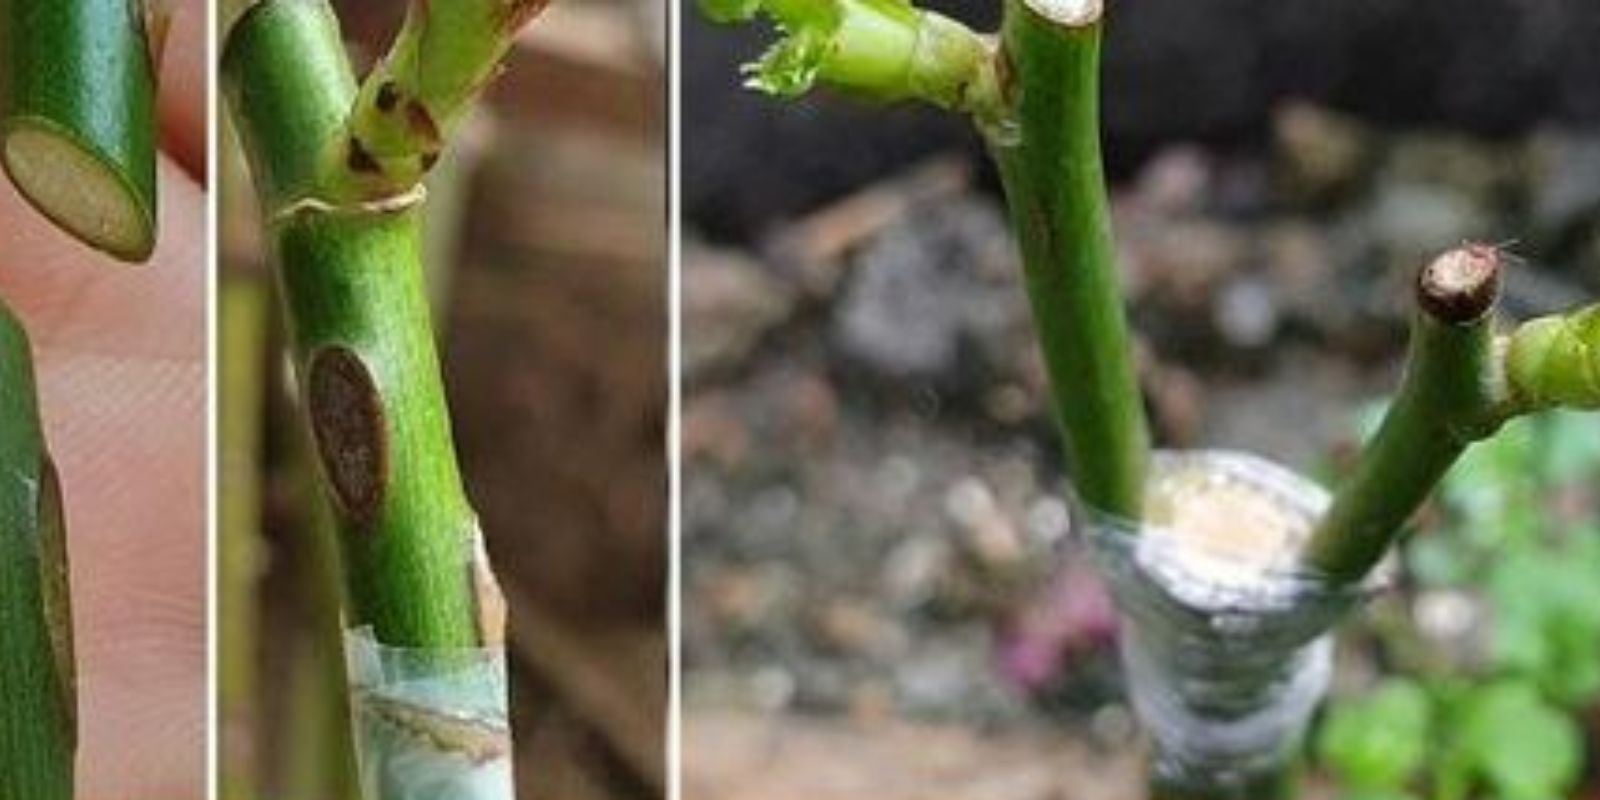
Select a healthy, robust rose bush as your rootstock. The rootstock should be well-established with a strong root system to support the new growth. - Prepare the Scions:
Select branches from the rose varieties you want to graft. Each branch, or scion, should have at least 3-4 healthy buds. Cut these scions from the parent plants using pruning shears sterilized with a disinfecting solution to prevent disease transmission. - Make the Incision on the Rootstock:
Choose a smooth, straight section on the rootstock’s stem, about 6 inches above the ground. Make a T-shaped cut with your grafting knife: a horizontal cut about an inch long and a vertical cut intersecting it, about 2 inches long. Carefully peel back the bark flaps created by this cut. - Prepare the Scion for Insertion:
Trim the bottom end of the scion into a wedge shape, about an inch long. This wedge should fit snugly into the T-cut on the rootstock. - Insert the Scion:
Gently insert the wedge-shaped end of the scion into the T-cut on the rootstock. The cambium layers (the green tissue just under the bark) of the scion and rootstock should be aligned to ensure successful fusion. - Wrap and Secure the Graft:
Once the scion is in place, wrap the grafted area with grafting tape or a rubber band to hold the scion securely against the rootstock. Ensure that the graft is tight enough to stay in place but not so tight that it restricts growth. - Protect the Graft:
To protect the graft from environmental stressors, consider wrapping the grafted area with a plastic bag or placing a plastic bottle with the bottom cut off over it. This creates a mini-greenhouse effect, maintaining humidity and temperature around the graft. - Care for the Grafted Plant:
Water the grafted rose bush regularly, ensuring the soil stays moist but not waterlogged. Place the plant in a location where it gets partial sunlight, avoiding intense direct sunlight that can stress the graft. Over time, gradually acclimate the grafted plant to more sunlight.
Tips for Successful Grafting
- Timing: The best time to graft roses is in early spring or late winter when the plant is emerging from dormancy. This is when the sap flow is starting, which helps the graft take.
- Tool Sterilization: Always sterilize your tools before making cuts to prevent the spread of diseases.
- Humidity and Temperature: Maintain consistent humidity and temperature around the grafted area to promote successful integration.
- Monitoring: Regularly check the graft for signs of successful union or any issues. If the graft takes, you’ll notice new growth from the scion within a few weeks.
- Patience: Grafting is a delicate process that requires patience. Give the plant time to heal and the graft to establish before expecting full blooms.
Troubleshooting Common Grafting Issues
- Graft Failure: If the graft fails to take, it may be due to misalignment of the cambium layers or improper wrapping. Ensure that the scion and rootstock are properly aligned and secure.
- Infection: Infections can occur if tools are not properly sterilized. Always disinfect tools before use and monitor the graft site for any signs of disease.
- Environmental Stress: Extreme temperatures or lack of humidity can stress the graft. Use protective coverings and maintain a stable environment around the grafted area.
Conclusion
Grafting a rose bush to produce flowers of different colors is a rewarding horticultural technique that can transform your garden into a vibrant, multicolored display. By following the detailed steps outlined in this guide, you can successfully graft roses and enjoy the beauty and diversity of multiple rose varieties on a single plant. Embrace the art of grafting and create a stunning, unique rose bush that will be the envy of your neighborhood. With patience, care, and attention to detail, your grafted rose bush will thrive, offering a spectacular array of blooms season after season. Start your grafting journey today and unlock the full potential of your garden.