
Pine trees are some of the oldest and most enduring trees on the planet, known for their towering height, fragrant needles, and iconic pine cones. While pine cones may seem like simple structures, they house some of the most resilient and fascinating seeds. Germinating pine cone seeds can be a rewarding and engaging gardening project. However, the process of germination isn’t always as straightforward as planting other types of seeds, as pine seeds have unique needs for successful growth. In this comprehensive guide, we’ll walk you through the essential steps to germinate pine cone seeds, from collecting the cones to caring for the young seedlings.
Understanding Pine Cone Seeds
Before diving into the germination process, it’s important to understand the basic nature of pine cone seeds. Pine trees, like all conifers, reproduce using cones. These cones contain seeds that are dispersed into the environment through wind or animal activity. Most pine species produce two types of cones: male and female cones. The female cones are the ones that contain seeds.
Pine seeds vary greatly depending on the species. While some are very small and require a specific set of conditions to germinate, others are larger and may have more straightforward needs. The key to successful germination is mimicking the conditions that nature provides for these seeds.
Step 1: Collecting Pine Cones
The first step in germinating pine cone seeds is to collect the cones. The best time to collect pine cones is in the fall, when they are mature. Look for cones that are closed, as they have not yet released their seeds. Pine cones can remain closed for months or even years before releasing seeds, depending on the species and environmental conditions.
- Choose mature cones: These are typically brown or grayish and may be slightly open at the tips. They will release seeds if exposed to the right conditions.
- Select the right species: If you’re aiming to germinate seeds from a particular pine species, identify the tree and ensure you collect cones from the correct species.
- Collect with care: Pine cones can be prickly and may contain sap. Use gloves or tongs to avoid getting sap on your hands.
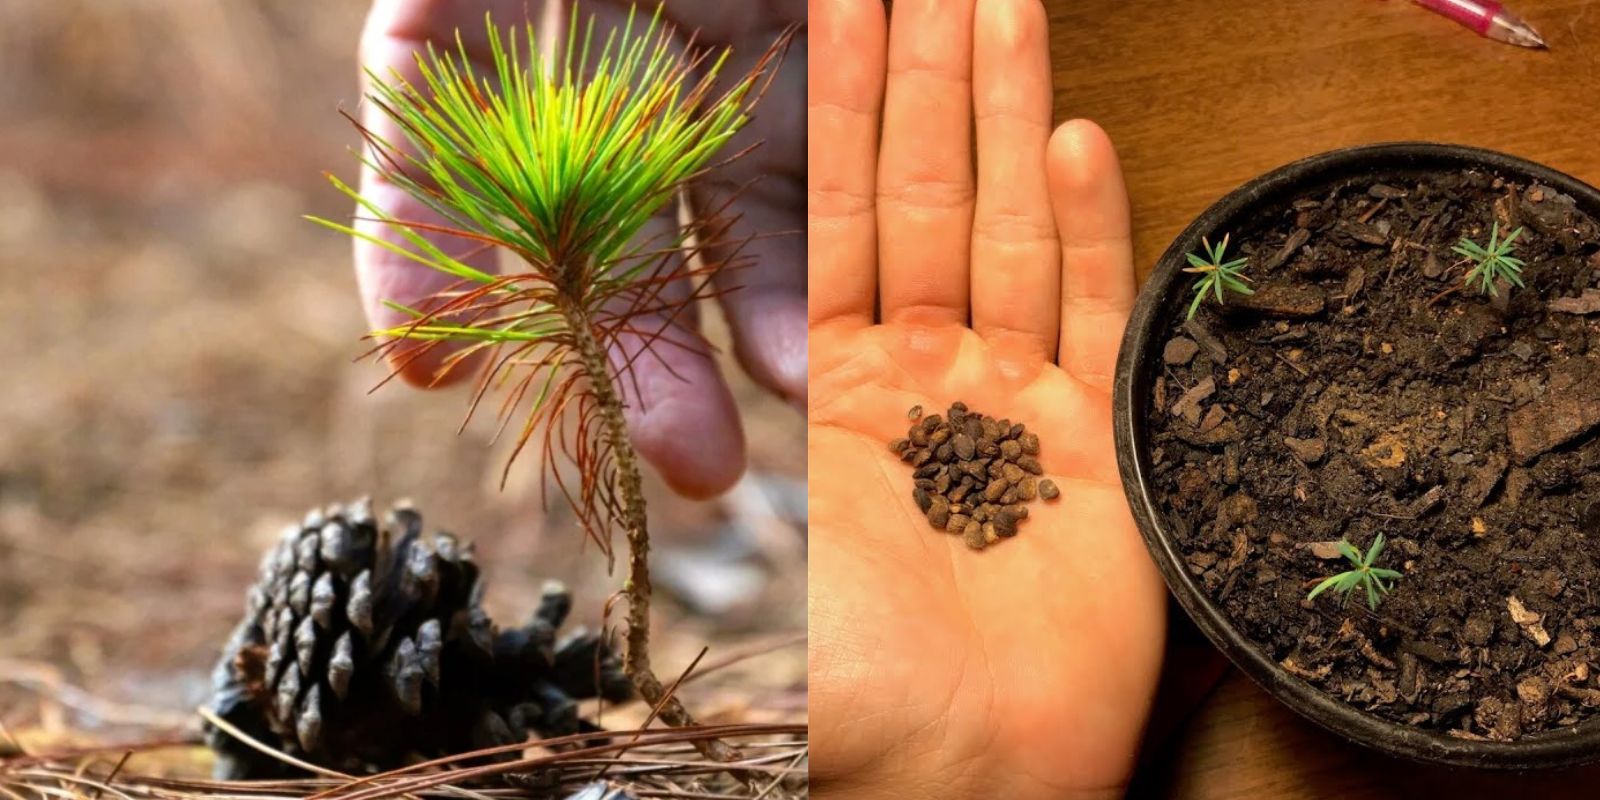
Step 2: Extracting the Seeds from Pine Cones
Once you have collected your pine cones, it’s time to extract the seeds. This step may take a little patience, but it’s vital for successful germination.
- Drying the cones: Lay your pine cones on a flat surface and allow them to dry out completely. This may take several days to weeks, depending on the moisture content of the cones. As the cones dry, they will naturally open, releasing the seeds inside.
- Removing seeds: Once the cones are open, gently tap or shake the cones to release the seeds. Some species of pine cones may have seeds that are difficult to extract, so you may need to carefully pry open the scales of the cone with your fingers or a tool. Be sure to handle the seeds gently to avoid damaging them.
- Inspecting the seeds: Pine seeds are generally flat and oval-shaped. Inspect them for damage or signs of rot. Healthy seeds should have a hard, dark outer shell. Remove any seeds that appear shriveled or damaged, as they are unlikely to germinate.
Step 3: Stratifying the Pine Seeds
Pine seeds, like many other coniferous seeds, require a period of cold treatment known as stratification to mimic winter conditions. This process is necessary to break the seed’s dormancy and encourage germination.
- Cold stratification: Place the seeds in a plastic bag with some damp peat moss or vermiculite. Seal the bag and place it in the refrigerator for 30 to 60 days. This cold period simulates winter, which is crucial for the seeds to “wake up” and begin germinating.
- Check periodically: Every few weeks, check the seeds for signs of mold or rot. If you notice any issues, discard the affected seeds and refresh the peat moss or vermiculite.
Step 4: Preparing the Planting Environment
While the seeds are stratifying, it’s important to prepare your planting environment. Pine seedlings require a specific set of conditions for successful growth.
- Choose the right container: Select a shallow container, such as a seed tray or a shallow pot, with drainage holes. Pine seeds don’t like to sit in waterlogged soil, so proper drainage is key.
- Use well-draining soil: Pine seeds require soil that drains well but retains some moisture. A mixture of sand, peat, and perlite can provide the ideal environment for germinating pine seeds. You can also use a store-bought seed-starting mix with added sand to improve drainage.
- Ensure proper temperature: Once the seeds have completed their cold stratification, it’s time to sow them. Pine seeds generally germinate best at temperatures between 65°F to 70°F (18°C to 21°C). You can place the containers in a warm spot, such as near a sunny windowsill, but avoid direct sunlight, which can dry out the seeds.
Step 5: Sowing Pine Seeds
Once your seeds have undergone stratification and your planting environment is prepared, it’s time to plant the seeds. Here’s how to sow pine seeds:
- Sow the seeds: Spread the seeds evenly across the surface of the soil in the container. Do not bury them too deeply—pine seeds require light for germination. Press them gently into the soil, but leave them exposed on the surface.
- Water carefully: After sowing the seeds, gently water the soil to moisten it. Keep the soil consistently damp but not soggy. Too much water can cause the seeds to rot, while too little can prevent germination.
- Provide humidity: Cover the seed tray with a clear plastic lid or plastic wrap to create a humid environment. This helps maintain the moisture levels and encourages germination.
- Maintain proper light: While pine seeds do not require direct sunlight for germination, they do need light to sprout. Place your container in a bright room, but not in direct sunlight. A windowsill with indirect light is ideal.
Step 6: Germinating the Seeds
After sowing, patience is key. Pine seeds can take anywhere from a few weeks to a few months to germinate. Here’s what to do while waiting:
- Keep the soil moist: Check the soil regularly and water as needed to keep it damp. Be careful not to overwater, as this can lead to fungal issues.
- Provide gentle warmth: Pine seeds need warmth to trigger germination. If you have a seedling heat mat, you can use it to maintain a consistent temperature. If not, simply ensure that the seeds are in a warm area of your home.
- Be patient: Germination can take time. Some seeds may sprout in a few weeks, while others may take longer. Once the seeds sprout, you will see small green shoots emerging from the soil.
Step 7: Caring for Pine Seedlings
Once your pine seeds have germinated, they need proper care to grow into healthy seedlings. Here’s how to care for your young pine trees:
- Provide adequate light: As the seedlings grow, they will need more light to develop strong stems and leaves. If they do not receive enough light, they may become leggy and weak. Place them in a sunny spot or under grow lights.
- Water regularly: Keep the soil moist but not waterlogged. As the seedlings grow, they will require slightly more water, but be sure to avoid overwatering.
- Transplant when ready: Once the seedlings have grown large enough to handle, you can transplant them into larger pots or directly into your garden. Be sure to acclimate them slowly to outdoor conditions if you’re moving them outside.
Step 8: Transplanting Pine Seedlings Outdoors
After the pine seedlings have developed a few sets of true leaves, it’s time to prepare for transplanting. Choose a location with well-drained soil and ample sunlight, as pine trees typically thrive in full sun and well-drained soil. Make sure to transplant them during the spring or fall to avoid extreme temperatures.
Conclusion
Germinating pine cone seeds can be a fun and rewarding process, though it requires patience and careful attention to detail. By following the steps outlined above, you’ll have a better chance of successfully growing your own pine trees from seed. Whether you’re looking to start a small forest in your backyard or simply enjoy the beauty of pine trees, this process can connect you with nature in a meaningful way. Happy gardening!