
Gardening enthusiasts and beginners alike often find themselves grappling with the question of how to effectively fill a deep raised bed. While the concept may seem daunting, creating a productive growing space doesn’t have to be a costly or complicated endeavor. In this guide, we’ll explore cost-effective methods and practical strategies to fill your deep raised bed with ease, ensuring you can cultivate a thriving garden without breaking the bank.
Understanding the Benefits of Deep Raised Beds
Before diving into the how-to, it’s essential to understand why deep raised beds are a valuable addition to any garden. Here are a few key benefits:
- Improved Drainage: Deep raised beds promote better drainage, preventing waterlogged soil and reducing the risk of root rot.
- Enhanced Soil Quality: They allow for the creation of ideal soil conditions, as you can customize the soil mix to suit your plants’ needs.
- Less Soil Compaction: With a raised bed, you avoid walking on the soil, which helps maintain its structure and aeration.
- Extended Growing Season: The elevated soil warms up faster in the spring, allowing for earlier planting and extended growing periods.
- Accessible Gardening: Raised beds are easier on the back and knees, making gardening more accessible for individuals with mobility issues.
With these benefits in mind, let’s explore how to fill your deep raised bed without spending a fortune.
Step-by-Step Guide to Filling Your Deep Raised Bed
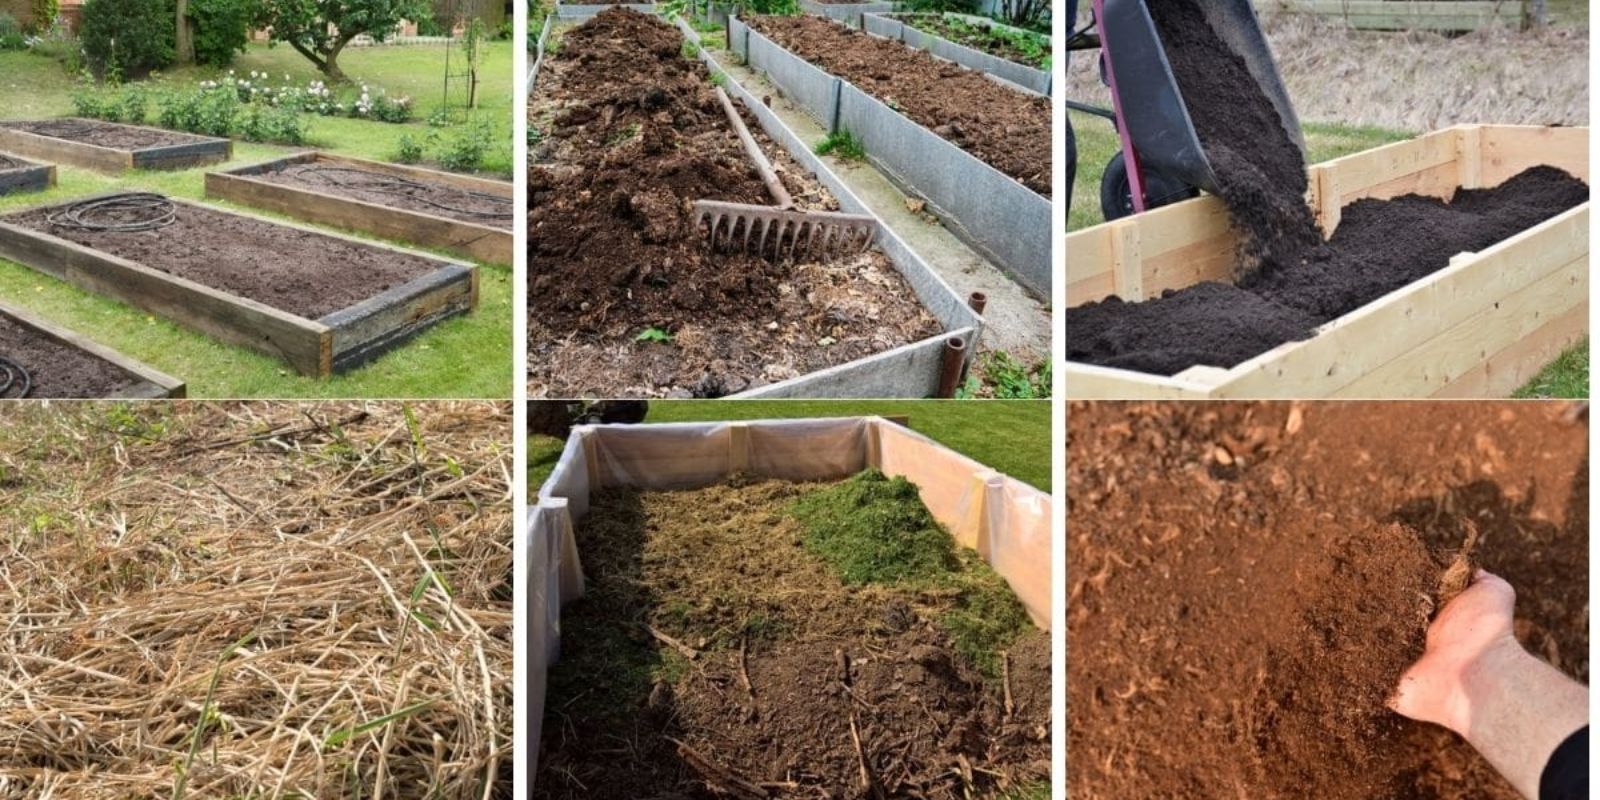
1. Gather Your Materials
The first step in filling your deep raised bed is to gather the right materials. Here’s a list of options you can use:
- Brown Materials: Dried leaves, straw, cardboard, or wood chips are excellent for creating a carbon-rich base.
- Green Materials: Grass clippings, vegetable scraps, and garden waste add nitrogen and promote decomposition.
- Soil: Quality topsoil, compost, or a soil mix is essential for the upper layer where your plants will grow.
- Water: A watering can or hose to moisten the materials as you build.
Tip: Look for materials you already have at home or in your garden to keep costs low!
2. Create the Base Layer
The foundation of your raised bed is crucial for ensuring good drainage and soil structure. Start by layering larger, bulkier items at the bottom:
- Logs and Branches: Use untreated wood to fill the bottom of your raised bed. This not only saves on soil but also creates a habitat for beneficial organisms and enhances drainage.
- Cardboard: Lay down a layer of cardboard on top of the logs to suppress weeds and provide a barrier. Make sure to moisten it to aid decomposition.
3. Add Green Materials
Once your base layer is established, it’s time to introduce green materials. These items are rich in nitrogen and are vital for the composting process:
- Grass Clippings: Fresh grass clippings are an excellent source of nitrogen. Spread a layer on top of the cardboard.
- Kitchen Scraps: Vegetable peels, fruit scraps, and coffee grounds can be added. Avoid adding meat or dairy products, as they can attract pests.
Tip: Layer green materials with brown materials for balanced decomposition.
4. Incorporate Brown Materials
After adding your green materials, it’s essential to include brown materials to balance the nitrogen content:
- Dried Leaves: If you have fallen leaves from the previous autumn, they make excellent brown material.
- Straw or Hay: These materials are lightweight and break down slowly, providing structure to your bed.
Layering: Alternate layers of green and brown materials to create a balanced mix. Aim for about a 2:1 ratio of browns to greens.
5. Top It Off with Soil
Once you’ve layered your materials, it’s time to add the top layer where your plants will thrive:
- Quality Topsoil or Compost: Choose a high-quality soil mix that provides essential nutrients for your plants. You can create a mix of 50% topsoil and 50% compost for the best results.
Tip: Fill the bed to about 1 inch from the top to allow space for watering without overflow.
6. Water the Layers
After filling your raised bed, thoroughly water the materials to help settle them and kickstart the decomposition process. This step is crucial for creating a nutrient-rich environment for your plants.
- Moisten Gradually: Start at the bottom and work your way up, ensuring that each layer is adequately moistened.
7. Let It Rest
Before planting, it’s important to allow your raised bed to rest for a few weeks. This resting period allows the materials to break down, heat up, and create a rich growing environment.
- Monitor the Temperature: Check the soil temperature; ideally, it should reach around 60°F (15°C) before planting.
8. Plant Your Seeds or Seedlings
Once the bed has rested and the materials have decomposed, it’s time to plant your seeds or seedlings!
- Choose Compatible Plants: Select plants that thrive in your climate and growing conditions. Consider companion planting to maximize your space and yield.
9. Maintenance and Care
To ensure your deep raised bed remains productive, follow these maintenance tips:
- Mulching: Apply a layer of organic mulch on top of the soil to retain moisture, suppress weeds, and regulate temperature.
- Regular Watering: Keep an eye on the moisture levels and water regularly, especially during dry spells.
- Fertilization: Depending on your plants’ needs, consider adding organic fertilizers or compost throughout the growing season.
10. Harvesting
Enjoy the fruits (or vegetables) of your labor! Proper care will lead to a bountiful harvest, allowing you to reap the benefits of your deep raised bed.
Conclusion
Filling a deep raised bed doesn’t have to be a labor-intensive or expensive task. With these simple, budget-friendly steps, you can create a productive growing environment that yields an abundant harvest. By utilizing materials you have at home and incorporating organic waste, you’ll not only save money but also contribute to a more sustainable gardening practice.
So, roll up your sleeves, gather your materials, and get ready to enjoy the benefits of a flourishing garden with your newly filled deep raised bed!
Final Thoughts
Are you ready to fill your deep raised bed and kickstart your gardening journey? Share your experience and any additional tips you may have for creating the perfect growing space! Let’s cultivate a community of passionate gardeners who support each other in our green endeavors.
Happy gardening! 🌱✨
By following this comprehensive guide, you can achieve a thriving garden that provides not only food but also joy and fulfillment throughout the growing season!