
Building a raised garden bed is one of the best ways to grow healthy, thriving plants. Raised beds offer better drainage, warmer soil, and reduced soil compaction. They are perfect for gardening in small spaces or areas with poor soil. However, one challenge many gardeners face is how to fill these deep raised beds in a cost-effective way without spending a fortune on store-bought soil and compost.
In this article, we will explore how you can fill a deep raised bed cheaply and easily using simple, sustainable methods. Whether you are a beginner gardener or a seasoned pro, these tips will help you save money while ensuring your plants have the best possible environment to grow. Let’s dive into these practical and budget-friendly methods for filling your raised bed!
Why Use Raised Beds?
Before we get into the specifics of filling a raised bed, let’s first explore why raised beds are such a popular choice for gardeners:
- Improved Soil Drainage: Raised beds prevent waterlogging by allowing excess water to drain more easily. This is especially beneficial for plants that require well-drained soil.
- Better Control Over Soil Quality: Raised beds allow you to create the perfect soil mix for your plants. You can choose high-quality soil to support healthy growth, without worrying about poor, rocky, or contaminated ground.
- Warmer Soil: Raised beds warm up faster in the spring compared to traditional garden soil, which allows for earlier planting and a longer growing season.
- Easier Access: Raised beds reduce the need for bending over or kneeling, making them ideal for people with mobility issues.
- Weed Control: A well-maintained raised bed can be easier to manage in terms of weed control, especially if you use a weed barrier at the bottom.
Challenges of Filling a Raised Bed
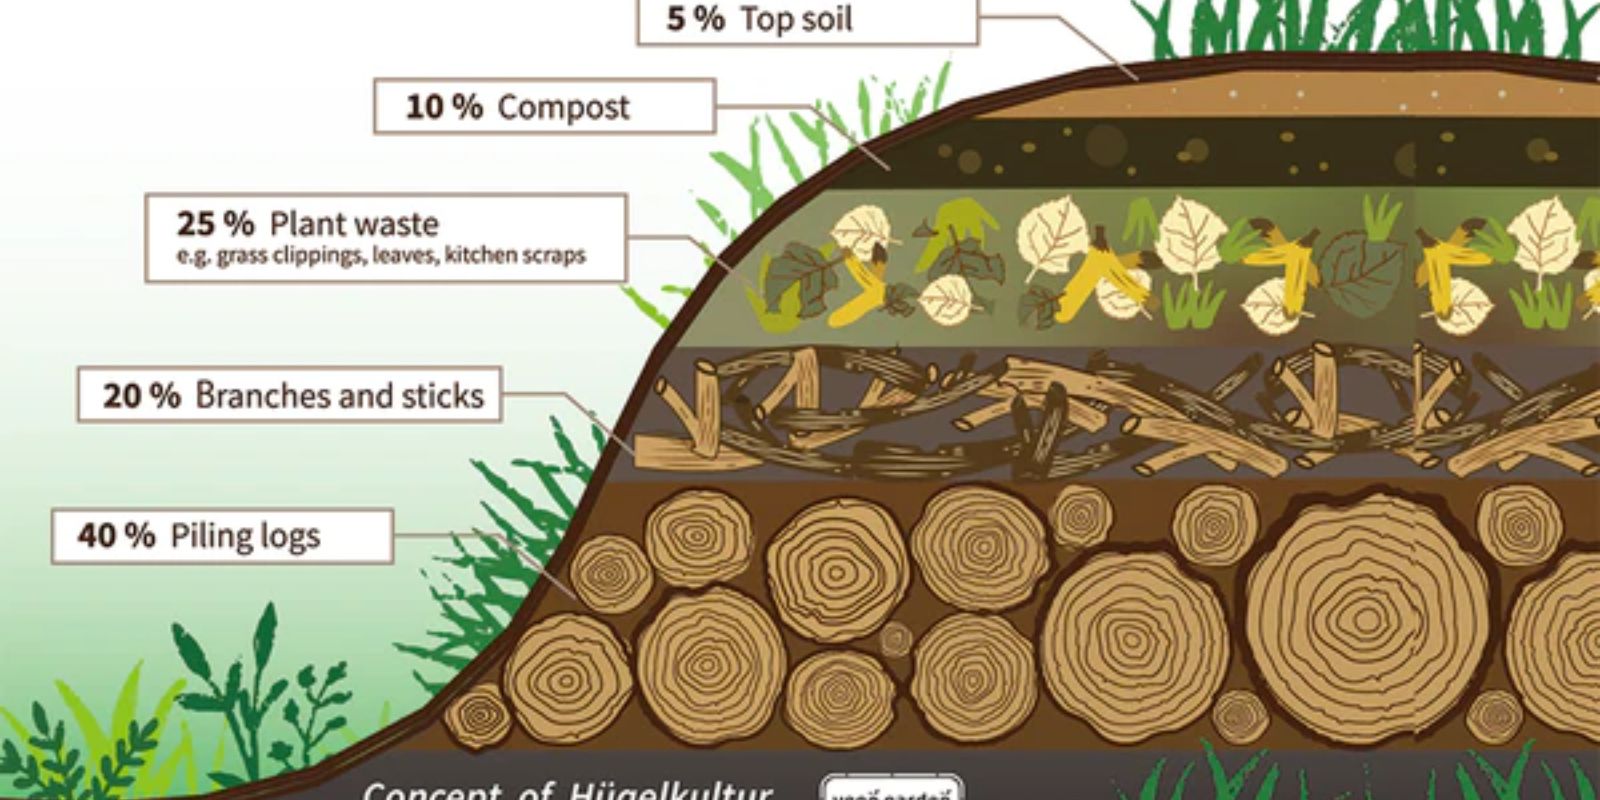
While building a raised bed is relatively simple, filling it can get expensive. Soil, compost, and mulch can cost a lot, especially if you need to fill a large or deep bed. Thankfully, there are ways to fill your raised bed without overspending. The key is to use layers of different organic materials that decompose over time, enriching the soil and creating the perfect environment for your plants.
Let’s explore some cost-effective methods for filling a raised bed.
Step 1: Line the Bottom with Cardboard or Newspaper
The first step in filling your raised bed is to lay down a base layer to prevent weeds from growing up into your garden. This also helps retain moisture and slows down the decomposing process of organic matter.
What to Use:
- Cardboard: Old cardboard boxes are a great option to line the bottom of your raised bed. Simply tear the boxes into pieces and lay them across the bed’s floor. Make sure to overlap the pieces so that weeds don’t find a way through the gaps.
- Newspaper: Layers of newspaper also work well as a weed barrier. Use a few sheets at a time and lay them over the bed in a crisscross pattern. Be sure to wet the paper down to keep it from blowing away.
This initial layer prevents weeds from growing through the soil while adding a biodegradable component to your bed. Over time, the cardboard or newspaper will break down, enriching the soil with organic matter.
Step 2: Add Bulk Layers Using Kitchen Scraps and Yard Waste
Now that you’ve got your base layer in place, it’s time to start building the bulk of the raised bed with layers of organic material. These layers will break down over time and create rich, loamy soil. You can fill your raised bed for free by using items you might otherwise throw away.
What to Use:
- Kitchen Scraps: Vegetable peels, fruit scraps, coffee grounds, and eggshells make excellent additions to the bottom layers of your raised bed. These materials will break down into nutrient-rich organic matter, providing your plants with essential nutrients.
- Yard Waste: If you have access to leaves, grass clippings, or even small twigs, you can use these as a bulk layer. Shredded leaves, in particular, make a great addition, as they break down quickly and provide organic matter that enriches the soil.
As you add these materials, try to alternate between dry and wet components. For example, you can layer dry leaves with moist kitchen scraps. This will help the materials decompose more evenly and prevent odor buildup.
Step 3: Use Cheap Fillers Like Straw, Wood Chips, or Hay
One of the most affordable and effective ways to fill a raised bed is by using straw, hay, or wood chips. These materials are often readily available and cost very little. They also help improve soil structure by adding air pockets and drainage.
What to Use:
- Straw: Straw is light and fluffy, which makes it an excellent choice for filling raised beds. It decomposes over time, improving the soil and adding organic matter. Just be sure not to confuse straw with hay—straw is cleaner and has fewer seeds.
- Wood Chips: Wood chips, especially from local tree services, are another great way to fill your bed. They are usually inexpensive or even free if you can source them locally. Wood chips help with drainage and provide structure to the soil.
- Hay: Like straw, hay can also be used, though it may contain seeds. If you use hay, be prepared to do some weeding as the seeds germinate.
These materials are ideal for filling large sections of your raised bed, especially if you’re trying to save money while ensuring good drainage.
Step 4: Add Compost and Organic Matter for Nutrient-Rich Soil
Now that your raised bed is well on its way to being filled, it’s time to add some nutrient-rich compost. Compost is the cornerstone of a healthy garden, as it provides the nutrients plants need to grow strong and healthy.
What to Use:
- Homemade Compost: If you’ve been composting at home, now is the perfect time to use your homemade compost to top off your raised bed. It’s rich in nutrients and helps improve the soil’s texture and fertility.
- Compost from Local Sources: If you don’t have your own compost, check with local garden centers or city programs that provide affordable or free compost. Many cities offer free compost made from yard waste.
- Worm Castings: Worm castings are a great addition to any raised bed, as they provide natural fertilizers that plants love. You can find these at garden stores or online.
Spread a thick layer of compost on top of the straw, wood chips, and other organic matter. This will give your plants the nutrients they need right from the start and help the bed continue to break down the lower layers of organic matter.
Step 5: Top with High-Quality Garden Soil
The final step is to add a high-quality garden soil mix to the top of your raised bed. While you don’t need to fill the entire bed with expensive soil, a good topsoil mix is necessary to support healthy plant growth.
What to Use:
- Garden Soil Mix: You can purchase garden soil that is mixed with compost and other organic matter. This type of soil is ideal for raised beds because it contains the right balance of nutrients.
- Soil Blends: If you’re on a budget, you can make your own soil blend by mixing equal parts of compost, garden soil, and perlite or vermiculite for drainage.
The top layer should be about 6 to 8 inches deep, providing the perfect environment for plants to root and thrive.
Conclusion: Filling Your Raised Bed Doesn’t Have to Be Expensive
Building and filling a raised bed doesn’t have to cost a fortune. By following these simple and affordable steps, you can create a nutrient-rich environment for your plants to grow and thrive without spending a lot of money. Whether you use cardboard, kitchen scraps, yard waste, or cheap fillers like straw and wood chips, you can fill your bed cheaply and effectively.
By using sustainable, organic materials, you’ll not only save money but also help improve the health of your garden and the environment. With a little creativity and resourcefulness, your raised bed will be filled and ready for planting in no time.
Happy gardening, and may your raised bed yield beautiful, bountiful crops!