
Growing your own strawberries at home can be a delightful and rewarding experience. Imagine stepping into your garden and plucking ripe, juicy strawberries to enjoy in your favorite desserts, salads, or simply on their own. The good news is that you don’t need to start with seeds or specialized plants; you can easily grow strawberries from the ones you buy at the supermarket! This comprehensive guide will walk you through the process of growing strawberries at home, ensuring you can enjoy fresh berries right from your garden.
Why Grow Strawberries?
Strawberries are not only delicious but also packed with vitamins, antioxidants, and dietary fiber. Here are some compelling reasons to grow them at home:
- Freshness: Homegrown strawberries are fresher than store-bought ones, which often lose flavor and nutrients during transport.
- Cost-Effective: Growing your own strawberries can save you money in the long run, especially if you have a family that enjoys them.
- Variety: By growing strawberries, you can experiment with different varieties, including everbearing and June-bearing types, that may not be available in stores.
- Environmental Impact: Growing your own food reduces the carbon footprint associated with transporting produce.
Selecting the Right Strawberries
The first step in growing strawberries from supermarket berries is selecting the right fruit. Here’s how to choose the best strawberries:
- Look for Freshness: Choose firm strawberries that are bright red and free of blemishes or mold. The fresher the fruit, the better the chances of successful seed germination.
- Seed Quality: Strawberries have tiny seeds on their surface. These seeds are what you will use to grow new plants. Ensure the berries have healthy, mature seeds.
Preparing the Seeds
Once you have selected your strawberries, it’s time to prepare the seeds for planting.
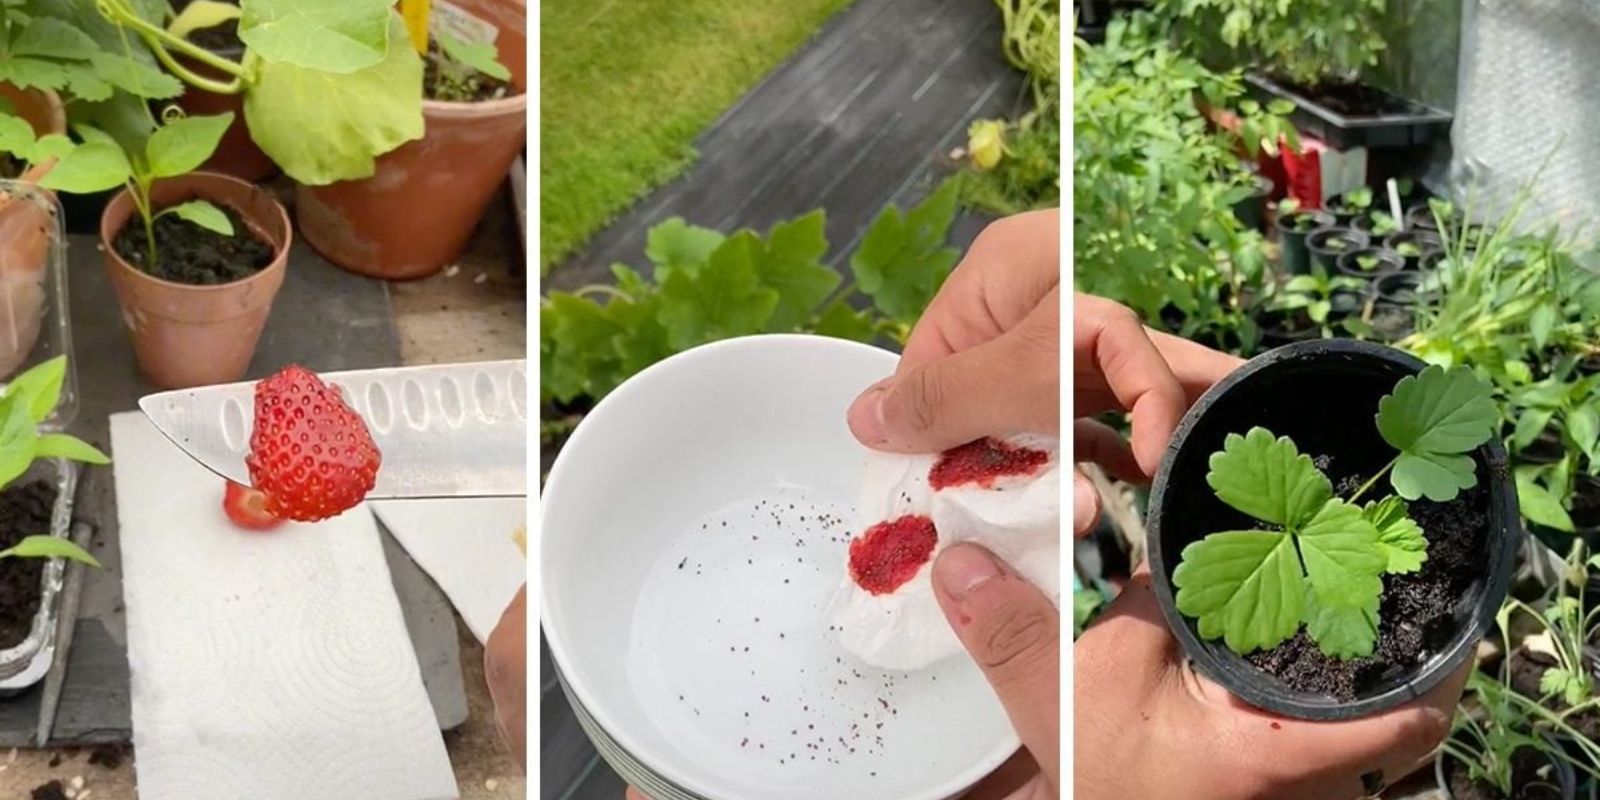
- Extracting the Seeds:
- Take a ripe strawberry and cut it in half. Using a spoon or your fingers, gently scoop out the seeds.
- Alternatively, you can mash the strawberries in a bowl to release the seeds and make extraction easier.
- Drying the Seeds:
- Spread the seeds on a paper towel in a single layer. Allow them to dry for one to two days in a cool, dry place. This step is essential, as it helps prevent mold during the germination process.
Starting Your Strawberry Seeds
Now that you have prepared your seeds, it’s time to start planting them.
Materials Needed:
- Seed-starting mix or potting soil
- Small pots or seed trays
- Plastic wrap or a clear lid
- Spray bottle for watering
- A sunny location or grow lights
Planting Steps:
- Fill Your Pots: Fill small pots or seed trays with seed-starting mix. This soil is lighter and provides better drainage than regular potting soil.
- Sowing the Seeds:
- Sprinkle the dried strawberry seeds evenly over the surface of the soil.
- Lightly press them into the soil but do not cover them. Strawberry seeds require light for germination.
- Moistening the Soil:
- Use a spray bottle to mist the soil lightly. Ensure the soil is moist but not soaking wet.
- Creating a Greenhouse Effect:
- Cover the pots with plastic wrap or a clear lid to maintain humidity. This greenhouse effect will encourage seed germination.
Providing Ideal Conditions
- Temperature: Place the pots in a warm location (around 65-75°F or 18-24°C). If possible, a seedling heat mat can help provide consistent warmth.
- Light: After a few days, remove the cover and move the pots to a bright spot with indirect sunlight or under grow lights. Strawberries need at least 12-16 hours of light per day for healthy growth.
Germination Process
Germination can take 1 to 3 weeks. Be patient and keep the soil consistently moist but not overly wet. Once the seedlings have developed two sets of true leaves, they are ready for transplanting.
Transplanting Seedlings
Once your seedlings are strong enough, it’s time to move them to larger pots or your garden. Follow these steps:
- Choose the Right Time: Transplant your seedlings when they are about 3-4 inches tall and have at least two sets of true leaves.
- Preparing the New Containers or Garden Bed:
- If planting in containers, choose pots that are at least 12 inches in diameter with good drainage holes.
- For a garden bed, ensure it receives at least 6-8 hours of sunlight daily and is well-draining.
- Transplanting the Seedlings:
- Carefully remove the seedlings from their original pots, taking care not to damage the roots.
- Plant them at the same depth they were growing in their original pots, spacing them about 12-18 inches apart.
- Watering:
- Water the newly transplanted seedlings thoroughly, ensuring the soil is moist but not waterlogged.
Caring for Your Strawberry Plants
With your strawberries now planted, it’s important to provide them with the right care to ensure they thrive.
Watering
- Regular Watering: Strawberries need consistent moisture, especially during their growing season. Water your plants deeply once or twice a week, depending on weather conditions.
- Mulching: Consider adding a layer of straw or mulch around the base of your plants. This helps retain moisture, suppress weeds, and protect the fruit from rot.
Fertilizing
- Balanced Fertilizer: Use a balanced, slow-release fertilizer or organic compost every few weeks to provide essential nutrients. Avoid over-fertilizing, as it can lead to excessive leaf growth at the expense of fruit.
Pest and Disease Management
- Monitor for Pests: Keep an eye out for common pests such as aphids, slugs, and spider mites. If you notice an infestation, consider using insecticidal soap or neem oil.
- Disease Prevention: Ensure good air circulation around your plants and avoid overhead watering to minimize the risk of fungal diseases. Remove any diseased leaves promptly.
Harvesting Your Strawberries
Strawberries typically start producing fruit about 4 to 6 weeks after blooming. Here’s how to tell when they’re ready to be harvested:
- Color: Look for fully red berries. A well-ripened strawberry will be bright red all over.
- Firmness: Gently squeeze the berry; it should feel firm but slightly soft.
- Fragrance: Ripe strawberries have a sweet aroma.
How to Harvest
- To harvest, gently twist the berry or use scissors to cut it from the plant, leaving a small stem attached to avoid damaging the fruit.
Enjoying Your Strawberries
Now that you’ve grown and harvested your strawberries, it’s time to enjoy them! Fresh strawberries can be used in a variety of dishes, including:
- Salads: Add sliced strawberries to salads for a burst of sweetness.
- Desserts: Use them in cakes, tarts, or just serve with whipped cream.
- Smoothies: Blend strawberries into smoothies for a delicious, healthy treat.
Conclusion
Growing strawberries from supermarket berries is not only possible but also a fun and rewarding project for gardeners of all levels. By following these steps, you can enjoy fresh, delicious strawberries right from your garden. Remember to be patient, provide the right care, and soon you’ll have a bountiful harvest to enjoy.
So, grab some strawberries from the supermarket, start planting, and let your gardening journey begin!
#StrawberryGrowing #HomeGardening #GrowYourOwnFood #GardeningHacks #SustainableLiving #FreshFruit #UrbanFarming