
Daylilies (Hemerocallis) are a favorite perennial among gardeners, and for good reason. These hardy plants are known for their vibrant flowers, easy maintenance, and long blooming period. However, over time, daylilies can become overcrowded, leading to diminished blooms and a decline in overall plant health. Dividing daylilies is a simple and effective way to rejuvenate your plants, improve their growth, and ensure they continue to thrive in your garden for years to come.
In this article, we’ll guide you through the 12 essential steps for dividing daylilies, as well as when and why you should do it. With these tips, you’ll be able to create healthier plants, more blooms, and a more vibrant garden.
Why You Should Divide Daylilies
Before we dive into the step-by-step process, let’s briefly discuss why dividing daylilies is necessary.
Over time, daylilies naturally form large clumps that can become too crowded. As they become overcrowded, the plants start to produce fewer blooms, and the center of the plant may die off, leaving a bare spot in the middle. Dividing the plants helps to:
- Prevent overcrowding: Spacing out the plants improves air circulation and allows them to grow healthier and stronger.
- Increase blooming: Dividing daylilies can trigger better blooming in the following season as the plants have more space and nutrients to grow.
- Revitalize the plant: By removing older or dying sections of the plant, you encourage fresh, vigorous growth.
Now that we understand the importance of dividing daylilies, let’s walk through the process step by step.
1. Choose the Right Time to Divide
The best time to divide daylilies is during their dormancy periods, either in early spring or in late summer to early fall. In spring, before they start to grow, is ideal as it allows the divided plants to establish themselves before the growing season begins. Dividing daylilies after they’ve finished blooming in late summer is also a good option, as the plants are not actively growing, and you avoid interrupting the blooming cycle.
2. Gather Your Tools
You don’t need a lot of fancy tools to divide daylilies, but having the right ones on hand will make the process easier. Here’s what you’ll need:
- A shovel or spade for digging up the plant
- A sharp knife or garden fork for dividing the clumps
- Gardening gloves to protect your hands
- A garden hose or watering can to moisten the soil
- A wheelbarrow or bucket to hold the divisions
3. Water the Daylilies the Day Before Dividing
Watering your daylilies the day before you plan to divide them is a helpful step. It softens the soil and makes it easier to dig up the plant. Moist soil will also reduce the stress on the plant, making it easier for the roots to recover after being disturbed.
4. Dig Up the Daylily Clump
Use a shovel or garden spade to dig around the perimeter of the daylily clump. Make sure you dig deep enough to get as many roots as possible. Start digging a few inches away from the base of the plant to avoid damaging the roots. Carefully lift the clump from the ground, taking care not to tear the roots.
5. Shake or Rinse Off Excess Soil
Once you’ve lifted the plant out of the soil, shake it gently to remove excess dirt. You can also rinse the roots with water to expose them fully. This will allow you to inspect the plant better and determine where to make your divisions. It’s important to handle the plant with care to avoid injuring the roots.
6. Inspect the Daylily Plant
At this stage, inspect the daylily clump for any signs of disease, pests, or damaged roots. Trim off any unhealthy or dead sections of the plant, as these will not contribute to healthy growth. Look for sections that have strong roots and healthy leaves. These are the sections you’ll want to divide and replant.
7. Divide the Clump into Smaller Sections
Using a sharp knife, garden fork, or your hands, divide the clump into smaller sections. Each division should have a healthy root system and some leaves attached. Aim for divisions that are roughly the size of a fist, though they can be slightly smaller or larger depending on the size of the original plant.
If the clump is particularly large, you may need to use a knife to cut through tough roots. It’s important to make sure each division has both roots and shoots to ensure successful replanting.
8. Trim Damaged or Excess Roots
After dividing the clumps, take the time to trim away any damaged or excess roots. This will encourage new, healthy root growth. If the roots are excessively long, you can cut them back slightly to create a more manageable size. A clean cut helps prevent the roots from becoming waterlogged and reduces the chance of disease.
9. Replant the Divisions Immediately
Once your daylilies are divided, it’s time to replant them. Prepare a planting site in your garden with well-drained soil that receives adequate sunlight. Daylilies prefer full sun but can tolerate partial shade as well.
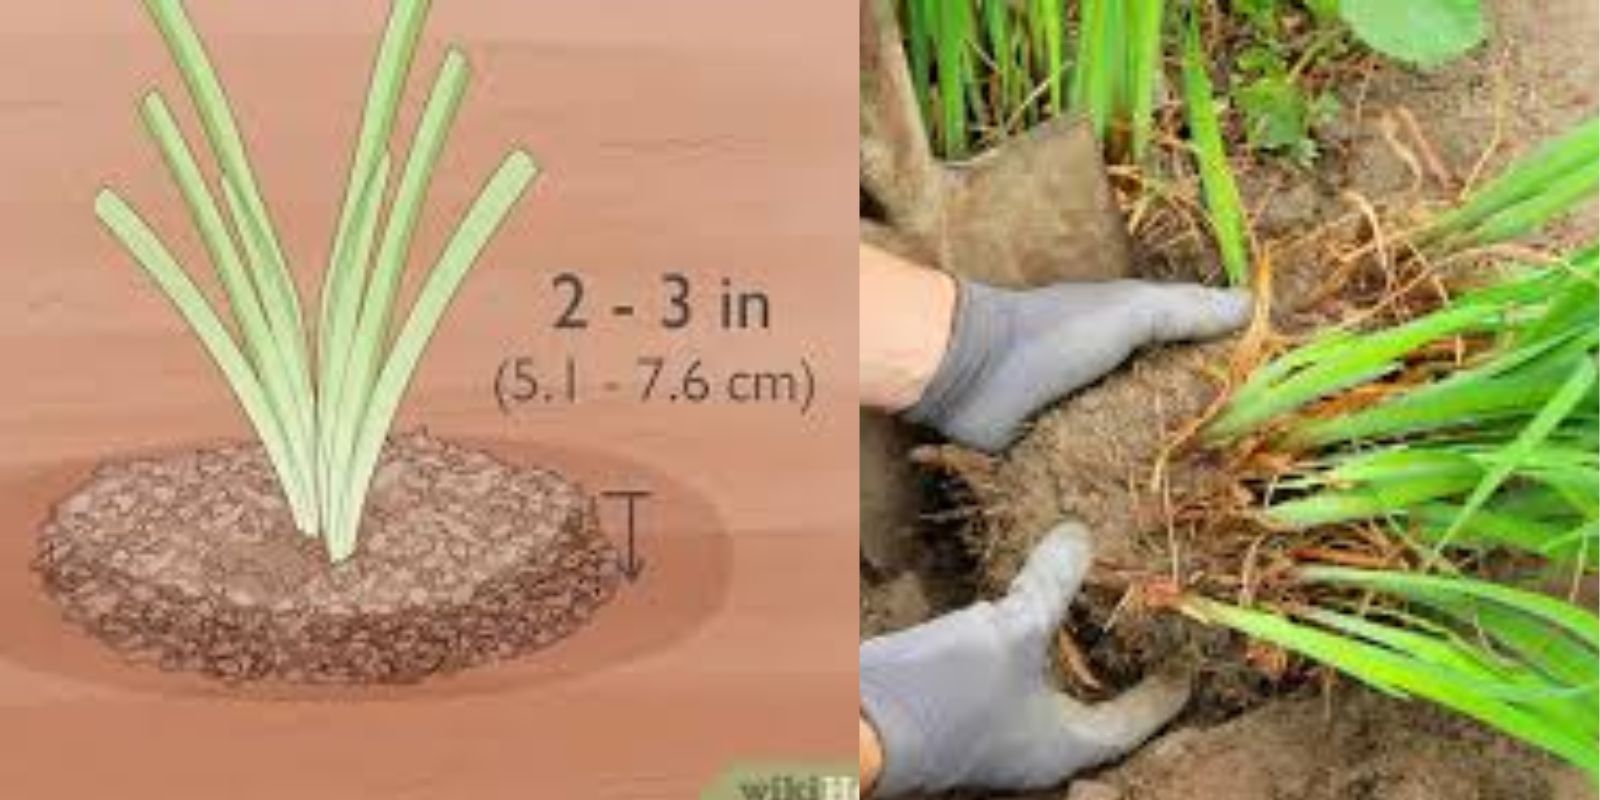
Dig holes deep enough to accommodate the root system of each division. Place the divisions in the hole, ensuring the crown (the area where the roots meet the shoots) is level with the soil surface. Don’t plant the crown too deep, as this can cause rot. Gently press the soil around the base of the plant to remove any air pockets.
10. Space the Divisions Properly
When replanting daylilies, space the divisions about 18 to 24 inches apart. This spacing allows the plants to grow without overcrowding, ensuring they have enough room for healthy root and leaf development. Proper spacing also improves air circulation, which helps prevent fungal diseases.
11. Water the Divided Plants Thoroughly
After planting, water the divisions thoroughly to help them settle into their new location. This also helps ensure that the soil around the roots is moist, which is essential for establishing new growth. Be careful not to overwater, as daylilies do not like soggy soil.
12. Mulch to Retain Moisture and Protect Roots
Apply a layer of mulch around the base of the newly divided plants to help retain moisture and protect the roots from extreme temperatures. Mulch also prevents weeds from competing with your daylilies for nutrients and water. Use organic mulch such as shredded bark, leaves, or straw for the best results.
Post-Division Care
Once your daylilies are replanted, it’s important to continue caring for them to ensure they thrive. Here are a few tips for post-division care:
- Water regularly: Daylilies require consistent moisture to establish their roots, so keep the soil moist but not waterlogged.
- Fertilize: Use a balanced fertilizer to encourage new growth. Apply fertilizer once in the early spring and again in mid-summer.
- Watch for pests: Keep an eye out for pests like aphids, slugs, and snails, which can damage daylilies. Remove pests by hand or use organic pest control methods if necessary.
- Prune spent flowers: Regularly remove dead flowers to encourage the plant to focus its energy on new growth.
Conclusion
Dividing daylilies is a simple yet effective way to keep your plants healthy and vibrant, ensuring they continue to produce beautiful blooms year after year. By following these 12 steps, you can easily divide and rejuvenate your daylilies, helping them thrive in your garden. Remember to choose the right time, handle the plants with care, and provide proper care after division to ensure success.
Dividing daylilies not only improves the plant’s health but also allows you to propagate new plants for your garden or share with friends and family. Happy gardening!
#Daylilies #GardeningTips #PlantDivision #HealthyPlants #BloomingGarden #Perennials #GardenMaintenance #GardeningCommunity #FlowerGarden #GrowYourOwnGarden