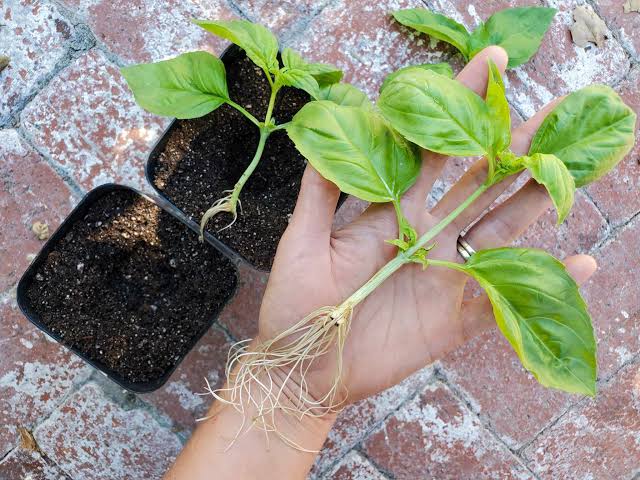
If you’ve ever grown basil, you already know how rewarding it can be — the aroma, the flavor, the lush green leaves that brighten any kitchen or garden. But do you know the right way to cut basil so it keeps growing stronger and fuller? Welcome to “How to Cut Basil from Plant Magic Awaits!” — your complete, easy-to-follow guide to harvesting basil like a pro.Whether you live in the United States, United Kingdom, or Canada, these basil-cutting secrets will help you enjoy an endless supply of this fragrant herb all season long!🌿 Introduction: The Secret to Thriving BasilBasil is one of the most popular herbs in the world — and for good reason. Its vibrant green leaves add flavor and freshness to countless dishes, from Italian pastas to Thai curries. But here’s the magic: the more you cut basil the right way, the more it grows.That’s right — proper pruning doesn’t harm your basil; it boosts its growth! This article reveals how to cut basil from the plant the right way, when to harvest it, and how to keep it thriving for months.Let’s dive into the basil magic! 🌱🌿 Why Properly Cutting Basil MattersBefore you grab your scissors, it’s important to understand why the method of cutting matters. Cutting basil incorrectly can stunt growth or cause your plant to become leggy and weak.🌱 Benefits of Cutting Basil the Right WayEncourages bushy growth instead of tall, spindly stems.Prevents flowering, which makes leaves bitter.Promotes continuous harvesting throughout the season.Keeps your plant healthy and productive longer.So, when it comes to basil, think of cutting not as damage — but as a form of love and encouragement!🌿 When to Cut BasilTiming is everything. Basil should be cut at the right growth stage for maximum flavor and regrowth.🌼 The Best Time to Cut Basil:Wait until your basil is about 6 to 8 inches tall before the first cut.Cut in the morning when the oils are most concentrated for better flavor.Harvest every 7–10 days to encourage fresh growth.Before flowering — once basil starts producing flowers, the leaves lose their sweet flavor.✨ Pro Tip: If you see flower buds, pinch them off immediately to keep your basil focused on leaf growth!🌿 How to Cut Basil from Plant — Step-by-StepHere’s the core of our “How to Cut Basil from Plant Magic Awaits!” guide — a simple method for abundant, healthy basil.🪴 Step 1: Gather Your ToolsClean, sharp scissors or pruning shears.A small bowl or basket for harvested leaves.Always use clean tools to prevent disease and infection.🌿 Step 2: Find the Right Spot to CutLook for a stem with two sets of healthy leaves. You’ll see new baby leaves or shoots growing where each leaf meets the main stem — called nodes.✨ Cut just above a leaf node (about ¼ inch above it).This encourages the two small shoots at that node to grow into new branches, doubling your plant’s growth!🌿 Step 3: Cut StrategicallyNever cut more than one-third of the plant at a time.Start from the top of the plant, where the leaves are most tender.Always leave at least two sets of leaves on each stem.🌱 The more you harvest correctly, the fuller your basil will become!🌿 Step 4: Repeat and MaintainKeep repeating this process throughout the growing season. With each harvest, your basil plant becomes bushier and produces even more leaves.If you’re growing basil indoors, you can harvest year-round — just ensure it gets at least 6 hours of sunlight daily or use a grow light.🌿 How to Store Freshly Cut BasilOnce you’ve learned how to cut basil from the plant, the next step is preserving its freshness!🧺 Short-Term StorageIn water: Place basil stems in a glass of water, just like a bouquet. Keep at room temperature — not in the fridge.Covered loosely: Drape a plastic bag over the top to retain humidity.Change water daily to keep it fresh for up to a week.❄️ Long-Term StorageFreeze it: Chop leaves and freeze them in ice cube trays with olive oil or water.Dry it: Hang stems upside down in a warm, dry place until crisp, then crumble and store in jars.Make pesto: Blend fresh basil with olive oil, garlic, nuts, and Parmesan for a long-lasting, flavorful sauce.🍃 Bonus Tip: Never refrigerate basil leaves directly — cold air causes them to turn black and lose flavor.🌿 Common Mistakes to AvoidEven experienced gardeners sometimes make small mistakes when harvesting basil. Avoid these pitfalls for the best results:Cutting too low: Don’t cut stems at the base; leave several leaf nodes to regrow.Overharvesting: Taking too many leaves at once weakens the plant.Letting it flower: Once basil flowers, leaf production slows dramatically.Neglecting regular pruning: If you don’t cut it often, the plant becomes tall and thin.Using dull scissors: Jagged cuts can harm stems and invite disease.🌿 The Magic of Continuous Basil HarvestingWhen you master how to cut basil from plant, something magical happens — your basil rewards you with lush, aromatic growth all season long.By pruning correctly and frequently, you encourage branching, which means more leaves, more flavor, and more pesto!🌸 Fun Idea: Combine basil with other herbs like mint, parsley, and oregano for your own “mini herb garden.”🌿 Practical Basil Care TipsTo keep your basil thriving:Sunlight: At least 6–8 hours daily of direct sunlight.Water: Keep soil moist but not soggy. Water early in the day.Soil: Use well-draining, nutrient-rich soil (add compost if needed).Fertilizer: Use an organic herb fertilizer every 2–3 weeks.Airflow: Space plants 12–18 inches apart to prevent mildew.🌱 Basil loves warmth! Keep indoor basil in a sunny kitchen window.🌿 Conclusion: How to Cut Basil from Plant Magic Awaits!Learning how to cut basil from the plant the right way is one of the most rewarding gardening skills you can master. Not only does it give you endless fresh herbs, but it also strengthens your plant and fills your home with a delightful scent.By cutting basil above the nodes, harvesting regularly, and storing it properly, you’ll unlock the true magic of basil gardening — abundant leaves, incredible flavor, and a thriving herb that keeps on giving. 🌿✨So, grab your scissors, find your favorite basil plant, and start cutting like a pro. Your kitchen — and your taste buds — will thank you!