
Gardening can be a relaxing and rewarding hobby, but for those with busy schedules, maintaining a garden can sometimes feel like a chore. One of the biggest challenges is ensuring that plants receive consistent water, which is crucial for their growth and health. A self-watering garden bed is an excellent solution for busy gardeners. This innovative system uses a built-in reservoir to provide a steady supply of water to plants, reducing the need for frequent watering. In this article, we’ll explore the benefits of self-watering garden beds and provide a step-by-step guide to building your own.
The Benefits of Self-Watering Garden Beds
Self-watering garden beds offer several advantages that make them ideal for busy individuals:
- Consistent Moisture: Plants receive a steady supply of water, which helps prevent over-watering and under-watering. This consistency promotes healthier root systems and more vigorous plant growth.
- Water Efficiency: The self-watering system reduces water waste by delivering water directly to the plant roots. This method is more efficient than traditional watering methods, which can result in water loss through evaporation or runoff.
- Reduced Maintenance: With a self-watering garden bed, you don’t need to water your plants as frequently. This feature is especially useful for people with busy schedules or those who travel often.
- Healthier Plants: By maintaining consistent moisture levels, self-watering garden beds help prevent common plant issues such as root rot, blossom end rot, and nutrient imbalances.
- Flexibility in Planting: These garden beds are suitable for a variety of plants, including vegetables, herbs, and flowers. They can be used in both indoor and outdoor settings, making them versatile for different gardening needs.
Building a Self-Watering Garden Bed: A Step-by-Step Guide
Creating a self-watering garden bed is a straightforward project that requires some basic materials and tools. Here’s a comprehensive guide to help you build your own:
1. Choose a Container or Build a Frame
The first step is selecting a suitable container or building a wooden frame for your garden bed. The container should be large enough to accommodate the plants you want to grow and deep enough to hold a water reservoir and soil. Here are a few options:
- Pre-made containers: You can purchase a self-watering container designed for gardening, which comes with all the necessary components.
- DIY wooden frame: Build a frame using untreated wood. Cedar and redwood are excellent choices because they are naturally resistant to decay.
Make sure the container or frame has a bottom or can hold a lining to create the reservoir.
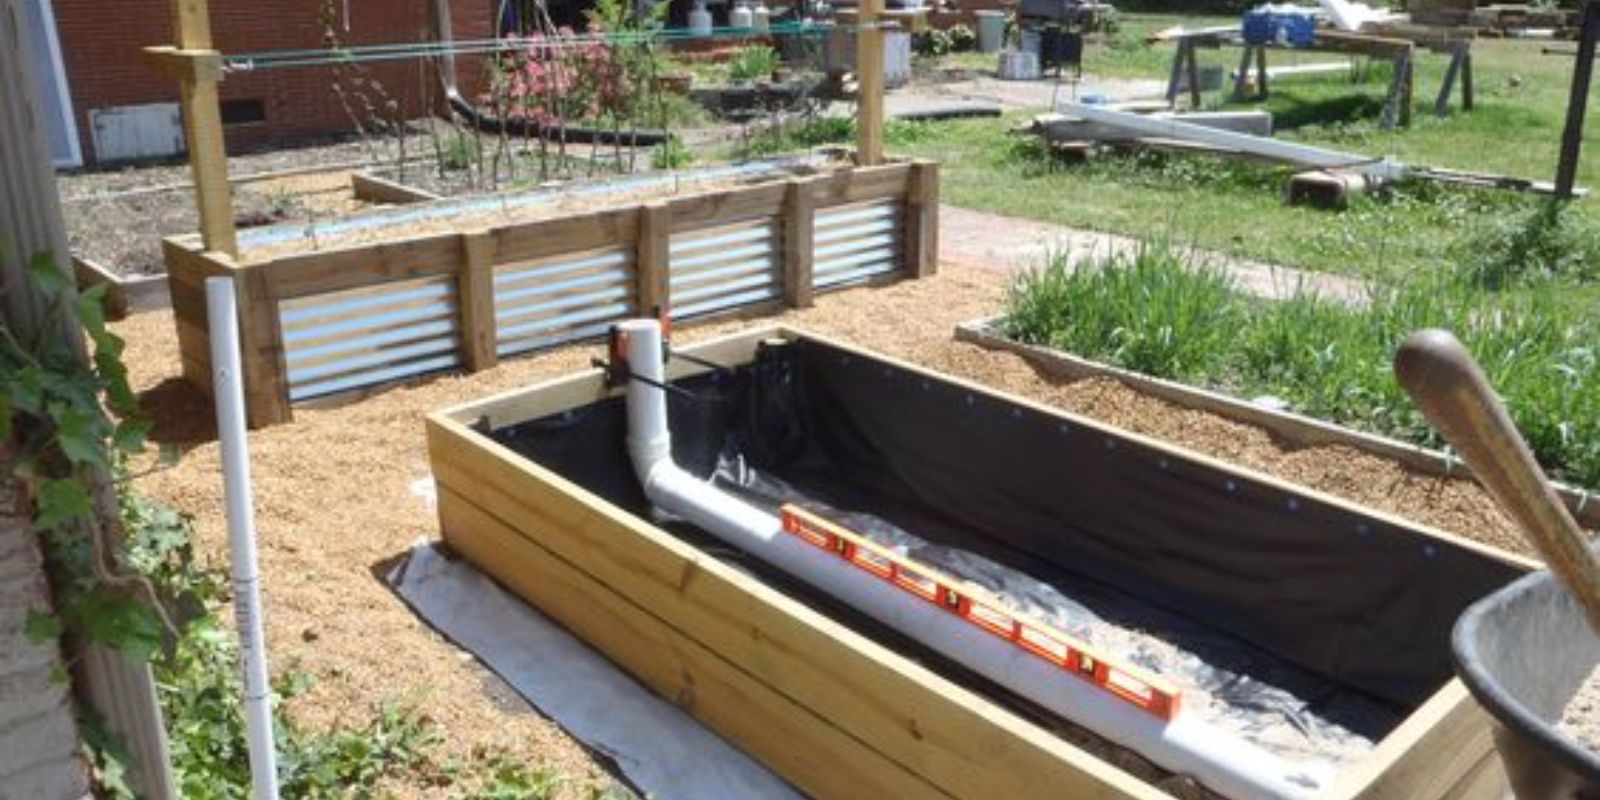
2. Create the Water Reservoir
The water reservoir is a critical component of a self-watering garden bed. It stores water and provides a consistent supply to the plants. To create the reservoir:
- Install a Waterproof Liner: Line the bottom of the container or frame with a waterproof liner, such as heavy-duty plastic or pond liner. This will hold the water and prevent leakage.
- Add a PVC Pipe: Insert a PVC pipe vertically through one corner of the container, reaching from the bottom to above the soil line. This pipe will be used to fill the reservoir with water.
- Build the Reservoir Layer: Place a layer of gravel, rocks, or perforated drainage pipes at the bottom of the container. This layer should be 2-4 inches deep and will act as the reservoir to store water.
3. Add a Wicking System
The wicking system is responsible for drawing water from the reservoir to the soil, ensuring that plants receive moisture consistently. To set up the wicking system:
- Cover the Reservoir Layer: Place a layer of landscape fabric or geotextile fabric over the gravel or drainage pipes. This fabric will separate the soil from the reservoir and act as a wick to draw water upward.
- Create Wicking Points: If using landscape fabric, cut slits or holes in the fabric to allow the soil to make direct contact with the water in the reservoir. This enhances the wicking action.
4. Fill with Soil
Next, add the soil to your garden bed:
- Choose the Right Soil: Use a well-draining potting mix or a blend of compost, peat moss, and perlite. Avoid using garden soil, as it can become compacted and hinder water movement.
- Fill the Bed: Fill the container or frame with soil, ensuring that it covers the landscape fabric and wicking points. Leave a few inches of space at the top for easy planting and watering.
5. Plant and Water
With the soil in place, it’s time to plant your desired vegetables, herbs, or flowers:
- Plant Your Crops: Follow the recommended spacing and planting depth for each type of plant. Make sure the roots have good contact with the soil.
- Water the Plants: Initially water the soil from above to help establish the plants. Then, fill the reservoir using the PVC pipe. Fill until water starts to come out of the overflow outlet, which prevents overfilling.
6. Monitor Water Levels
To ensure the success of your self-watering garden bed, regularly check the water level in the reservoir. Refill the reservoir through the PVC pipe as needed, typically once a week or more frequently in hot weather. The frequency of refilling will depend on the size of the reservoir, the type of plants, and the weather conditions.
Conclusion
Building a self-watering garden bed is an excellent solution for busy gardeners who want to enjoy fresh, homegrown produce without the daily hassle of watering. By providing consistent moisture, reducing water waste, and lowering maintenance requirements, these beds make gardening more accessible and enjoyable for everyone.
Whether you’re growing vegetables, herbs, or flowers, a self-watering garden bed can help you achieve a thriving garden with minimal effort. Ready to try this project? Share your experiences, ask questions, or discuss your favorite plants to grow in a self-watering bed below! 🌿💧