
In recent years, water conservation has become increasingly important as we face growing concerns about water scarcity and environmental sustainability. One effective way to conserve water and reduce your utility bills is by building a rain barrel. A rain barrel is a container that collects and stores rainwater from your roof, which can then be used for various non-potable purposes such as watering your garden, washing your car, or cleaning outdoor spaces. In this article, we will provide a detailed step-by-step guide on how to build your own rain barrel, a project that is not only practical but also environmentally friendly.
Benefits of Building a Rain Barrel
Before diving into the construction process, it’s important to understand the benefits of having a rain barrel:
- Water Conservation: Rainwater is a valuable natural resource. By collecting and using it, you reduce the demand on municipal water supplies, particularly during dry seasons.
- Cost Savings: Using rainwater for gardening and other outdoor activities can lower your water bills.
- Plant Health: Rainwater is free of the chemicals and salts found in tap water, making it better for plants.
- Flood Control: Collecting rainwater reduces runoff, which can help prevent erosion and decrease the risk of flooding in your yard.
Materials and Tools Needed
To build a rain barrel, you will need the following materials and tools:
- A Food-Grade Barrel: Preferably 55 gallons or more, made of plastic or another durable material.
- Spigot Kit: Includes a spigot, washers, and nuts.
- Overflow Valve or Hose Adapter: For directing excess water away from the foundation of your house.
- Downspout Diverter Kit: For directing rainwater from the downspout into the barrel.
- Drill: With appropriate bits for making holes in the barrel.
- Fine Mesh Screen: To cover the barrel opening and keep debris and insects out.
- Teflon Tape: For sealing the spigot and overflow valve.
- Cinder Blocks or a Stand: To elevate the barrel for easy water access and pressure.
Step-by-Step Guide to Building a Rain Barrel
1. Choosing and Preparing the Barrel
Start by selecting a suitable barrel. A 55-gallon food-grade plastic barrel is ideal, as it is large enough to collect a significant amount of water and is safe for garden use. Ensure the barrel is clean and has no harmful residues. If the barrel previously held food products, clean it thoroughly with a mild detergent and rinse well.
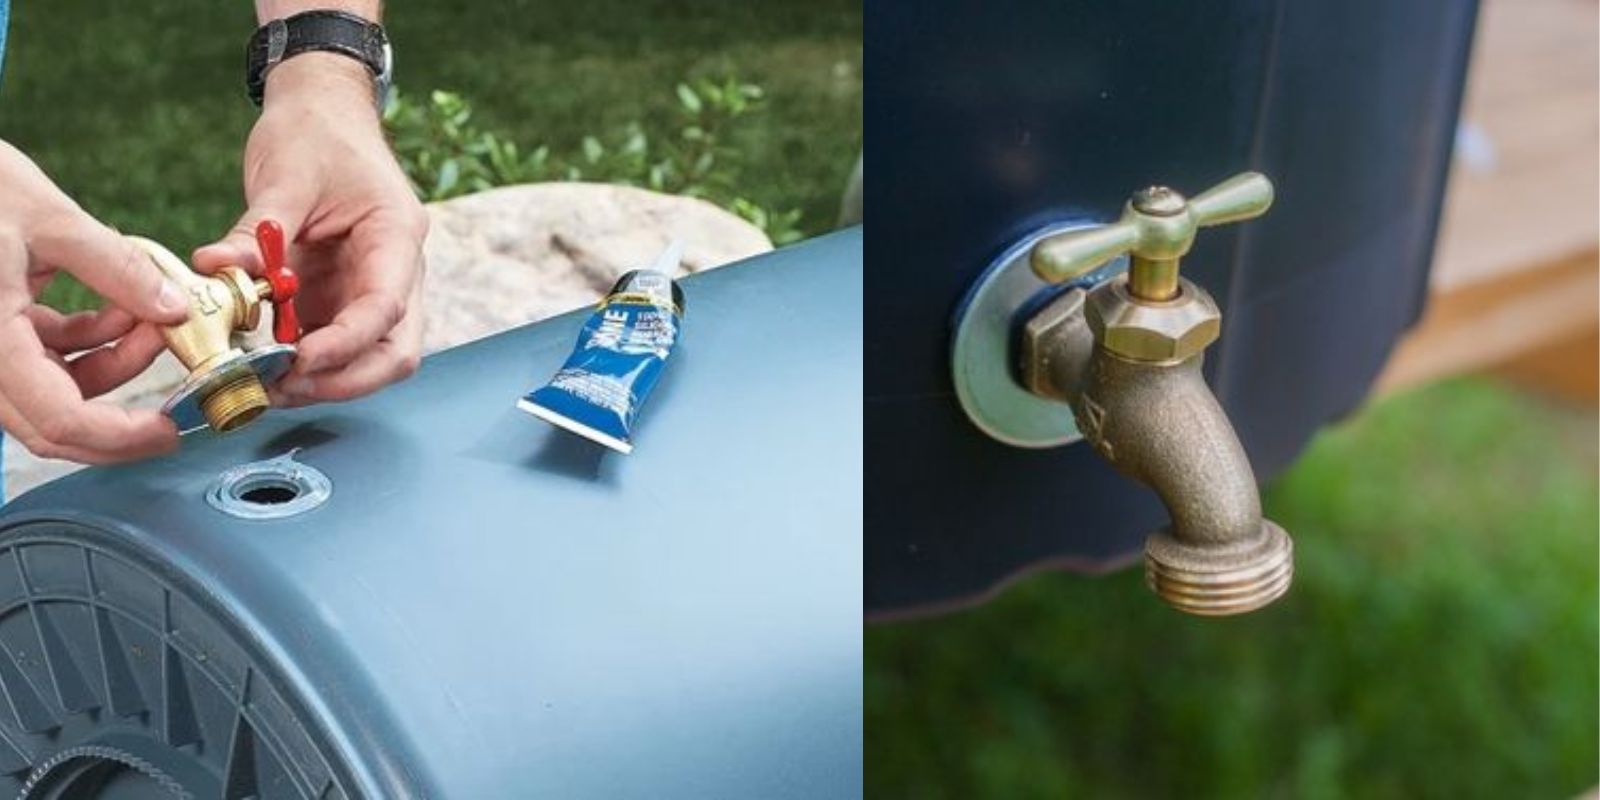
2. Installing the Spigot
To install the spigot, first, decide where you want it on the barrel. Typically, the spigot should be placed near the bottom of the barrel but high enough off the ground to fit a watering can or bucket underneath. Drill a hole for the spigot using a bit that matches the size of the spigot’s threads. Apply Teflon tape to the spigot’s threads to ensure a tight seal and prevent leaks. Insert the spigot through the hole and secure it with washers and a nut from the inside of the barrel.
3. Creating an Overflow Outlet
An overflow outlet is crucial to prevent water from spilling over the sides of the barrel during heavy rain. Drill a hole near the top of the barrel, opposite the spigot. Attach an overflow valve or a hose adapter to this hole. This outlet will direct excess water away from your home’s foundation, protecting it from water damage. You can connect a hose to the overflow valve and direct the water to a suitable drainage area.
4. Preparing the Downspout
Next, modify your downspout to direct rainwater into the barrel. Measure the height of the barrel and mark the downspout accordingly. Cut the downspout using a hacksaw, ensuring it is a few inches above the top of the barrel. Install a downspout diverter kit, which typically includes a flexible tube that channels water into the barrel. The diverter also allows excess water to continue down the downspout once the barrel is full.
5. Placing the Barrel
Choose a stable, level surface to place your rain barrel. Elevate the barrel on cinder blocks or a sturdy stand to increase water pressure and make it easier to access the spigot. The stand should be strong enough to support the weight of the full barrel, which can weigh over 400 pounds. Ensure the barrel is positioned directly beneath the downspout diverter.
6. Securing the Lid and Screen
Cover the top of the barrel with a fine mesh screen before securing the lid. This screen is essential for keeping leaves, debris, and insects, particularly mosquitoes, out of the collected water. Make sure the lid is securely fastened to prevent animals or children from accessing the water.
7. Testing and Maintenance
Once your rain barrel is set up, test the system by directing water into the downspout. Check for leaks around the spigot and overflow outlet, and ensure the water flows correctly into the barrel. Regularly inspect and clean the screen to prevent clogs and maintain water quality. During the winter, either disconnect the barrel and store it indoors or ensure it is properly drained to prevent freezing and cracking.
Tips for Using Your Rain Barrel
- Water Plants Wisely: Use the water collected in your rain barrel for garden irrigation, avoiding the use of municipal water. Rainwater is soft and free from chemicals, making it ideal for sensitive plants.
- Avoid Contaminants: Do not use rain barrel water for drinking, cooking, or bathing, as it may contain contaminants from the roof or air.
- Plan for Overflow: Ensure the overflow system directs water away from your home’s foundation to prevent damage.
Conclusion
Building a rain barrel is a straightforward and rewarding DIY project that contributes to water conservation and sustainability. By following these steps, you can create an efficient system for collecting and using rainwater, reducing your environmental footprint and water bills. Not only does this project benefit your garden, but it also plays a role in protecting our natural resources. Start building your rain barrel today and enjoy the benefits of this eco-friendly addition to your home!