
Potatoes are a beloved staple in gardens around the world, but their growth typically requires a lot of space. For those with limited garden space, especially urban dwellers or those with small backyards, growing potatoes can seem like a daunting task. However, there is a solution that can help you grow your own potatoes in a small space without sacrificing yield: the potato tower.
A potato tower is a vertical gardening technique that maximizes your growing space, allowing you to grow more potatoes in less room. This method is perfect for gardeners with limited space and can even be adapted for patios, balconies, and small plots of land. By using a potato tower, you can grow a significant amount of potatoes in a confined area, ensuring that your harvest is as abundant as it is space-efficient.
In this article, we’ll walk you through everything you need to know about building a potato tower, from the materials and tools you’ll need to the step-by-step process of constructing your own potato tower at home. By the end, you’ll have all the information you need to get started and enjoy a successful potato harvest, even in the smallest of spaces.
What is a Potato Tower?
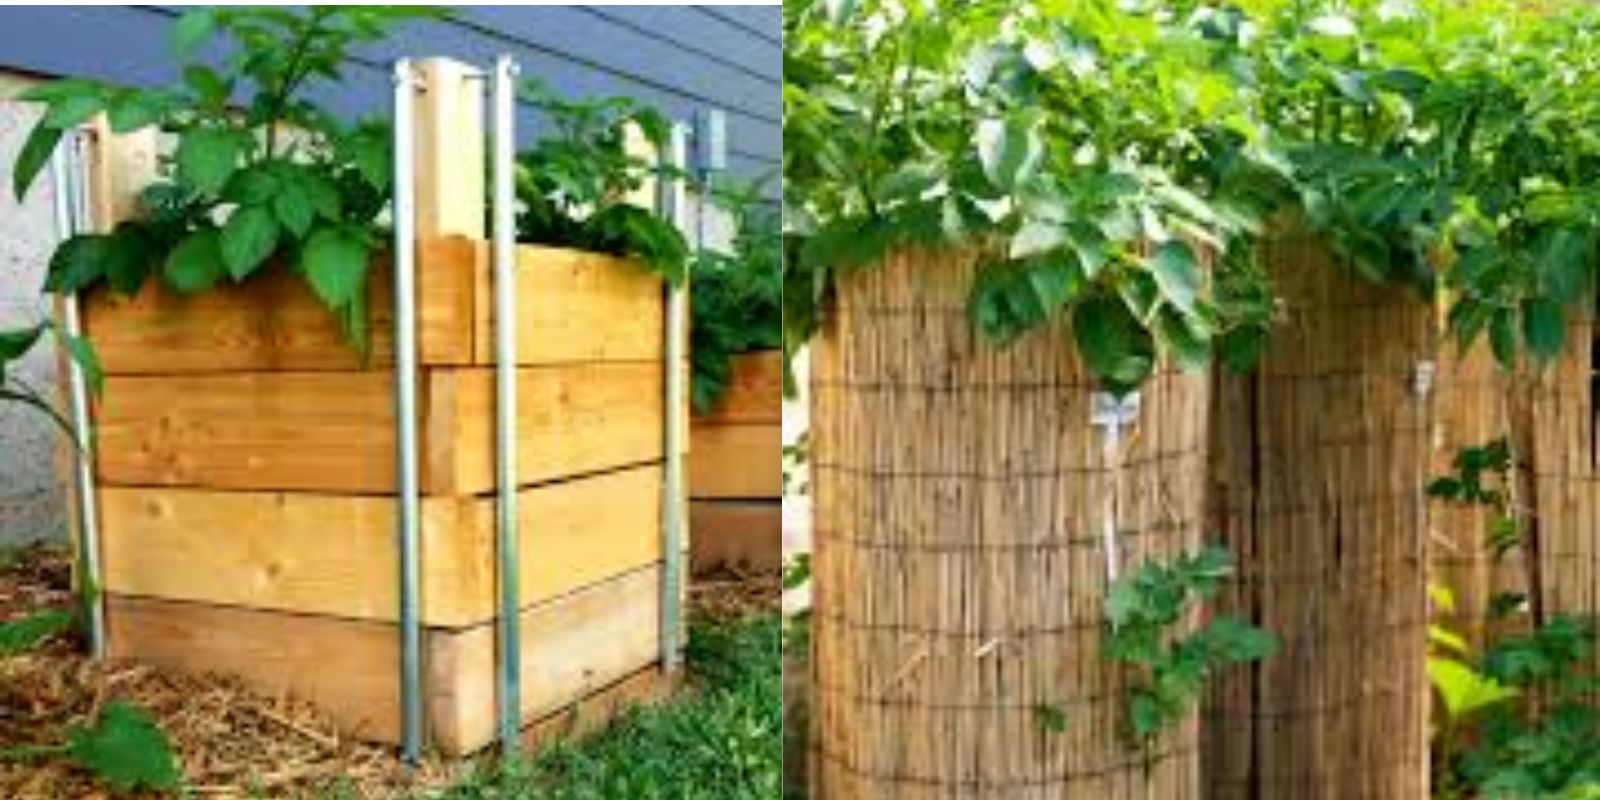
A potato tower is a vertical structure designed to allow potatoes to grow in layers, maximizing the space used for planting. It is essentially a cylindrical tower made from wire mesh, wood, or other materials, where seed potatoes are planted in layers of soil as the tower height increases. As the plants grow, more soil and compost are added, encouraging the potatoes to grow along the length of the tower.
This innovative growing method allows gardeners to harvest more potatoes from a small footprint and is especially useful for those living in apartments or homes with limited outdoor space. Potato towers are also great for controlling soil conditions, improving drainage, and reducing the risk of pests that often plague traditional potato crops.
Why Grow Potatoes in a Tower?
There are several benefits to growing potatoes in a tower, especially for those with limited space:
- Maximized Space: Vertical gardening allows you to grow potatoes in tight spaces by utilizing height rather than horizontal area.
- Better Drainage: A potato tower helps prevent waterlogging, as excess water can drain away from the bottom.
- Easier Harvesting: Harvesting potatoes from a tower is much easier than digging through traditional garden soil. Simply remove the tower and gather the potatoes.
- Less Weeding: As the plants grow upwards, there is less opportunity for weeds to invade the tower, making it easier to maintain.
- Pest Management: A potato tower reduces the risk of common pests, such as rodents and insects, that typically damage potato crops.
Now that we’ve discussed the benefits, let’s dive into the steps of building your own potato tower.
Step-by-Step Guide to Building a Potato Tower
Building a potato tower is an easy and rewarding project that can be completed in a day. Here’s everything you need to do:
Materials You’ll Need:
- Wire Mesh or Chicken Wire: This will form the structure of your potato tower. Choose wire mesh with holes about 2–3 inches wide to allow for proper growth.
- Staples or Zip Ties: These will be used to secure the wire mesh into a cylindrical shape.
- Wooden Stakes or Bamboo Poles: These are optional but can be used to reinforce the structure.
- Soil and Compost: You’ll need a mixture of good-quality potting soil and compost for planting the potatoes.
- Seed Potatoes: Choose certified seed potatoes from a reputable supplier to ensure they are disease-free.
- Mulch or Straw: This will help retain moisture and prevent weeds from growing inside the tower.
Tools You’ll Need:
- Wire Cutters: To cut the wire mesh to the desired size.
- Shovel or Trowel: For digging and moving soil.
- Gloves: For protection when handling the wire and soil.
- Scissors or Pruning Shears: If you need to trim excess growth.
- Tape Measure: For measuring the height and size of the tower.
Instructions for Building the Potato Tower:
- Choose a Location Start by selecting a spot in your garden that receives at least 6 hours of direct sunlight daily. Potatoes need plenty of sunlight to grow and produce a good yield. The location should also have good drainage to prevent the soil from becoming waterlogged.
- Prepare the Base Begin by laying out your wire mesh on the ground. Roll the wire into a cylindrical shape that’s approximately 3–4 feet in height. The width of the tower should be about 2–3 feet in diameter. Secure the ends of the wire mesh together using zip ties or staples, ensuring that the structure holds its shape.
- Reinforce the Tower (Optional) If you’re concerned about the stability of the tower, you can insert wooden stakes or bamboo poles around the outside of the mesh for added reinforcement. These will help the tower stay upright and maintain its shape as the plants grow.
- Fill the Base with Soil Place the tower in its final position and begin filling the bottom with a layer of soil and compost. You’ll want a layer that’s about 4–6 inches deep. Make sure the soil is loose and well-drained, allowing the potatoes to grow without being waterlogged.
- Plant the Seed Potatoes Place your seed potatoes on top of the soil, spacing them about 4–6 inches apart. If your seed potatoes are large, you can cut them into smaller pieces, ensuring that each piece has at least one “eye” or sprout. Cover the potatoes with another layer of soil, ensuring they are well-covered.
- Build the Tower Upwards As the potato plants grow, add more soil and compost in layers, burying the stems as they shoot up. This encourages the plants to produce more tubers along the buried stems. Continue adding soil as the plants grow, keeping the leaves exposed at the top. You can add additional straw or mulch to help retain moisture and prevent weeds.
- Watering and Care Water the potato tower regularly, keeping the soil moist but not soaking wet. Ensure the plants get enough water, especially during dry spells. Potatoes require consistent moisture for optimal growth, but overwatering can cause the tubers to rot.
- Monitor Growth and Adjust As the potatoes continue to grow, keep an eye out for pests, disease, and any signs of nutrient deficiency. If necessary, apply a balanced fertilizer to encourage healthy growth. Be vigilant about controlling weeds and any unwanted growth within the tower.
- Harvesting the Potatoes After several months, once the potato plants begin to flower and the leaves start turning yellow and dying back, it’s time to harvest. Gently remove the layers of soil and compost from the tower, carefully digging out the potatoes. You’ll find potatoes growing along the length of the tower, making harvesting easy and efficient.
Tips for Success
- Choose the Right Varieties: Certain potato varieties are better suited for container and vertical gardening. Look for early-maturing types, such as Red Pontiac or Yukon Gold, which produce a good yield in smaller spaces.
- Avoid Overcrowding: While it’s tempting to plant too many potatoes in the tower, overcrowding can lead to poor air circulation and stunted growth. Stick to the recommended spacing for optimal results.
- Rotation: Consider rotating your crops each season to avoid soil depletion and reduce the risk of disease.
Conclusion
Building a potato tower is an excellent way to grow potatoes in small spaces, whether you have a tiny backyard, a balcony, or even just a patio. By following the simple steps outlined in this article, you can enjoy a bountiful harvest of homegrown potatoes with minimal effort. Not only does this technique save space, but it also allows you to grow a crop that would typically require more room. Happy gardening!
Get started with your own potato tower today and watch your potato harvest grow taller—literally! 🌱🍠 #PotatoTower #VerticalGardening #UrbanFarming #SmallSpaceGardening #GrowYourOwnFood #SustainableLiving #DIYGarden #HomegrownPotatoes