
Water management is an essential aspect of landscaping and home maintenance, especially if you have areas in your yard or around your foundation that are prone to flooding or water accumulation. A French drain is a popular and highly effective solution for redirecting water and preventing damage to your landscape and property. It’s a simple drainage system that channels excess water away from vulnerable areas, ensuring that your plants thrive and your foundation stays dry.
In this comprehensive guide, we will walk you through how to build a French drain from start to finish, step by step. Whether you’re dealing with water pooling in your yard, soggy patches in your garden, or water seeping into your basement, this DIY solution can be an affordable and highly effective fix. Let’s get started!
What Is a French Drain?
A French drain is a trench filled with gravel and a perforated pipe that redirects water away from areas that need to stay dry. It works by allowing water to flow into the perforated pipe, where it is then carried away to a designated area, such as a drainage ditch, storm drain, or dry well. The system is named after Henry French, a 19th-century lawyer and farmer who popularized its use in the United States.
French drains are often used around the perimeter of homes, gardens, or areas where water tends to pool. They can be installed in both dry and wet climates, making them a versatile solution for a variety of drainage issues.
Why Should You Build a French Drain?
A French drain offers several benefits, including:
- Waterproofing Foundations: Water pooling near your home’s foundation can cause cracks and structural damage. A French drain helps direct water away from the foundation, preventing potential damage and costly repairs.
- Preventing Erosion: Excess water can erode the soil around your garden or lawn. By installing a French drain, you protect your landscape from erosion and maintain its integrity.
- Improving Lawn Health: Excess moisture can lead to soggy, unhealthy lawns. A French drain helps dry out waterlogged areas, improving the overall health of your grass, plants, and garden.
- Cost-Effective Solution: Compared to more complex drainage systems, French drains are relatively inexpensive to install and maintain, making them a great DIY project for homeowners.
- Flood Control: If your yard tends to flood during heavy rains, a French drain can be a life-saver, ensuring water doesn’t stay stagnant and wreak havoc on your property.
Materials Needed to Build a French Drain
Before you begin your French drain project, gather the following materials:
- Shovel or Post Hole Digger: For digging the trench.
- Perforated Pipe: This is the key component of the French drain. It allows water to enter the pipe and flow through to the designated outlet.
- Landscape Fabric: To line the trench and prevent soil from clogging the perforated pipe.
- Gravel: For filling the trench and providing a base for the pipe. Gravel allows water to flow easily into the pipe.
- Pipe Fittings and Elbows (if necessary): If your drainage system requires turning or connecting multiple pipes, you’ll need the appropriate fittings.
- Level: To ensure the trench slopes properly.
- Rake: To level the gravel after it’s been placed in the trench.
- Soil or Sod: To fill in the trench after the system is installed.
Step-by-Step Guide to Building a French Drain
Now that you have your materials ready, it’s time to start building your French drain. Follow these steps to create an effective and long-lasting water management system in your yard or garden.
Step 1: Plan the Drainage Path
The first step in building a French drain is to plan the path the drain will take. Ideally, your French drain should be placed in an area where water naturally flows or pools. The drain should also slope gently downhill to allow the water to flow toward the designated outlet.
Important Tips:
- Choose a location where water naturally accumulates, such as around the foundation of your home or in low spots in your yard.
- Mark the starting point and end point of the drain. The starting point should be where water tends to collect, and the endpoint should be where the water will safely drain away (such as a storm drain, ditch, or dry well).
- Ensure that the slope of the trench is between 1% and 2%, meaning the trench should slope downward about 1-2 inches every 10 feet.
Step 2: Dig the Trench
Once you’ve planned the path, it’s time to start digging the trench. Using a shovel or post hole digger, dig a trench that’s 6 inches wide and 18-24 inches deep. The trench should follow the slope you’ve planned, ensuring water will flow freely through the system.
Pro Tip: Use a level to ensure the trench has the correct slope. Place the level across the trench, adjusting the depth of the trench as necessary to maintain the proper incline.
Step 3: Lay the Gravel Base
Once the trench is dug, add a 2-3 inch layer of gravel at the bottom of the trench. This will provide a stable base for the perforated pipe, and it will also help improve drainage by allowing water to flow more easily into the pipe.
Pro Tip: Make sure the gravel is evenly spread and level in the trench to support the pipe.
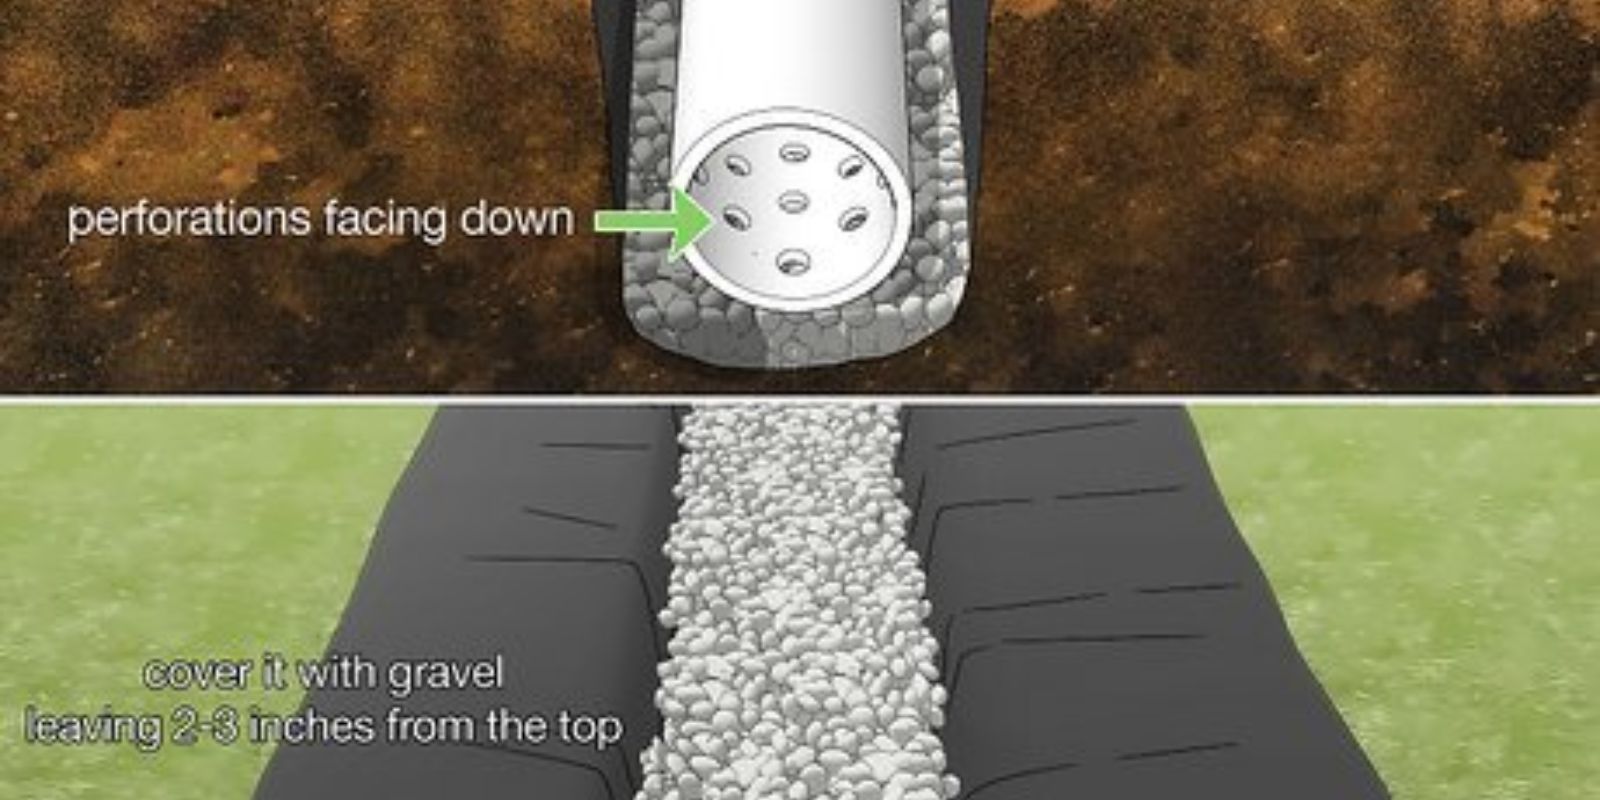
Step 4: Install the Perforated Pipe
Now, it’s time to lay the perforated pipe. Unroll the pipe along the trench, ensuring that the perforations (holes) are facing downwards. This allows the water to enter the pipe through the holes and be carried away. If your system needs to turn or connect with other pipes, use the appropriate pipe fittings or elbows.
Important Tip: Ensure that the pipe is sloping downhill to encourage the flow of water toward the outlet.
Step 5: Wrap the Pipe in Landscape Fabric
After the pipe is placed in the trench, cover it with landscape fabric. This will prevent soil, dirt, and debris from entering the pipe and clogging it over time. The fabric should overlap the edges of the trench, and it should be secured in place.
Pro Tip: Be sure the fabric is loose enough to allow water to flow through but tight enough to keep dirt out.
Step 6: Add More Gravel
Next, add more gravel over the perforated pipe, filling the trench until the gravel is a few inches below the surface of the soil. The gravel will help guide the water into the pipe, and it will also provide excellent drainage for your lawn or garden.
Pro Tip: Use a rake to level the gravel evenly and create a smooth surface.
Step 7: Cover the Drain with Soil or Sod
Once the trench is filled with gravel, you can cover it with soil or sod to restore the surface of your yard. If you’re using soil, gently spread it over the gravel, ensuring the surface is level with the rest of the yard. If you’re using sod, cut the sod into strips and lay it over the trench.
Step 8: Water the Drain and Test
Once your French drain is complete, water the area around the drain to check if it’s functioning correctly. Observe how the water moves and ensure that it flows downhill toward the outlet without pooling.
Maintenance of Your French Drain
French drains are relatively low-maintenance, but it’s important to periodically check them for clogs or damage. Here are a few maintenance tips:
- Check for Clogs: Inspect the outlet of the French drain regularly to ensure that water is flowing freely. Remove any debris or blockages that may accumulate.
- Clean the Pipe: If you notice that water isn’t flowing properly, you may need to flush the pipe with a hose to clear any blockages.
- Inspect for Settling: Over time, the trench may settle and cause the gravel to shift. If you notice unevenness, add more gravel as needed.
Final Thoughts
Building a French drain is a straightforward DIY project that can save you a lot of headaches by managing water around your property. By following the steps outlined in this guide, you can easily create an effective drainage system that prevents water damage, improves your landscape’s health, and keeps your home’s foundation safe.
Remember to plan carefully, use the right materials, and ensure proper slope and drainage. Once completed, you’ll have a functional and cost-effective solution to manage water flow around your yard.
So, roll up your sleeves, gather your materials, and start building your French drain today! Your lawn, garden, and home will thank you. 🌿