
Tomatoes are one of the most popular crops for home gardeners, but without the right support, your plants can end up damaged, fruitless, or even diseased. That’s where a strong tomato trellis comes in! Not only does a trellis keep your plants upright, but it also helps increase airflow, reduce pests, and ensure that your tomato fruits grow large and healthy. If you’re growing tomatoes and want to build a wooden trellis on a budget, this step-by-step guide will walk you through the process from start to finish.
Why Do You Need a Tomato Trellis?
Tomato plants, especially indeterminate varieties, can grow quite tall and heavy, making it difficult for them to support themselves without assistance. Here are the key benefits of having a tomato trellis:
- Improved Air Circulation: A trellis helps lift the plant off the ground, which reduces the risk of fungal infections caused by poor airflow.
- Better Sun Exposure: With plants growing vertically, each leaf and fruit gets ample sunlight for photosynthesis and ripening.
- Ease of Harvest: Fruit is easier to access when it’s supported and raised above the ground.
- Space Efficiency: Vertical gardening with a trellis allows you to grow more plants in a smaller space.
- Prevention of Fruit Rot: Tomatoes resting on the soil are prone to rot or being eaten by pests. A trellis keeps them safely off the ground.
Now that you know why a trellis is essential, let’s dive into how you can create a sturdy, budget-friendly wooden tomato trellis.
Materials You’ll Need
Before starting your project, gather the necessary materials. Most of these can be easily found at your local hardware store or garden center.
- Wooden Stakes: You’ll need four to six wooden stakes, each around 6 to 8 feet tall. These will serve as the main support structure for your trellis.
- Wooden Crossbars: Shorter pieces of wood (2-3 feet long) to attach horizontally between the stakes.
- Twine or String: Use strong, garden-friendly twine to create a grid for your tomatoes to climb.
- Hammer and Nails: To secure the wooden pieces together.
- Measuring Tape: To ensure that your stakes and crossbars are evenly spaced.
- Shovel or Stake Driver: For inserting the stakes into the ground.
- Tomato Clips or Plant Ties: Optional, but helpful for tying tomato vines to the trellis as they grow.
Step-by-Step Guide to Building a Wooden Tomato Trellis
Step 1: Select the Perfect Location
The first step is to choose a suitable location in your garden. Tomatoes thrive in full sunlight, so pick a spot that receives at least 6-8 hours of direct sun daily. The soil should also be well-drained and nutrient-rich to support healthy growth.
Once you have your location, decide on the size of your trellis based on how many tomato plants you’ll be growing. Generally, a trellis should be around 3 to 5 feet wide to accommodate several plants.
Step 2: Insert the Wooden Stakes
Begin by driving the wooden stakes into the ground. Space the stakes about 3-4 feet apart, depending on the size of your tomato plants. The stakes should be at least 6 feet tall, but 8 feet is even better if you have taller tomato varieties.
Use a hammer or stake driver to insert each stake at least 12 inches into the ground. Make sure they’re securely placed, as they’ll need to bear the weight of the plants and fruit.
Step 3: Attach the Crossbars
Once your stakes are firmly in place, it’s time to add the crossbars. The crossbars will help reinforce the structure of the trellis and provide horizontal support for the tomato vines to lean against.
Cut wooden pieces about 2-3 feet long (the same width as the spacing between your stakes). Start attaching them horizontally between the stakes using nails and a hammer. You should place a crossbar every 12-18 inches along the height of the stakes.
Ensure the crossbars are level and firmly attached, as this will be the backbone of your trellis.
Step 4: Create a Twine Grid
The next step is to create a twine grid for your tomato plants to climb. Begin at the bottom of the trellis and tie the twine to one of the wooden stakes. Run the twine across to the opposite stake, tying it securely. Repeat this process, spacing the twine about 6-8 inches apart vertically as you move up the stakes.
For additional support, you can also run the twine diagonally or crosswise between the stakes, forming a crisscross grid pattern. This will give the tomato vines more places to latch onto as they grow.
Step 5: Plant Your Tomatoes
Now that your trellis is ready, it’s time to plant your tomatoes. Place each plant about 18-24 inches apart at the base of the trellis. Be sure to plant them deeply, covering the stem up to the first set of leaves to encourage strong root development.
As the plants grow, gently tie the vines to the twine grid using tomato clips or soft plant ties. Be careful not to tie them too tightly, as you want to allow room for the stems to expand.
Step 6: Maintain and Train Your Tomato Plants
Once your trellis is set up, it’s important to maintain the structure and train your tomato plants to climb. As the plants grow taller, continue to tie the vines to the trellis to prevent them from falling over.
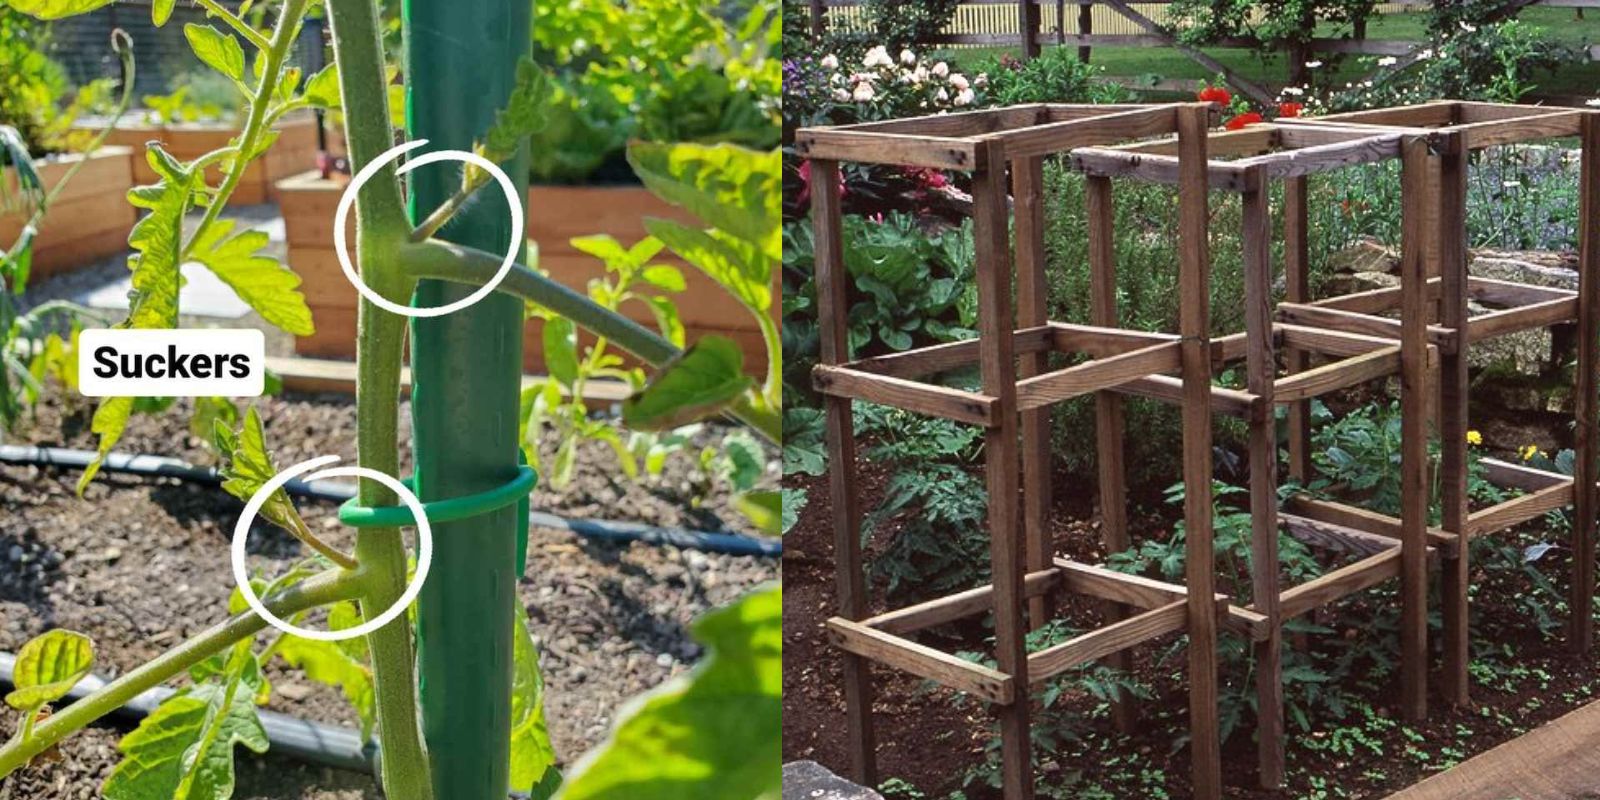
Regularly prune any lower leaves that touch the soil, as these are more prone to disease. Also, pinch off suckers (small shoots that grow between the main stem and a branch) to keep the plant focused on fruit production rather than excessive foliage growth.
Keep an eye on the twine and wooden structure throughout the growing season to ensure everything remains sturdy and in place.
Tips for Maximizing Your Trellis’s Effectiveness
- Choose the Right Tomato Varieties: Indeterminate tomato varieties (such as cherry or beefsteak) will grow taller and require more support. Determinate varieties (such as Roma) tend to be bushier and may not need as tall of a trellis.
- Rotate Your Crops: To prevent soil-borne diseases, avoid planting tomatoes in the same spot year after year. Rotate them with other crops like beans or lettuce.
- Fertilize Regularly: Tomatoes are heavy feeders, so be sure to use a balanced fertilizer throughout the growing season to keep your plants healthy and productive.
- Monitor for Pests: Keep an eye out for common tomato pests such as aphids, whiteflies, and tomato hornworms. Early detection and treatment are key to preventing an infestation.
- Mulch Around the Base: Adding mulch around the base of your tomato plants helps retain soil moisture and suppress weeds.
Conclusion
Building your own wooden tomato trellis on a budget is a simple and rewarding DIY project that can significantly improve your tomato harvest. Not only does it provide crucial support for your plants, but it also keeps them healthy and productive throughout the growing season. With just a few basic materials and a little effort, you’ll have a sturdy trellis that can last for years, helping you grow more delicious tomatoes than ever before.
Get Involved!
Have you tried making your own tomato trellis? Share your tips, tricks, and pictures with us and let’s grow together! 🌱🍅