
Composting is an eco-friendly practice that transforms organic waste into valuable nutrient-rich soil. Whether you are a seasoned gardener or a beginner, composting is an easy, sustainable way to enrich your garden without having to rely on store-bought fertilizers. One of the most effective ways to compost at home is by using a compost tumbler. These tumblers are simple to use, efficient, and can speed up the decomposition process significantly. But did you know you can build your own compost tumbler at home for a fraction of the cost of buying one? In this guide, we’ll show you how to build a budget-friendly DIY compost tumbler and explain how to use it to create the perfect compost for your garden.
Why Use a Compost Tumbler?
Before diving into the construction process, let’s first understand why a compost tumbler is such a great tool for home composting. A compost tumbler is essentially a rotating container that helps mix compost ingredients and provides adequate airflow to speed up the composting process. Here are some key benefits of using a compost tumbler:
- Faster Composting: Compost tumblers help to mix the materials regularly, which accelerates the breakdown of organic matter. The process typically takes 2-4 weeks when using a tumbler, compared to several months for traditional compost bins.
- Odor Control: A well-maintained compost tumbler can reduce unpleasant odors by ensuring the compost ingredients are properly aerated. Regular turning prevents the buildup of smelly anaerobic conditions.
- Ease of Use: Unlike traditional composting methods that require frequent manual turning with a pitchfork, a compost tumbler requires less effort to mix the compost. Simply turn the handle, and the compost gets aerated.
- Space Efficient: Compost tumblers are typically compact and can fit in small spaces like a backyard or balcony, making them perfect for urban gardeners or those with limited space.
Materials Needed to Build a DIY Compost Tumbler
Building your own compost tumbler doesn’t require advanced skills or expensive materials. In fact, you can create a functional tumbler with easily accessible items. Below are the materials you’ll need to make a simple, budget-friendly compost tumbler:
Materials:
- Plastic Barrel or Large Container: A 55-gallon plastic drum is ideal, but you can also use a large plastic container or an old barrel. Ensure it has a tight-fitting lid to keep pests out.
- Drill with Large Drill Bit: You’ll need a drill to create air holes in the barrel for ventilation. A 1-inch drill bit works best for this purpose.
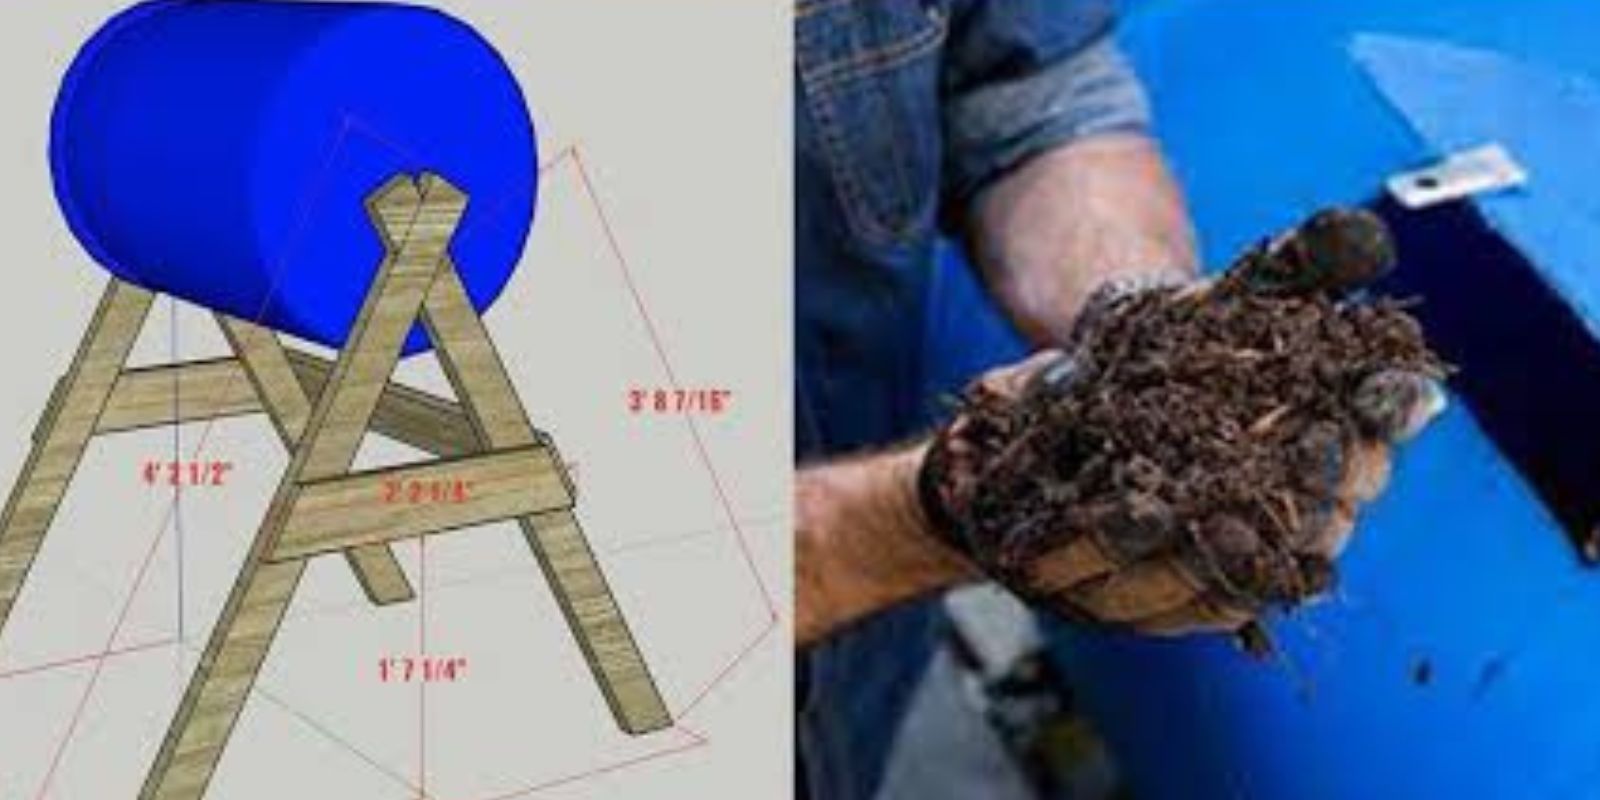
- Wooden Frame: To hold the tumbler in place and make it easier to rotate, you can build a simple wooden frame. This frame will support the barrel and help it rotate smoothly.
- Wheels: Use sturdy wheels to attach to the bottom of the frame. This will make it easier to turn the tumbler, ensuring you get well-aerated compost.
- Handle or Crank: To make turning the tumbler more manageable, you can attach a handle or a crank to one end of the barrel.
- Screws and Bolts: To assemble the frame and secure the parts together.
Optional Materials:
- Compost Thermometer: While not strictly necessary, a thermometer will help you monitor the internal temperature of your compost to ensure it’s decomposing at the right rate.
- Lid: A simple lid that can be securely fastened to the barrel helps keep the compost contained and protects it from rain and pests.
Step-by-Step Guide to Building Your DIY Compost Tumbler
Now that you have your materials, it’s time to start building your compost tumbler. Follow these simple steps:
Step 1: Prepare the Barrel
Start by preparing the plastic barrel or container. Clean the barrel thoroughly, especially if it was used for anything other than food storage. Once the barrel is clean, drill several 1-inch holes in the barrel to allow for airflow. Make sure to drill holes on all sides, including the top and bottom. This will ensure proper ventilation and speed up the decomposition process.
Step 2: Build the Frame
Next, you’ll need to build the wooden frame that will support the tumbler and allow it to rotate easily. Start by measuring the dimensions of the barrel and cut four pieces of wood to create the base and support structure. The frame should be wide enough to hold the barrel securely while allowing space for the barrel to rotate freely.
Assemble the frame by attaching the four pieces of wood together, forming a rectangular base. Once the base is complete, attach vertical supports at the corners of the frame. These supports will hold the barrel in place.
Step 3: Attach the Wheels
To make the compost tumbler easier to rotate, attach wheels to the bottom of the frame. Use sturdy, durable wheels that can support the weight of the barrel once it’s filled with compost materials. Ensure the wheels are securely fastened to prevent wobbling when you rotate the tumbler.
Step 4: Add the Handle or Crank
At one end of the barrel, attach a handle or crank that will allow you to turn the compost tumbler. If you’re using a handle, simply drill a hole at one end of the barrel and attach the handle with screws. For a crank, you’ll need to attach a rotating mechanism, such as a metal rod or PVC pipe, that allows you to turn the barrel easily.
Step 5: Assemble the Tumbler
Once the frame and handle are attached, place the barrel onto the frame. The barrel should be balanced and able to rotate smoothly. You may need to adjust the frame to ensure the barrel is properly positioned and can spin without obstruction.
Step 6: Start Composting!
Now that your DIY compost tumbler is complete, it’s time to start composting. Place your tumbler in a sunny spot in your garden or backyard to speed up the decomposition process. The warmth from the sun helps to maintain the ideal temperature inside the tumbler, ensuring efficient composting.
How to Use Your Compost Tumbler
Using a compost tumbler is relatively simple. Here’s a basic guide on how to get the best results:
- Add the Right Materials: Start by adding compostable materials such as fruit and vegetable scraps, coffee grounds, grass clippings, leaves, and small branches. Aim for a balance between green materials (rich in nitrogen) and brown materials (rich in carbon).
- Turn the Tumbler Regularly: To ensure the composting process is efficient, turn the tumbler every few days. This helps to mix the materials, allowing oxygen to reach the compost and promoting faster decomposition.
- Keep It Moist: The compost should be kept moist, but not too wet. If it’s too dry, add some water. If it’s too wet, add more brown materials such as leaves or cardboard to absorb excess moisture.
- Harvest the Compost: After several weeks, your compost should be ready to use. Once it turns dark and crumbly, it’s time to remove it and add it to your garden.
Common Composting Mistakes to Avoid
To get the best results from your compost tumbler, avoid these common mistakes:
- Adding the Wrong Materials: Avoid adding meat, dairy products, or oily foods, as they can attract pests and create unpleasant odors.
- Overloading the Tumbler: Don’t fill the tumbler too quickly. Add materials gradually, and ensure there’s enough air circulation for proper decomposition.
- Not Turning Enough: Turning the tumbler is crucial for aerating the compost. Turn it regularly to speed up the process and prevent foul odors.
Conclusion
Building a DIY compost tumbler is an affordable and effective way to compost at home. With just a few materials and some simple tools, you can create an efficient system that will help you recycle organic waste and create nutrient-rich compost for your garden. Whether you have a small backyard or a large garden, a compost tumbler is an excellent addition to your sustainable gardening practices. Start building your compost tumbler today, and enjoy a more eco-friendly, waste-free garden tomorrow!
Hashtags: