
Building a brick walkway can be a rewarding project that enhances the aesthetic appeal of your garden while providing a practical solution for navigating your outdoor space. A well-designed walkway can lead guests through your garden, create a defined path, and reduce wear on your lawn and soil. In this comprehensive guide, we’ll walk you through the process of designing and constructing a beautiful brick walkway that will elevate your garden.
The Benefits of a Brick Walkway
Before we dive into the steps, let’s explore some benefits of having a brick walkway:
- Aesthetic Appeal: Brick walkways add a classic and elegant look to any garden. They can be designed in various patterns, colors, and styles to complement your landscaping.
- Durability: Bricks are incredibly durable and can withstand harsh weather conditions, making them a long-lasting option for outdoor paths.
- Low Maintenance: Unlike concrete, which can crack and stain, bricks are easier to replace if damaged. They require minimal maintenance, typically just periodic cleaning.
- Improved Accessibility: A brick walkway provides a safe and accessible route through your garden, reducing the risk of tripping or slipping on uneven ground.
- Increased Property Value: A well-designed landscape can increase the value of your home, and a brick walkway is an attractive feature for potential buyers.
Step 1: Planning Your Walkway
The first step in building your brick walkway is planning the design. Here are some factors to consider:
Determine the Location
Decide where you want your walkway to go. It could connect various parts of your garden, lead to a patio or deck, or provide access to garden beds. Consider the natural flow of foot traffic and choose a path that feels intuitive.
Choose a Design
There are various design options for your walkway, including:
- Straight Paths: These are simple and easy to construct. They work well for formal gardens.
- Curved Paths: These add a more organic feel and can be adapted to fit around plants and existing structures.
- Patterns: You can lay bricks in various patterns, such as herringbone, basketweave, or running bond. Choose a pattern that suits your style.
Measure and Mark
Once you’ve decided on the design, measure the length and width of the walkway. Use stakes and string to mark the outline of the path. This will give you a clear visual of where to dig.
Step 2: Gathering Materials
Before you start construction, you’ll need to gather the following materials:
- Bricks: Choose bricks that suit your design and budget. You can use new or reclaimed bricks for a unique look.
- Sand: This will create a stable base for your bricks.
- Landscaping Fabric: This prevents weeds from growing through the walkway.
- Edging Materials: Consider bricks, stones, or plastic edging to keep your walkway intact.
- Tools: You’ll need a shovel, a level, a rubber mallet, a rake, and a broom.
Step 3: Preparing the Area
Preparation is key to ensuring your walkway is durable and attractive. Follow these steps:
Remove Existing Grass and Debris
Use a shovel to remove any grass, weeds, or debris from the marked path. Dig down about 4-6 inches to create a suitable base.
Lay Landscaping Fabric
After you’ve cleared the area, lay down landscaping fabric along the path. This will help prevent weeds from growing through your walkway.
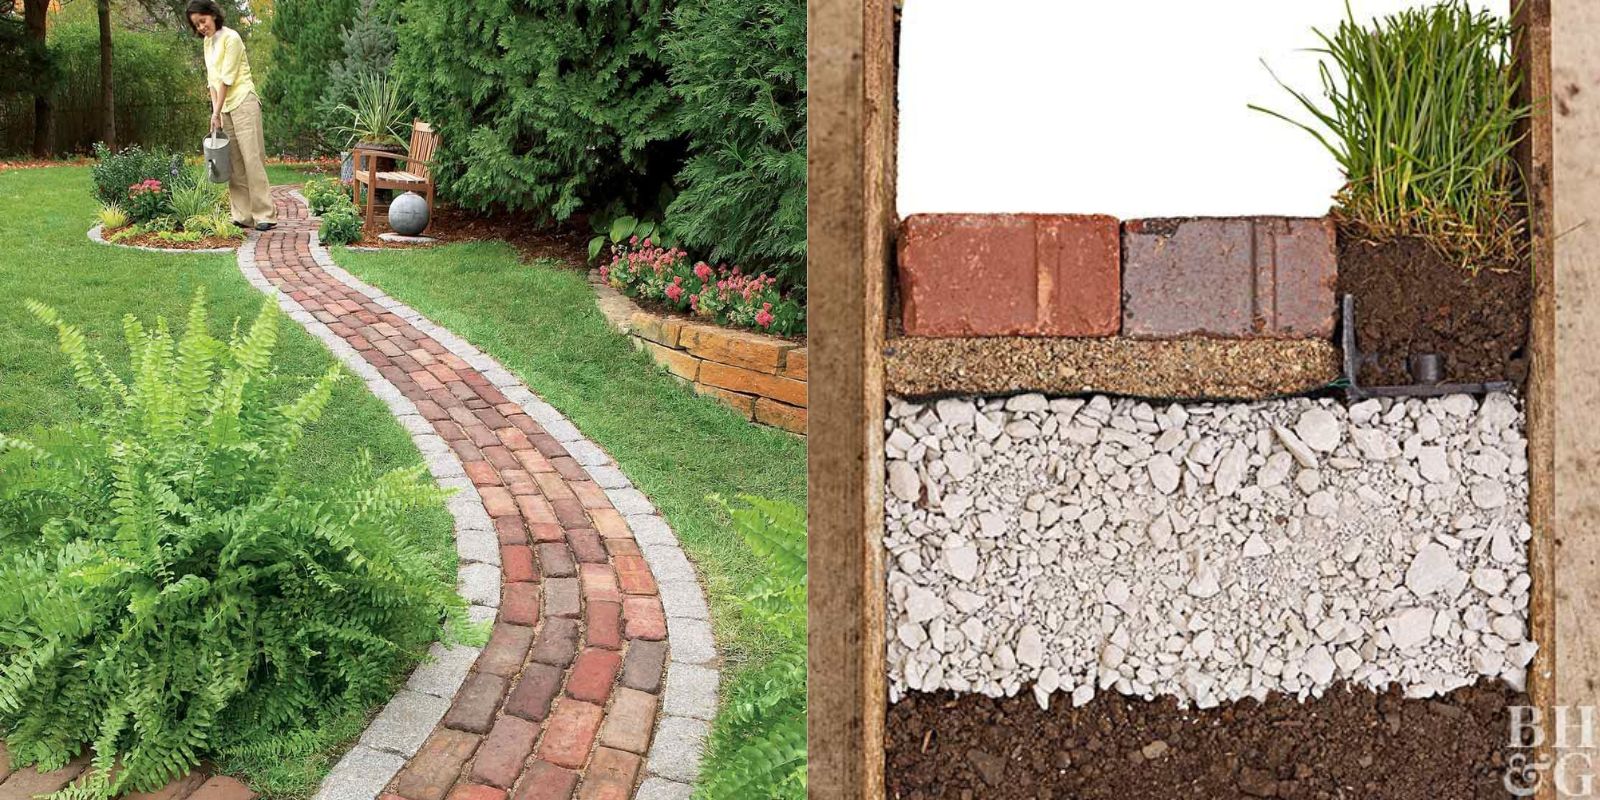
Add a Base Layer of Sand
Pour a 2-3 inch layer of sand over the fabric. Use a rake to spread it evenly and create a smooth surface. This sand layer will provide stability and help with drainage.
Step 4: Setting the Bricks
Now comes the fun part—laying the bricks! Here’s how to do it:
Begin Laying the Bricks
Start laying your bricks at one end of the walkway, following the design pattern you chose. Place the first brick in the corner and continue laying them side by side, ensuring they are tightly fitted.
Check for Level
As you lay the bricks, use a level to ensure they are even. Adjust the sand underneath if necessary to keep them level and aligned.
Fill Gaps Between Bricks
Leave small gaps between the bricks for expansion and drainage. These gaps should be consistent throughout the walkway.
Step 5: Filling Gaps and Compaction
After laying all the bricks, it’s time to fill the gaps and secure everything in place:
Fill Gaps with Sand or Gravel
Using a broom, sweep sand or gravel into the gaps between the bricks. This will help lock them in place and prevent shifting.
Compact the Bricks
To ensure stability, gently tap the bricks with a rubber mallet. This will help them settle into the sand base. Recheck the level and make adjustments as needed.
Step 6: Edging Your Walkway
Edging is essential to keep your walkway intact and maintain its shape:
Choose Your Edging Material
Select your edging material (bricks, stones, or plastic) and place it along the outer edges of the walkway. This will prevent the bricks from shifting and keep the walkway looking neat.
Secure the Edging
If you’re using bricks or stones, you may need to dig a small trench to set them in place. Make sure they’re level and aligned with the walkway.
Step 7: Final Touches and Maintenance
Congratulations! You’ve built your brick walkway. Now, let’s add some finishing touches and discuss maintenance:
Water the Walkway
Lightly water the walkway to help the sand settle into the gaps between the bricks. This will also help compact the walkway.
Add Decorative Elements
Consider adding decorative elements, such as garden lights, potted plants, or decorative stones, to enhance the look of your walkway.
Maintenance Tips
- Cleaning: Regularly sweep away leaves and debris to keep the walkway clean. You can also hose it down occasionally.
- Weeding: Check for weeds growing in the gaps and remove them as soon as you spot them.
- Replenishing Sand: Over time, the sand in the gaps may wash away. Replenish it as needed to maintain stability.
Conclusion
Building a brick walkway in your garden is a worthwhile investment that enhances both functionality and beauty. By following this step-by-step guide, you can create a charming path that will serve you for years to come. Not only will your garden look more organized, but you’ll also enjoy the practical benefits of a well-designed walkway.
So, roll up your sleeves, gather your materials, and let your creativity flow. Happy gardening!
#GardenWalkway #DIYProjects #BrickPathway #GardeningTips #HomeImprovement #OutdoorLiving #LandscapingIdeas