
Garlic, known scientifically as Allium sativum, is a staple in kitchens around the world. Not only does it add depth and flavor to countless dishes, but it also boasts numerous health benefits. Whether you’re a seasoned gardener or a beginner, knowing how and when to harvest garlic is crucial for ensuring the best flavor and storage life. This article provides a comprehensive guide on harvesting garlic, including the signs of readiness, techniques for harvesting, curing, and storing your garlic effectively.
Understanding Garlic Growth Stages
Garlic is typically planted in the fall or spring, depending on the variety and local climate. As it grows, garlic undergoes several stages:
- Planting: Garlic is planted from cloves, usually 1-2 inches deep in well-drained soil.
- Sprouting: Within a few weeks, green shoots emerge from the soil.
- Leaf Development: As the garlic plant grows, it develops long, slender leaves that contribute to photosynthesis and nutrient storage.
- Bulb Formation: The most critical phase for harvest timing, the bulbs begin to swell underground.
- Maturation: In the final weeks before harvest, the leaves start to change color, signaling that it’s time to check for readiness.
Understanding these growth stages helps you anticipate when to start monitoring your garlic for harvest.
When to Harvest Garlic
Timing is everything when it comes to harvesting garlic. Harvesting too early can result in small, underdeveloped bulbs, while waiting too long can lead to split bulbs or diminished flavor. Here are key indicators to determine the right time for harvest:
1. Observe the Foliage
One of the best ways to know when to harvest garlic is by monitoring the leaves:
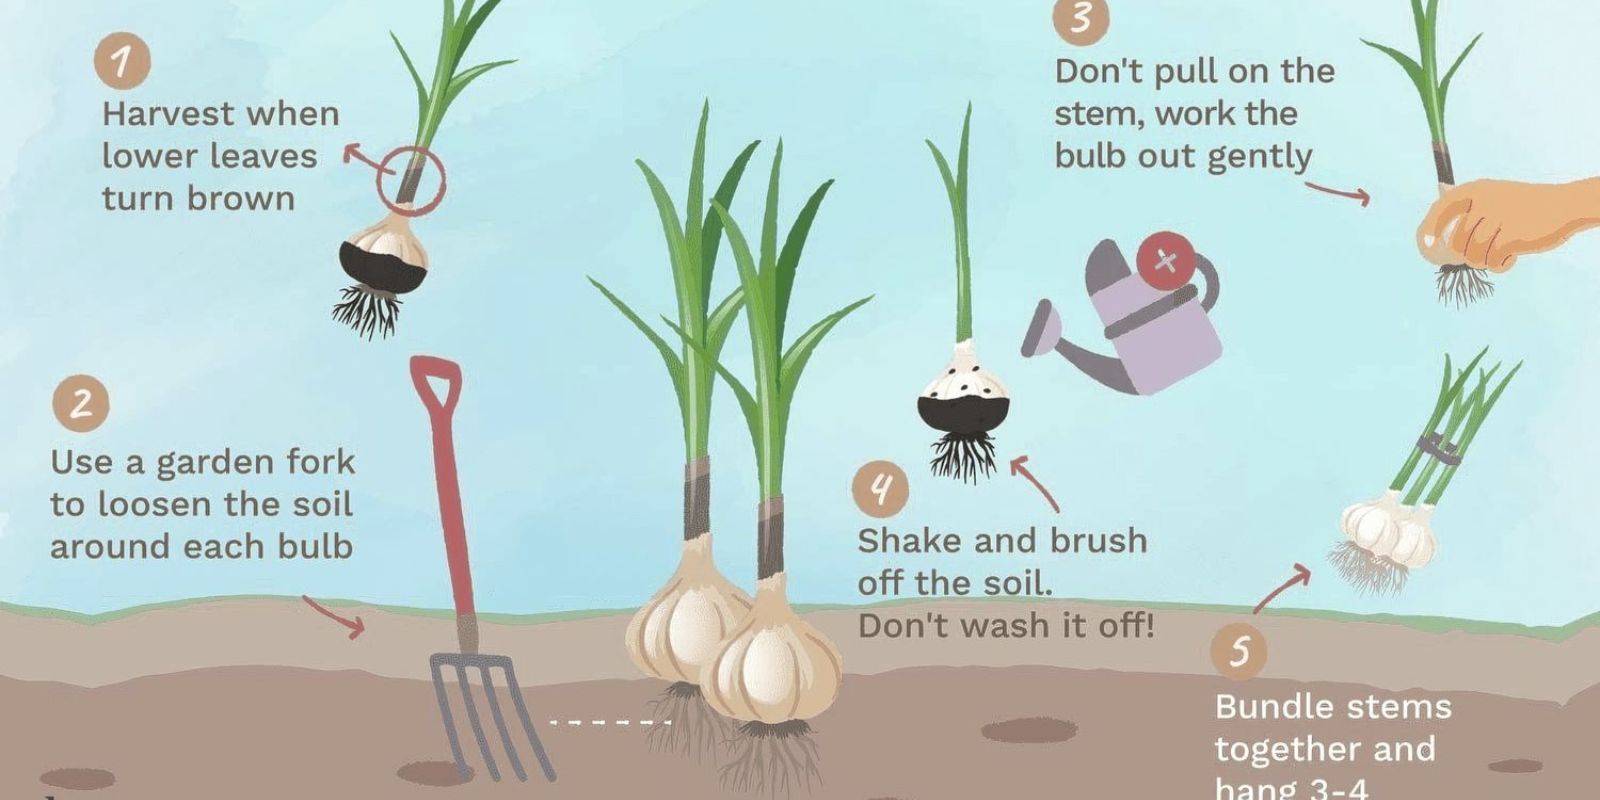
- Color Change: When the lower leaves start turning yellow and brown, it’s a sign that the garlic is nearing maturity. Aim for about 30-50% of the leaves to be brown.
- Upper Leaves: The upper leaves should still be green and healthy at this stage. If most of the leaves have died back, it may be too late to harvest.
2. Test a Bulb
If you’re uncertain about the harvest timing, you can always test a bulb:
- Dig Carefully: Gently dig around one bulb to see its size and condition. Use a trowel or garden fork to avoid damaging the bulb.
- Look for Firmness: A well-formed bulb will be firm to the touch and have tight, papery skin. If it’s small or mushy, give it more time in the ground.
3. Seasonal Considerations
Harvesting typically occurs in mid-summer, about 4-6 months after planting, depending on the garlic variety and local climate.
- Hardneck Varieties: These usually mature earlier, often in late June to early July.
- Softneck Varieties: These can take longer to mature, typically harvested in July to August.
4. Check the Weather
The weather can also influence your harvest timing:
- Dry Conditions: It’s best to harvest on a dry day, ideally after a few sunny days. Moist conditions can promote disease and mold during curing.
- Avoid Rain: Harvesting before expected rain can also help prevent moisture-related issues.
How to Harvest Garlic
Once you’ve determined that your garlic is ready for harvest, it’s time to take action. Here’s a step-by-step guide on how to harvest garlic properly:
1. Prepare Your Tools
Gather the necessary tools before heading to the garden:
- Garden Fork or Trowel: For loosening the soil around the bulbs.
- Hand Gloves: To protect your hands while digging.
- Pruning Shears or Snips: For cutting the stems.
- Basket or Container: For collecting the harvested bulbs.
2. Loosen the Soil
Using a garden fork or trowel, carefully loosen the soil around the garlic bulbs:
- Avoid Damage: Be cautious not to stab the bulbs, as this can lead to rot during storage.
- Create Space: Work your way around the bulb, loosening the soil so you can pull it out easily.
3. Pulling the Garlic
Now, it’s time to harvest the garlic:
- Grip the Stalk: Hold the stalk firmly, about an inch above the bulb.
- Pull Gently: With a steady motion, pull the garlic from the ground. If it doesn’t come out easily, use the fork to loosen it further.
4. Removing Soil and Trimming
Once you’ve harvested the bulbs, gently shake off any excess soil:
- Avoid Rubbing: Don’t wash the bulbs, as moisture can lead to mold during curing.
- Trim Stems: Use pruning shears to cut the stems about 1-2 inches above the bulb, but leave enough to allow for braiding if desired.
5. Sorting the Harvest
Sort through your harvested garlic to identify any damaged or diseased bulbs:
- Use Healthy Bulbs: Only store healthy, firm bulbs for future use.
- Use Damaged Bulbs First: Plan to use any compromised bulbs soon, as they won’t store well.
Curing Garlic
Curing is a vital process that enhances the flavor and storage life of garlic. Proper curing allows the outer layers to dry and helps develop the strong, aromatic flavor garlic is known for. Follow these steps to cure your garlic effectively:
1. Choose a Curing Location
Find a suitable spot for curing your garlic:
- Cool and Dark: Select a cool, dark area with good ventilation, such as a garage, shed, or well-ventilated room.
- Avoid Direct Sunlight: Sunlight can degrade the quality of the garlic and cause it to sprout prematurely.
2. Lay Out the Garlic
Arrange the harvested garlic in a single layer:
- Use Wire Racks or Baskets: These promote airflow around the bulbs. Alternatively, hang garlic in bundles, ensuring good air circulation.
- Avoid Crowding: Crowding can lead to uneven drying and increased risk of rot.
3. Curing Duration
Allow the garlic to cure for approximately 2-3 weeks:
- Check for Dryness: The outer layers should feel dry and papery. The roots will also dry out and should feel brittle.
- Monitor Conditions: Check periodically for mold or rot. If necessary, increase airflow or adjust humidity levels.
4. Final Trimming
After curing, it’s time to prepare your garlic for storage:
- Trim Roots: Cut off the roots close to the bulb.
- Trim Stems: If you haven’t already, trim the stems to about 1 inch above the bulb or braid them for decorative storage.
Storing Garlic
Proper storage is essential to extend the shelf life and maintain the flavor of your garlic. Here’s how to store garlic effectively:
1. Choose the Right Containers
Select containers that provide good airflow:
- Mesh Bags: These allow air circulation and prevent moisture buildup.
- Paper Bags or Baskets: If you prefer, paper bags can also work well, provided they’re not sealed tightly.
2. Store in a Cool, Dark Place
Garlic should be stored in a cool, dark, and dry location:
- Temperature: Ideal storage temperatures are between 60-65°F (15-18°C).
- Humidity: Aim for low humidity to prevent mold and sprouting.
3. Avoid Refrigeration
Refrigerating garlic is generally not recommended:
- Sprouting Risk: The cold environment can lead to sprouting and a decrease in flavor.
- Moisture Concerns: Refrigerators can create excess moisture, promoting rot.
4. Monitor Storage Conditions
Periodically check your stored garlic:
- Inspect Regularly: Look for signs of sprouting or mold. Remove any affected bulbs immediately to prevent spreading.
- Use Older Bulbs First: Use the oldest bulbs in your stash before newer ones to ensure nothing goes to waste.
Conclusion
Harvesting garlic is a rewarding process that allows you to enjoy the fruits of your labor in your culinary creations. By understanding when to harvest, how to do it properly, and how to cure and store your garlic, you can maximize flavor and ensure a bountiful supply.
Whether you’re growing garlic for personal use or sharing it with friends and family, mastering the harvesting process will enhance your gardening experience. Remember to monitor your plants, observe their growth, and enjoy the journey of nurturing your garlic from seed to table. Happy gardening!
Join the Conversation!
Have you harvested garlic before? Share your tips and experiences with us! Use the hashtags #GarlicHarvest, #HomeGardening, #OrganicGarlic, #GrowYourOwnFood, and #GardenToTable to connect with fellow garlic enthusiasts and inspire others to grow their own! 🧄🌱