
Water conservation is essential, especially for garden enthusiasts who need consistent access to water for healthy, thriving plants. A rain barrel offers an eco-friendly way to capture and store rainwater, reducing the demand on municipal water systems, lowering your water bill, and providing a free resource for your garden. This article dives into the details of constructing and maintaining a rain barrel for home gardeners, including step-by-step instructions, benefits, and important maintenance tips.
Why Use a Rain Barrel?
Rainwater collection isn’t a new concept; people have been harvesting rain for centuries. However, as water conservation gains attention, using a rain barrel has become a practical solution for urban and rural gardeners alike. Here are a few reasons why you might want to incorporate a rain barrel into your garden setup:
- Reduces Water Usage: Rainwater can supply water to plants, reducing the need to use potable water.
- Saves Money: Using collected rainwater minimizes your water bill.
- Eco-Friendly: Redirecting stormwater can prevent runoff, reducing soil erosion and decreasing pollution in local waterways.
- Improves Plant Health: Rainwater is free of the salts, minerals, and chemicals found in tap water, making it ideal for plants.
Materials You’ll Need
Before starting your DIY rain barrel, gather the necessary materials. Most can be found at local hardware stores or garden centers.
- A food-grade plastic barrel (50-60 gallons)
- 3/4-inch spigot
- PVC elbow fitting
- Drill with 1-inch and 3/4-inch bits
- Inlet filter or mesh screen
- Teflon tape
- Silicone caulk or waterproof sealant
- Overflow hose or additional elbow fitting (optional)
- Cinder blocks or a sturdy stand
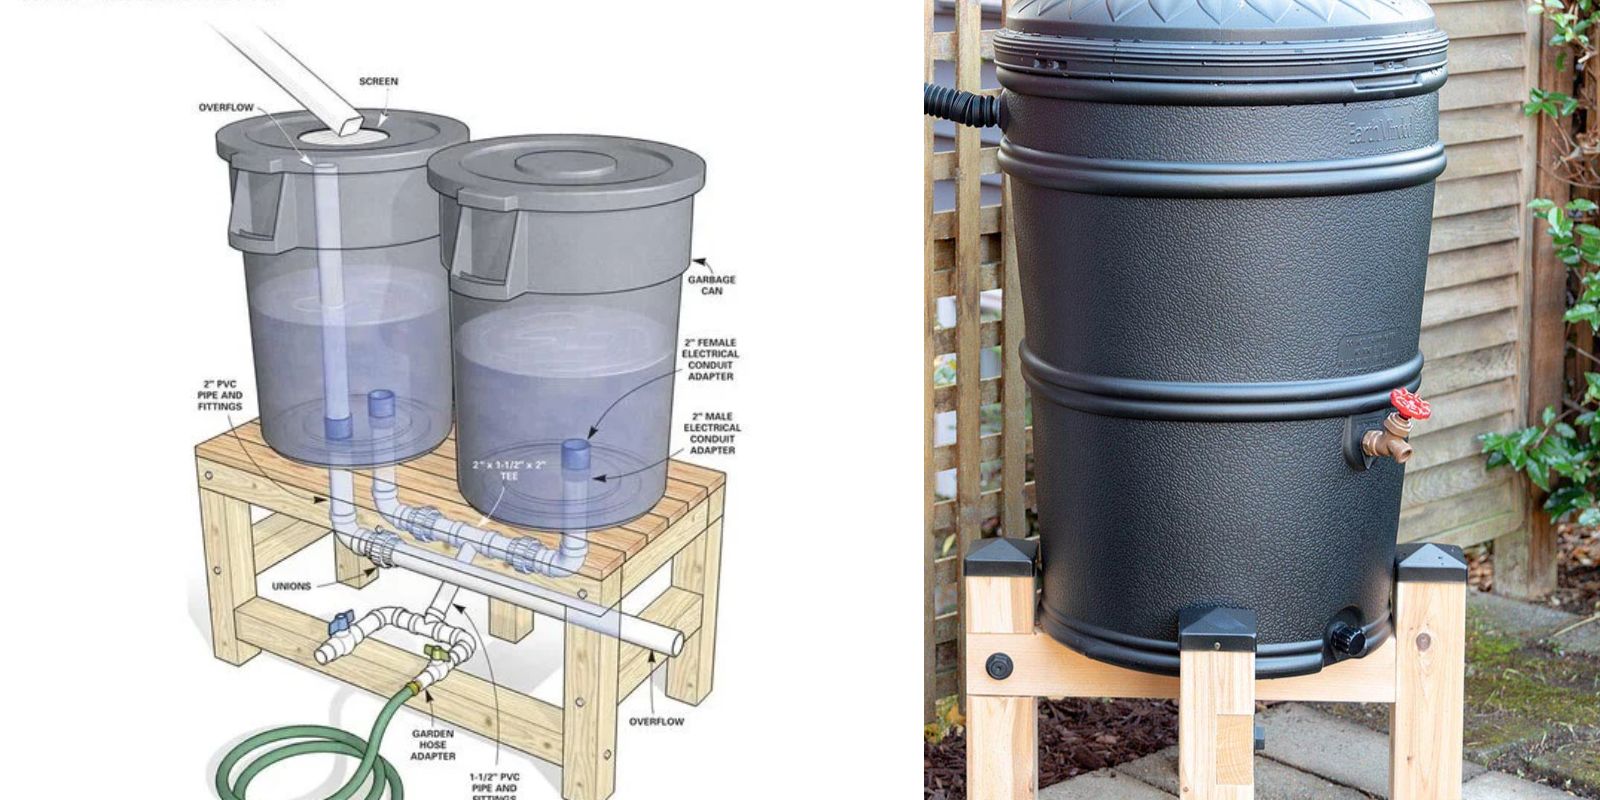
Step-by-Step Guide to Building a Rain Barrel
Step 1: Select Your Barrel
Choosing the right barrel is the first step. Look for a food-grade plastic barrel, preferably 50-60 gallons. Many people use barrels that previously held food products, like pickles or olives, as they are safe for storing water meant for gardening. Avoid barrels that have been used for chemicals, as residue can harm your plants.
Step 2: Clean the Barrel Thoroughly
If your barrel was used to store anything other than water, it’s essential to clean it out. Use a mixture of mild detergent and warm water to rinse the interior thoroughly. This step prevents any residues from contaminating your collected rainwater. Rinse several times until the water runs clear, ensuring no traces of detergent remain.
Step 3: Drill the Overflow Hole
To avoid overfilling, create an overflow system. Drill a hole near the top of the barrel for excess water to escape, using a 1-inch drill bit. Attach a PVC elbow fitting to direct the overflow away from the foundation of your home, or attach a hose for better control. This step helps prevent standing water around your house, which can attract pests and cause structural issues.
Step 4: Drill the Spigot Hole
For accessing the stored water, you’ll need to add a spigot near the bottom of the barrel. Use a 3/4-inch drill bit to make a hole roughly 3-4 inches above the base. Before inserting the spigot, wrap the threads with Teflon tape to ensure a watertight seal. Insert the spigot into the hole, applying a layer of silicone caulk around the threads before tightening it fully. Allow the caulk to dry as per the manufacturer’s instructions before testing.
Step 5: Install the Inlet
Create an opening on the lid of the barrel for water to flow in. Use a drill with a hole saw bit to cut a hole that’s large enough for your downspout to fit into, but small enough to prevent debris from falling into the barrel. Cover this hole with a fine mesh screen or inlet filter to keep out leaves, insects, and other debris. Secure the mesh with screws or a metal ring to keep it in place.
Step 6: Elevate the Barrel
To improve water flow from the spigot, place your rain barrel on a raised surface, such as a sturdy stand or cinder blocks. This elevation allows gravity to create water pressure when you open the spigot, making it easier to fill watering cans or attach a hose. A height of about 1-2 feet is generally sufficient.
Step 7: Position the Barrel Under a Downspout
Select a downspout on your home’s gutter system where rainwater can easily flow into the barrel. Position the barrel so the downspout aligns with the inlet. If needed, you can cut the downspout to ensure water flows directly into your rain barrel. You may want to add a flexible downspout extender or elbow fitting to guide water into the inlet hole.
Step 8: Check for Leaks
Before relying on your rain barrel, test it for leaks. Fill the barrel with water and inspect around the spigot, overflow outlet, and any other fittings. If you notice leaks, apply more caulk or adjust the fittings to ensure everything is watertight.
Step 9: Install an Overflow Diverter (Optional)
An overflow diverter can be added to prevent excess water from spilling around the base of the barrel. This is particularly useful if you live in an area with heavy rainfall. The diverter redirects excess water away from your home, protecting the foundation and keeping the area around the barrel dry.
Step 10: Maintain Regularly
To keep your rain barrel functioning well, clean the mesh screen and empty the barrel every few months. Debris can accumulate and clog the screen, so regular maintenance ensures a steady flow of water. If algae or mosquitoes become an issue, consider adding a lid or a mosquito dunk (a safe, non-toxic control method) to prevent breeding.
Tips for Using Your Rain Barrel
Now that you have a functional rain barrel, here are a few tips to maximize its benefits:
- Use the Water Regularly: To prevent stagnation, use the collected water frequently. This keeps the water fresh and discourages algae growth.
- Keep It Covered: Always keep a lid on your rain barrel to avoid mosquito breeding and contamination.
- Winterize in Colder Climates: If you live in a region with freezing winters, empty and store your rain barrel during the cold months to prevent cracking.
- Consider a Rain Barrel Linking System: For larger gardens, link multiple barrels together to store more water.
Benefits of Using a Rain Barrel in Your Garden
Using a rain barrel isn’t only a practical choice but also has several environmental and financial benefits. Here’s how a rain barrel can make a difference:
- Conserves Municipal Water: Reduces demand on the local water supply, a significant advantage in drought-prone areas.
- Improves Plant Health: Rainwater is naturally soft and free of salts, chemicals, and added minerals, promoting better plant health.
- Protects Local Waterways: Redirecting runoff reduces stormwater pollution, which can carry fertilizers and pesticides into rivers and lakes.
- Saves Money on Water Bills: By utilizing a free resource, you can reduce your water costs, especially during peak gardening months.
Common Questions About Rain Barrels
Is rainwater safe for all plants?
Yes! Rainwater is generally free of chlorine and other additives in tap water, making it ideal for most plants. Avoid using rainwater on edibles if your roof or gutters are treated with chemicals.
Can I leave my rain barrel outside year-round?
In regions with freezing temperatures, it’s best to drain and store the barrel indoors during winter to prevent cracking from ice expansion.
Can I connect multiple rain barrels together?
Yes, multiple barrels can be linked with a connecting hose to increase storage capacity. This setup is ideal for areas with frequent rain or larger gardens.
Final Thoughts
Building a rain barrel is a simple yet powerful way to make your garden more sustainable, eco-friendly, and self-sufficient. By capturing and utilizing rainwater, you reduce your environmental footprint, save money, and provide your plants with the purest form of water. With minimal maintenance, a rain barrel can serve you season after season, transforming your garden’s watering routine.
Harness the power of nature’s free resource with a DIY rain barrel, and start reaping the benefits in your garden today! 🌦️ #RainwaterHarvesting #DIYGardening #EcoFriendlyLiving #WaterConservation