
When it comes to expanding your garden or creating a lush landscape, growing shrubs from hardwood cuttings is one of the most rewarding and cost-effective methods available. Whether you’re looking to propagate an heirloom variety, expand your garden on a budget, or simply try your hand at a new gardening technique, growing shrubs from hardwood cuttings offers an easy, efficient way to achieve your goals. In this article, we’ll walk you through the essential steps to successfully propagate shrubs, ensuring that you can plant with confidence and watch your cuttings flourish into strong, healthy plants.
Why Grow Shrubs from Hardwood Cuttings?
Growing shrubs from hardwood cuttings offers a variety of benefits:
- Cost-Effective: Instead of buying new plants, you can propagate your existing shrubs, which is much more affordable.
- Genetic Consistency: Cuttings from a parent shrub will have the same characteristics, ensuring that the new plants are true to type.
- Preserving Unique Varieties: You can preserve rare, unique, or heirloom shrubs that may not be readily available in garden centers.
- Environmental Benefits: By propagating your own plants, you reduce the need for purchasing mass-produced nursery plants, which is more sustainable and environmentally friendly.
With all these benefits in mind, let’s explore the process of growing shrubs from hardwood cuttings, step by step.
Step 1: Choose the Right Time
Timing is crucial when propagating shrubs from hardwood cuttings. The best time to take hardwood cuttings is during late fall to early winter when the plant is dormant. At this time, the plant’s energy is focused on maintaining its roots, which helps encourage successful rooting in your cuttings. Avoid taking cuttings during the growing season, as the plant is expending energy on foliage and flowers rather than root development.
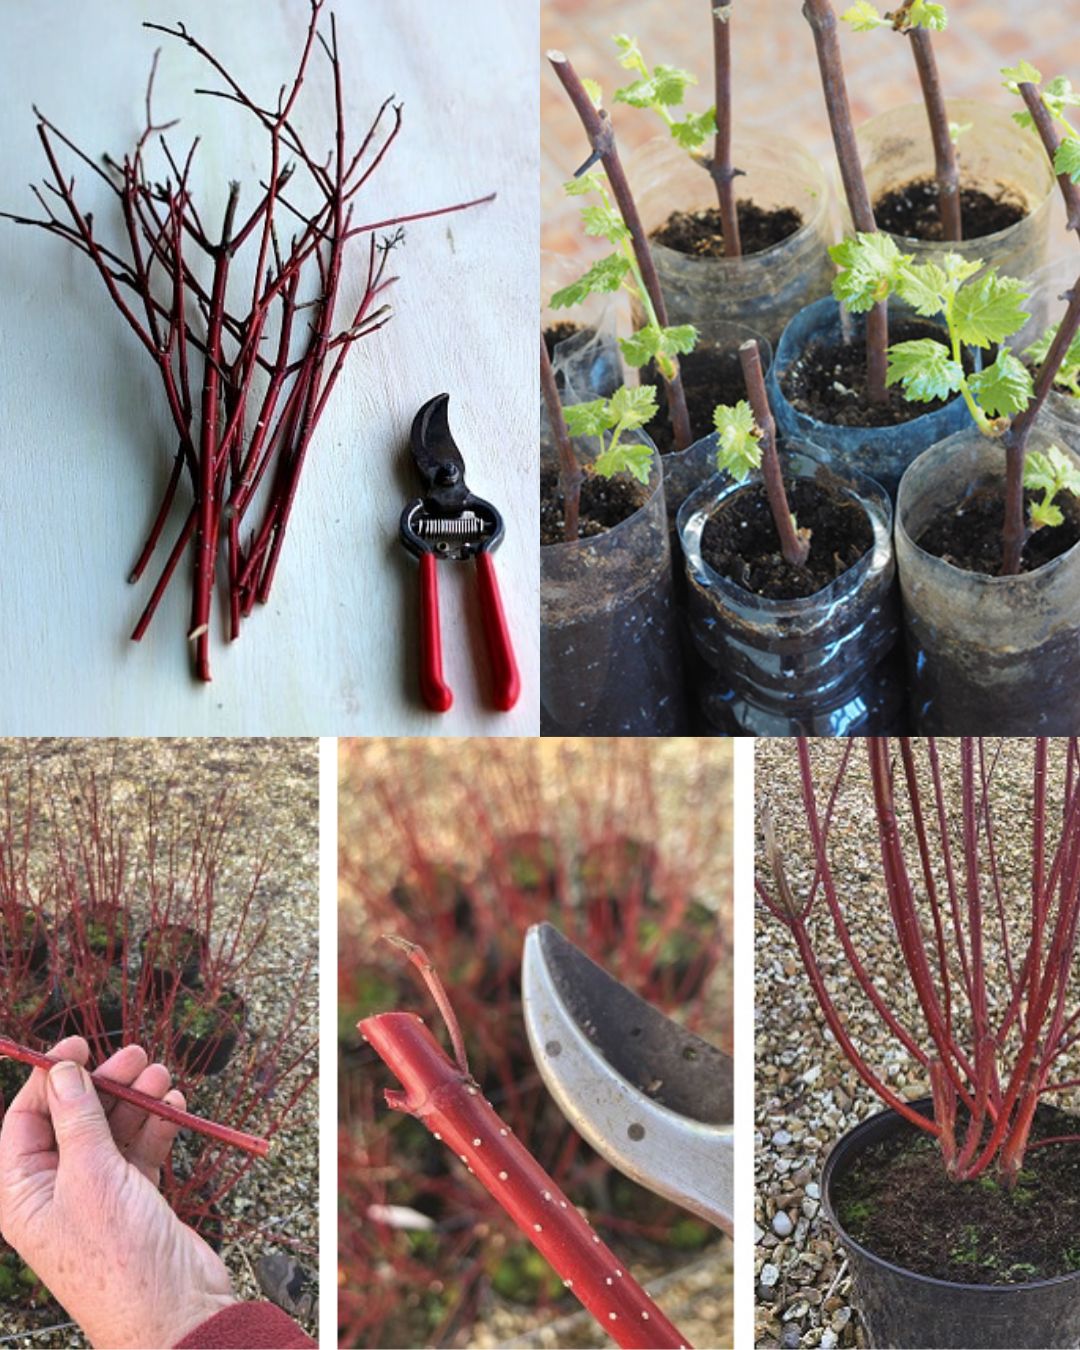
Step 2: Select Healthy, Mature Wood
The quality of your hardwood cuttings will determine how successful the propagation process is. Look for healthy, disease-free stems that are at least one year old and have matured on the plant. These stems should be firm to the touch, not soft or green, which would indicate that they are not fully matured and may not root well.
- Ideal Stem Characteristics: The ideal cutting should have firm, mature wood, and be free from disease or pest damage. It should feel woody, not flexible.
- Avoid Weak Stems: Avoid using soft, green stems, as these are typically less likely to root and may not produce a healthy plant.
When selecting cuttings, aim to choose those that are between 4-6 inches long, cutting just below a node (the place where leaves or branches are attached). This ensures that your cuttings will have the best chance of developing strong roots and growing into thriving plants.
Step 3: Prepare the Cuttings
Once you’ve selected your cuttings, it’s important to properly prepare them for rooting. Use sharp, sterilized pruners or a knife to ensure clean, precise cuts. Clean cuts will help reduce the risk of disease and encourage the cutting to form roots more effectively.
Steps for Preparing Cuttings:
- Take a sharp pair of pruners and cut the selected stems into sections of around 4-6 inches in length.
- Remove any leaves or flowers from the cutting, leaving just the top 2-3 nodes exposed. This prevents the leaves from taking up valuable energy that should go into rooting.
- If your cutting has any side branches, trim them back to ensure the cutting is clean and straight.
After preparing your cuttings, you can also choose to apply rooting hormone. While this is not strictly necessary, it can encourage faster root growth and increase the likelihood of success. Rooting hormone is available in both powdered and liquid forms and can be found in most garden centers.
Step 4: Apply Rooting Hormone (Optional but Recommended)
Rooting hormone is a powerful tool that can stimulate root development in your cuttings. While not essential, it can improve the success rate of your propagation, especially if you’re working with more challenging varieties of shrubs.
To apply the rooting hormone:
- Dip the cut end of your hardwood cutting into the hormone powder, making sure that the tip is fully coated.
- Gently tap off any excess powder. Be careful not to use too much, as it can inhibit root growth.
- If you prefer, you can also use a rooting gel or liquid hormone, applying it to the cut ends following the instructions on the packaging.
While rooting hormone can increase the chance of successful propagation, many gardeners have had success without it, so feel free to experiment with or without it to find what works best for you.
Step 5: Plant the Cuttings
Now that your cuttings are prepared and treated with rooting hormone (if desired), it’s time to plant them. The ideal medium for rooting cuttings is well-draining potting mix, as it provides the necessary balance of moisture and aeration.
- Choose Containers: Select small pots, trays, or containers with drainage holes to plant your cuttings. Ensure they are clean and sterile to prevent the introduction of diseases.
- Prepare the Potting Mix: Fill the container with a well-draining potting mix. A mix designed specifically for cuttings or seed starting works well, but you can also use a combination of peat moss and perlite.
- Insert the Cuttings: Insert the cuttings into the potting mix, burying them about 1-2 inches deep. Be sure the cut ends are in contact with the soil.
- Firm the Soil: Gently press down the soil around the cutting to ensure it stays upright and has good contact with the soil.
Step 6: Create a Humid Environment
In order to encourage rooting, hardwood cuttings need a humid environment to prevent them from drying out. One effective method is to cover the container with a plastic bag, a plastic dome, or place it in a mini greenhouse. This will help retain moisture and create a mini greenhouse effect, which is crucial for root development.
Make sure the container is kept in a warm, bright location but out of direct sunlight, as too much heat can cause the cuttings to dry out.
Step 7: Wait for Rooting
Root development can take anywhere from 4 to 8 weeks, depending on the species of shrub, the environmental conditions, and the time of year. During this waiting period, it’s important to monitor the cuttings for signs of stress or decay. Check the moisture level of the soil regularly, and ensure that the cuttings are not drying out or getting too wet.
- Signs of Rooting: Once the cuttings have developed roots, they will start to resist being gently tugged, indicating that they are securely rooted in the soil.
- Be Patient: Rooting can be a slow process, but it’s essential to give the cuttings time to develop a solid root system before transplanting them.
Step 8: Transplant the Rooted Cuttings
Once your hardwood cuttings have rooted successfully, it’s time to transplant them into their own pots or into your garden. If you used small containers, you can transplant them into larger pots for further growth. If the cuttings are large enough, you can also move them directly into your garden.
Before transplanting, make sure that the new plants are acclimatized to outdoor conditions, especially if they were grown indoors in a controlled environment. Gradually expose them to the elements by placing them outside for a few hours each day, increasing the exposure time as they get used to the climate.
Conclusion: Your Shrubs Are Ready for Success!
Growing shrubs from hardwood cuttings is a simple and rewarding process that allows you to expand your garden and propagate your favorite plants. With patience, care, and attention to detail, you can successfully grow new plants that will thrive for years to come. By following these steps, you’ll be able to propagate a wide variety of shrubs, whether for your landscape or to share with fellow gardening enthusiasts.
Happy gardening, and don’t forget to share your success with your fellow gardeners online! 🌱
#PlantPropagation #ShrubCuttings #GardeningTips #HardwoodCuttings #DIYGardening #HomeGarden #SustainableGardening #GardenSuccess #GrowYourOwn #PlantLovers