
Introduction
Growing peanuts at home can be a rewarding and exciting gardening experience. While they are often associated with large-scale farms in warm climates, peanuts can be grown in a variety of conditions—even in your backyard or garden. What’s even better? You don’t need special seeds; store-bought raw peanuts are all you need to get started! In this article, we will walk you through a detailed, 1500-word guide on how to grow peanuts from store-bought nuts, covering everything from soil preparation to harvesting. Follow these steps, and you’ll soon enjoy the fruits of your labor—fresh, homegrown peanuts!
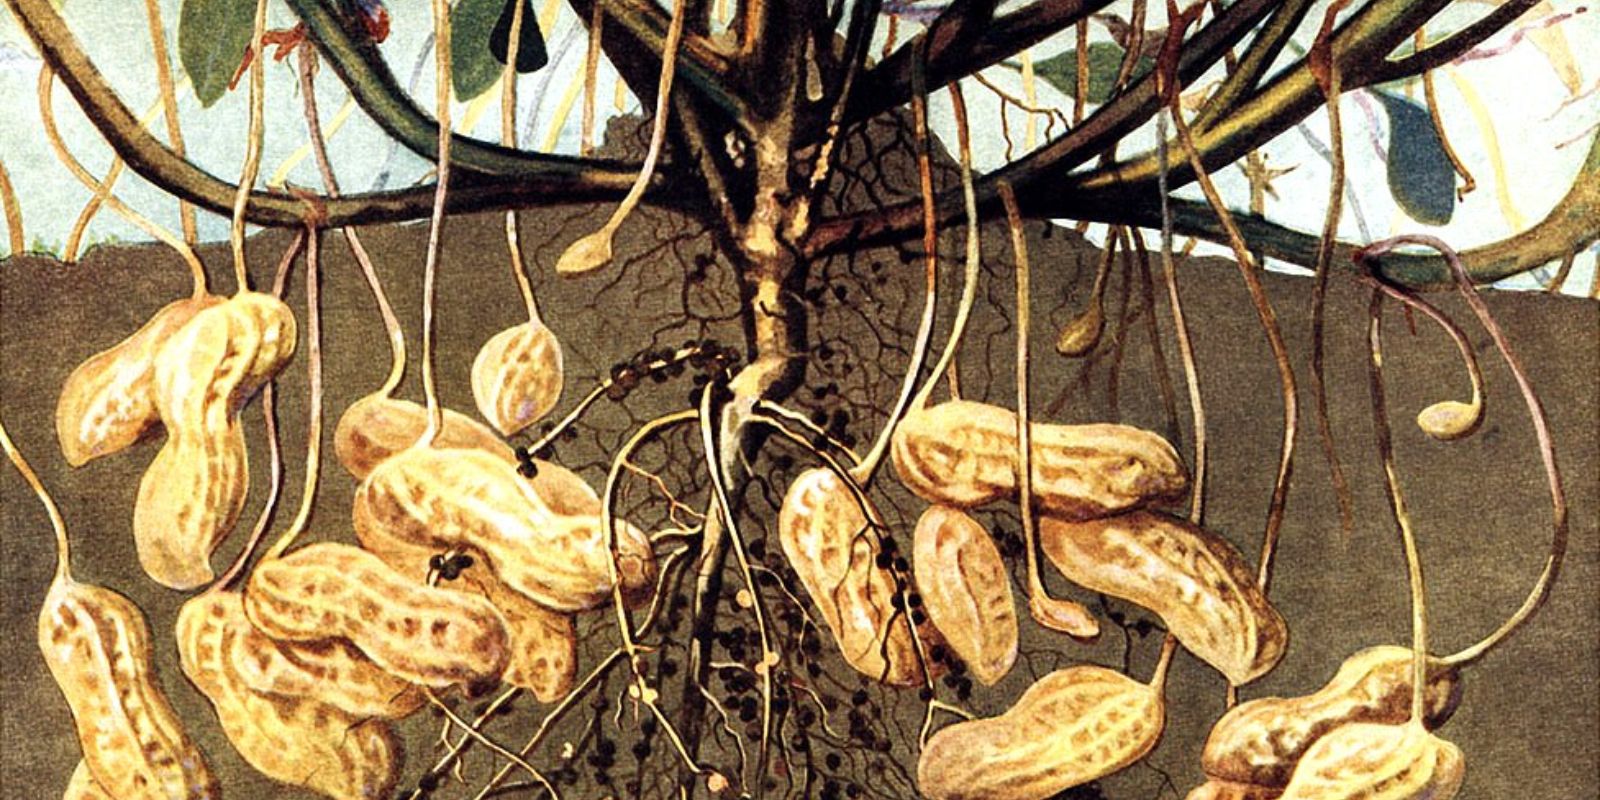
1. Understanding the Peanut Plant: Basic Information
Before we dive into the growing process, it’s important to understand the basics of peanut plants. Peanuts (Arachis hypogaea) are legumes, not true nuts, and they grow underground. Native to South America, peanuts thrive in warm climates with well-draining soil. They require about 120-150 days of frost-free weather to mature, making them suitable for regions with a long growing season.
Peanut plants are low-growing annuals that produce beautiful yellow flowers. Once the flowers are pollinated, the plant develops “pegs” that burrow into the soil, where the peanut pods grow and mature underground. This unique growth process makes peanuts fun to grow and a great learning experience for beginner gardeners.
2. Materials Needed to Grow Peanuts
Before starting, gather the following materials:
- Raw, unsalted peanuts in their shells (available at most grocery stores)
- Loose, well-draining soil
- Compost or organic matter to enrich the soil
- A garden bed or large container (at least 12-18 inches deep)
- Watering can or hose for consistent irrigation
3. Step-by-Step Guide to Growing Peanuts at Home
Step 1: Choose the Right Peanuts
The first and most important step is selecting the right peanuts. You need raw, unsalted peanuts that have not been roasted or processed in any way. Roasted peanuts won’t germinate, so make sure the peanuts you purchase still have their shells on and are raw.
Once you’ve sourced your peanuts, crack open the shells carefully to reveal the peanut seeds. You can plant the seeds with or without their thin skins.
Step 2: Prepare the Soil
Peanuts thrive in loose, well-draining soil with a slightly acidic to neutral pH (around 6.0-6.5). If your soil is clay-like or compacted, you’ll need to loosen it by tilling and mixing in organic matter such as compost, aged manure, or coconut coir. This will help improve aeration, moisture retention, and drainage, all of which are crucial for healthy peanut growth.
For container gardening, choose a pot at least 12-18 inches deep, with drainage holes at the bottom. Fill the container with a mix of potting soil and compost, making sure the soil is loose and friable.
Step 3: Soak the Peanuts
Before planting, it’s beneficial to soak the peanut seeds in water overnight. This softens the shell and encourages faster germination. However, this step is optional, and you can plant the peanuts directly if you prefer.
Step 4: Planting the Peanuts
Once your soil is prepared, it’s time to plant the peanuts. Follow these steps:
- Dig small holes about 2 inches deep, spaced 8-12 inches apart in a garden bed. If using a container, plant the seeds 6-8 inches apart.
- Place one peanut seed per hole, ensuring the seed is covered with about 1-2 inches of soil. Plant the peanut seeds horizontally, with the pointed end facing down.
- Lightly water the soil after planting, making sure not to oversaturate it.
Step 5: Watering and Care
Peanuts need consistent moisture, but it’s important to avoid overwatering, which can lead to root rot. Water the plants deeply once or twice a week, depending on the climate and soil type. Keep the soil evenly moist during the growing season, especially while the plants are flowering and forming peanut pods.
As the plants grow, be on the lookout for the formation of pegs (the specialized stems that extend from the flowers and grow into the soil). These pegs are crucial because they develop into peanut pods underground. Make sure the soil remains loose and well-aerated to allow the pegs to penetrate the ground easily.
Step 6: Fertilizing
Peanuts are nitrogen-fixing plants, meaning they produce their own nitrogen through a symbiotic relationship with bacteria in the soil. Therefore, you won’t need to use heavy nitrogen fertilizers. Instead, focus on using a balanced, organic fertilizer or compost during the early stages of growth. Too much nitrogen can lead to lush foliage growth at the expense of peanut pod formation.
To give your peanuts a nutrient boost, top-dress the soil with a layer of compost or well-rotted manure mid-season.
Step 7: Watch for Pests and Diseases
While peanuts are relatively easy to grow, they can attract pests such as aphids, spider mites, and leafhoppers. To protect your plants, use insecticidal soap or neem oil as needed. You can also introduce beneficial insects like ladybugs to naturally control pest populations.
In terms of diseases, peanuts can be susceptible to fungal infections, especially in overly wet conditions. To prevent this, ensure proper air circulation and avoid overhead watering. Mulching around the base of the plants can also help retain soil moisture and prevent fungal spores from splashing onto the leaves.
4. Harvesting Peanuts
Peanut plants take about 120-150 days to mature. When the leaves start to yellow and the plant begins to die back, this is a sign that the peanuts are ready for harvest. Here’s how to harvest your peanuts:
- Loosen the soil around the plants using a garden fork, taking care not to damage the peanuts.
- Gently pull up the plant by the base, lifting it out of the ground. You’ll see clusters of peanuts attached to the roots.
- Shake off excess soil and allow the peanuts to dry, still attached to the plant, in a warm, dry place for several days.
- After drying, remove the peanuts from the plant and allow them to cure for another week before storing or using them.
5. How to Enjoy Your Homegrown Peanuts
Once your peanuts have dried and cured, you can enjoy them in various ways. Roast them in the oven for a delicious snack, grind them into homemade peanut butter, or use them in cooking and baking.
To roast peanuts:
- Preheat the oven to 350°F (175°C).
- Spread the raw peanuts on a baking sheet in a single layer.
- Roast for 15-20 minutes, stirring occasionally, until they turn golden brown.
6. Tips for Success
- Warm Climate: Peanuts require a long growing season of 120+ frost-free days, so it’s important to plant them in early spring for best results.
- Loose Soil: Ensure your soil is loose and well-draining. Compacted soil will make it difficult for peanut pegs to grow underground.
- Container Size: If growing in containers, use a pot at least 12-18 inches deep to allow room for peanut pod development.
Conclusion
Growing peanuts from store-bought nuts is not only a fun and educational gardening project but also a rewarding way to produce your own food. By following these easy steps, you’ll be able to harvest a plentiful supply of fresh, homegrown peanuts in just a few months. Whether you have a backyard garden or are limited to container gardening, peanuts can thrive with the right care and attention.
💬 Have you tried growing peanuts at home? Let us know your results in the comments! #PeanutGardening #GrowYourOwn #HomeGardenHacks #OrganicGardening #GardeningMadeEasy