
Growing mushrooms at home can be a fascinating and rewarding endeavor. While it might seem complex at first, using simple household items like a plastic bottle and a blender makes the process accessible and easy for anyone. This comprehensive guide will take you through the steps of growing mushrooms at home, ensuring you can enjoy fresh, homegrown mushrooms without any hassle.
Introduction to Home Mushroom Cultivation
Mushrooms are not only delicious and nutritious but also relatively simple to grow at home with the right techniques. This method uses a plastic bottle and a blender to create an ideal environment for mushroom growth. By following these steps, you can create a sustainable source of mushrooms in your kitchen, making it both a fun project and a practical way to supply your cooking with fresh produce.
Benefits of Growing Mushrooms at Home
- Freshness: Homegrown mushrooms are fresher and often more flavorful than store-bought varieties.
- Cost-Effective: Growing your own mushrooms can be more economical than buying them regularly from the store.
- Educational: The process provides a great learning experience about fungi and their growth cycles.
- Sustainability: Using household waste like coffee grounds as a substrate is an eco-friendly way to recycle and reduce waste.
Materials Needed
Before you begin, gather the following materials:
- A plastic bottle (1-2 liters)
- A blender
- Mushroom spores (available from gardening stores or online)
- Growing substrate (coffee grounds, straw, or sawdust)
- Water
- A plastic bag
Step-by-Step Guide to Growing Mushrooms
Step 1: Prepare Materials
Start by collecting all the necessary materials. Ensure the plastic bottle is clean and dry. The blender should also be clean, as any residual food particles can contaminate the mushroom substrate.
Step 2: Blend the Substrate
The growing substrate is crucial for the mushrooms’ development. Common substrates include coffee grounds, straw, or sawdust. If using coffee grounds, ensure they are used and cooled.
- Blend the Substrate: Place the substrate in the blender and add water. Blend until you achieve a smooth consistency. The mixture should be moist but not overly wet. The ideal texture resembles a damp sponge.
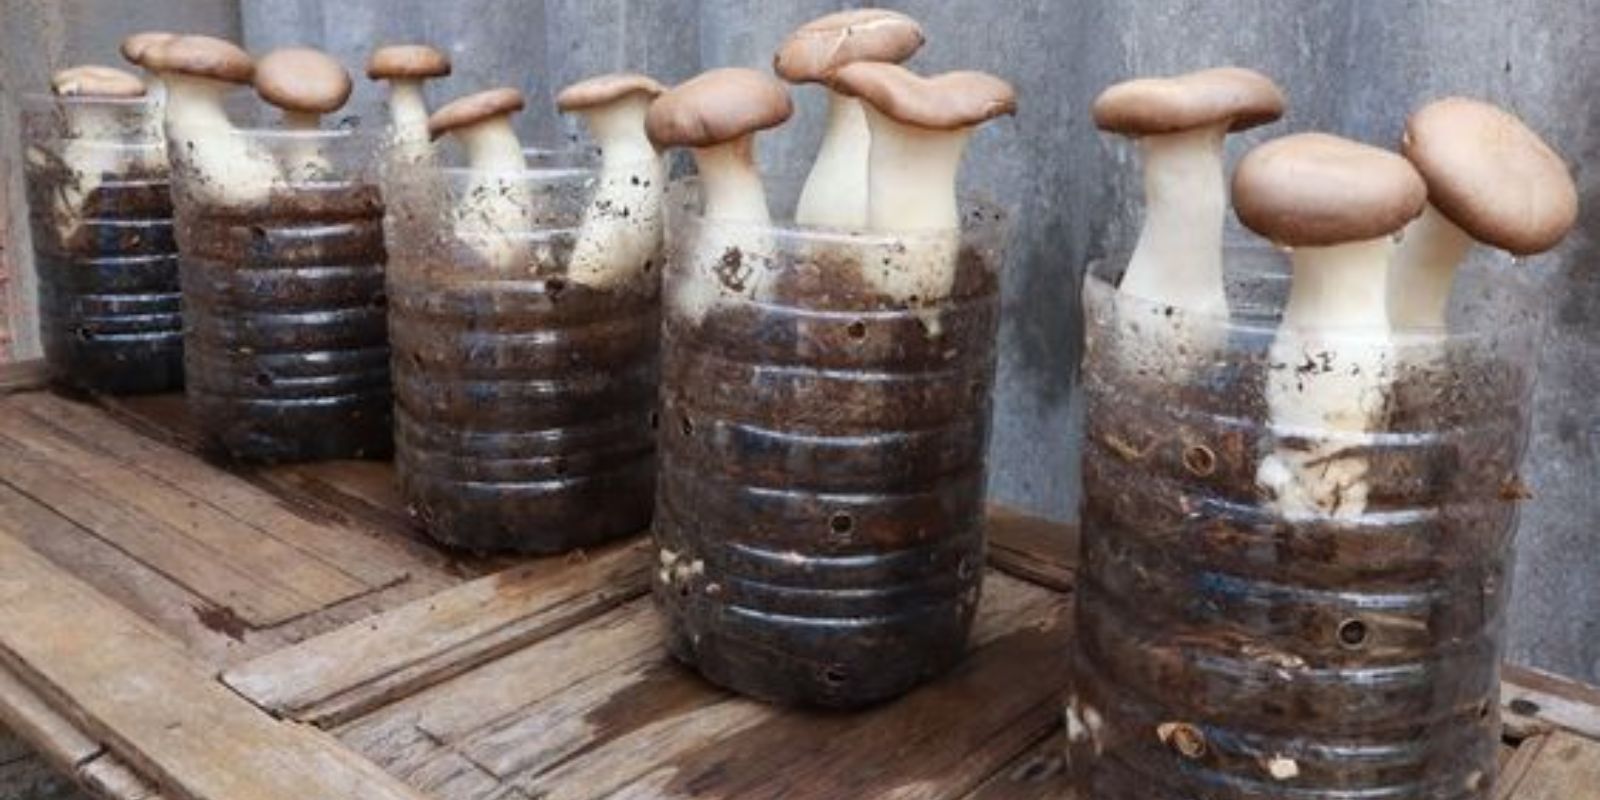
Step 3: Fill the Bottle
Once the substrate is ready, it’s time to prepare the bottle.
- Cut the Bottle: Using a sharp knife or scissors, carefully cut the top off the plastic bottle. This creates an open container that allows for easy filling and better air circulation.
- Fill with Substrate: Fill the bottle with the blended substrate, leaving a few inches at the top empty. This space will accommodate mushroom growth and prevent overflow.
Step 4: Inoculate with Spores
Now, it’s time to introduce the mushroom spores.
- Sprinkle the Spores: Evenly distribute the mushroom spores over the top of the substrate. Lightly mix them into the substrate with a clean utensil, ensuring they are well incorporated.
Step 5: Create Humidity
Mushrooms thrive in humid environments, so maintaining adequate moisture is essential.
- Cover with a Plastic Bag: Place a plastic bag loosely over the top of the bottle. This helps retain humidity while still allowing some airflow. You can secure the bag with a rubber band if necessary, but ensure it’s not too tight.
Step 6: Provide Proper Conditions
Proper conditions are crucial for the successful growth of mushrooms.
- Location: Place the bottle in a dark, cool area, such as a cupboard or basement. Avoid direct sunlight, which can dry out the substrate and inhibit growth.
- Misting: Regularly mist the substrate with water to keep it moist. Check the substrate daily and mist as needed to maintain a damp environment without waterlogging it.
Step 7: Harvest
With proper care, you should start to see mushrooms sprouting within a few weeks.
- Monitor Growth: Watch for small mushroom pins (tiny mushroom buds) to appear. This indicates the beginning of the fruiting stage.
- Harvesting: When the mushrooms are fully grown, harvest them by gently twisting and pulling them from the substrate. Avoid cutting them with a knife, as this can damage the mycelium and reduce future yields.
Tips for Successful Mushroom Cultivation
- Cleanliness: Maintain a clean environment to prevent contamination. Always use clean tools and wash your hands before handling the substrate or spores.
- Temperature: Different mushroom species have varying temperature requirements. Research the ideal temperature range for your chosen mushroom type and try to maintain those conditions.
- Patience: Mushroom cultivation can take time. Be patient and allow the mycelium to colonize the substrate fully before expecting significant growth.
Troubleshooting Common Issues
Contamination
- Signs: Mold or off-smells in the substrate indicate contamination.
- Prevention: Ensure all materials and tools are clean. Sterilize the substrate if possible by boiling or baking before use.
Drying Out
- Signs: Substrate appears dry, and mushroom growth is slow or nonexistent.
- Solution: Increase misting frequency and consider using a humidity dome or additional covering to retain moisture.
Conclusion
Growing mushrooms at home using a plastic bottle and a blender is an accessible and enjoyable way to produce fresh mushrooms. By following these simple steps—selecting the right materials, preparing the substrate, inoculating with spores, maintaining proper conditions, and harvesting—you can cultivate mushrooms successfully in your own kitchen. This method not only provides fresh produce but also offers an educational and sustainable gardening project.
Motivation:
Give it a try and experience the satisfaction of growing your own mushrooms! Share your progress and tips with others to inspire a community of home mushroom cultivators. Happy growing!