
Guava trees are beloved for their delicious, aromatic fruit, often used in a variety of dishes, beverages, and desserts. While many people are familiar with growing guava trees from seeds or cuttings, did you know that it’s also possible to grow guava trees from guava leaves? This unconventional method is a fascinating way to propagate the tree, allowing you to cultivate your own tropical fruit at home.
In this comprehensive guide, we’ll explore everything you need to know about growing guava trees from leaves, from selecting the best leaves to nurturing them through the planting and growth process. You’ll also discover the ideal growing conditions and care techniques needed for a successful guava harvest.
Why Grow Guava Trees from Leaves?
Most gardeners are used to propagating plants from seeds, cuttings, or grafts, but growing guava trees from leaves presents a unique and exciting opportunity. This method isn’t as widely known, but it can be an efficient way to propagate the tree in certain conditions. One of the major advantages of this technique is the potential for quicker growth and better genetic consistency compared to seeds. Additionally, it’s a great way to experiment with new gardening techniques if you’re looking to diversify your skills!
Let’s dive into the step-by-step process of growing guava trees from leaves.
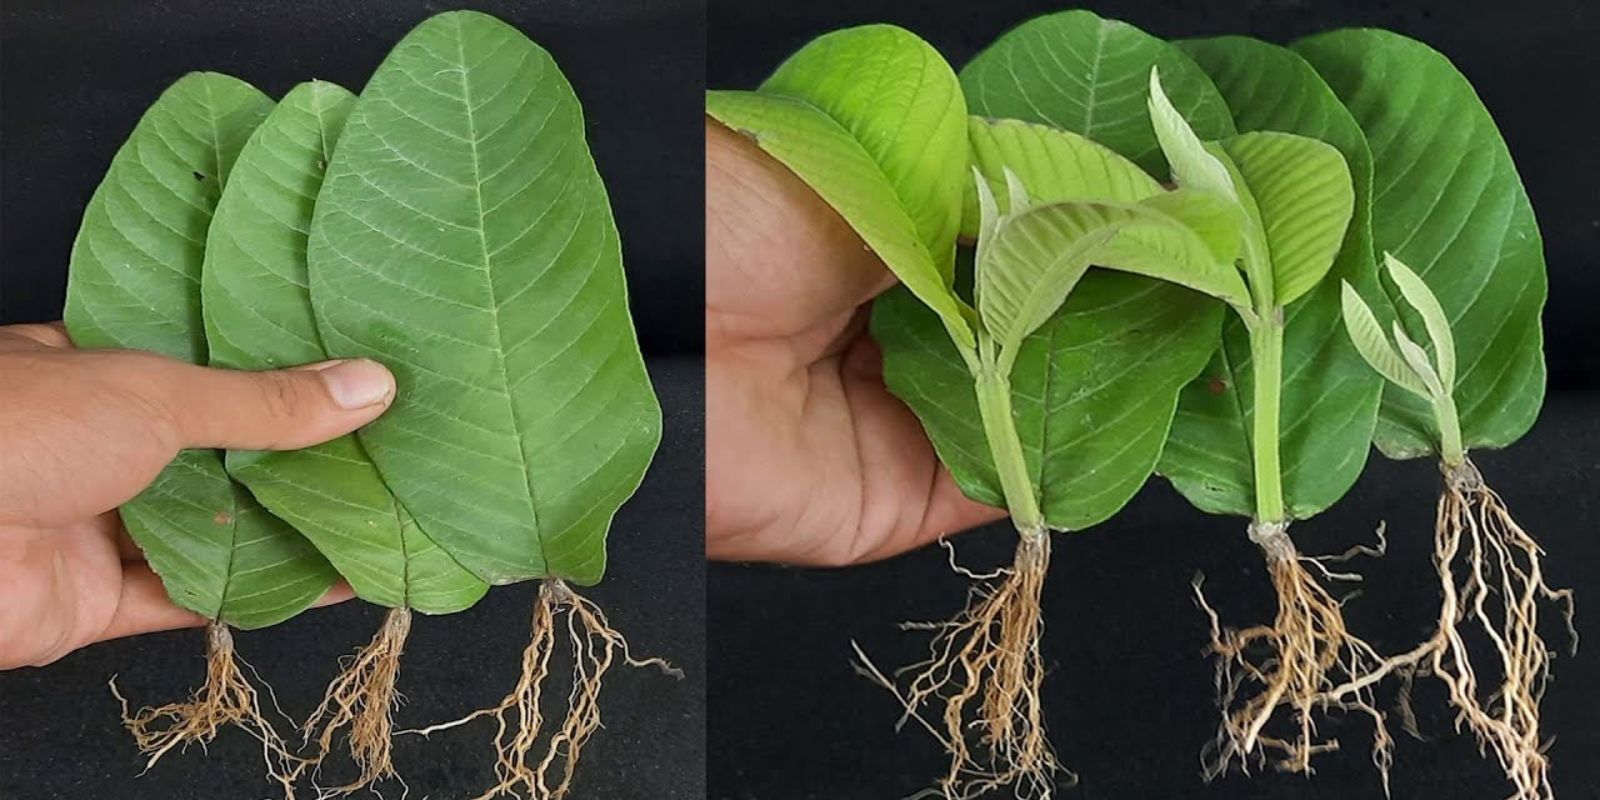
Step 1: Selecting the Best Guava Leaves
The first step in this process is choosing healthy, vibrant guava leaves. Look for leaves that are deep green, free from pests or damage, and fully matured. Young, underdeveloped leaves might not have the required nutrients for successful propagation, while older leaves that are browning or wilting may not root well.
The best time to collect the leaves is during the tree’s active growing season, which is typically in the spring and summer months when the plant’s energy is at its peak.
Step 2: Preparing the Leaves for Propagation
Once you’ve selected the healthiest leaves, you need to prepare them for propagation. Start by gently cleaning the leaves to remove any dirt or debris. Use a soft cloth and water, avoiding any harsh chemicals that could damage the leaves.
After cleaning, submerge the base of the leaves in a container of water. Make sure only the stem (the part where the leaf attaches to the branch) is submerged, as soaking the entire leaf can lead to rot. Place the container in a warm, well-lit area with indirect sunlight, as too much direct sunlight can dry out or scorch the leaves.
Step 3: Encourage Root Development
This is where patience is required. It can take several days to a couple of weeks for roots to begin forming at the base of the leaf. During this time, ensure that the water is changed every two to three days to keep it fresh and oxygenated.
To enhance the chances of root growth, you can add a rooting hormone to the water. Rooting hormones can stimulate root development and are available at most garden centers. While this step is optional, it may speed up the process and improve your success rate.
Keep an eye on the water level and ensure that the base of the leaf is always submerged. It’s essential to monitor for any signs of rotting or discoloration—if this happens, you’ll need to start over with a new leaf.
Step 4: Planting the Leaf Once Roots Develop
Once roots have formed (typically about 1 to 2 inches in length), it’s time to plant the leaf in soil. Choose a nutrient-rich, well-draining potting mix for the best results. You can make your own mix using compost, perlite, and sand, or you can purchase a pre-made mix designed for fruit-bearing trees.
- Fill a small pot with the potting mix, leaving enough space for the rooted leaf.
- Create a small hole in the center of the soil and gently place the rooted leaf inside, ensuring the roots are covered completely.
- Lightly pack the soil around the leaf, being careful not to damage the fragile roots.
- Water the soil thoroughly until it’s moist but not soggy.
After planting, place the pot in a location that receives indirect sunlight and remains warm throughout the day. The ideal temperature for guava propagation is between 70-85°F (21-29°C). Avoid exposing the young plant to direct sunlight, as it can be too harsh and might stunt its growth.
Step 5: Caring for Your Growing Guava Tree
At this stage, it’s all about providing consistent care to encourage the young guava tree’s growth. Here are some essential tips to keep in mind:
- Watering: Keep the soil consistently moist but not waterlogged. Overwatering can lead to root rot, so it’s essential to strike a balance. Water your guava tree once the top inch of soil feels dry to the touch.
- Sunlight: As the plant grows, gradually increase its exposure to sunlight. Guava trees need plenty of light, ideally about 6-8 hours of full sunlight per day once they are more mature.
- Humidity: Guava trees thrive in humid environments, so if you live in a dry climate, consider using a humidity tray or misting the plant occasionally to boost moisture levels.
- Fertilizing: Feed your guava tree with a balanced organic fertilizer every 4-6 weeks during its growing season (spring and summer). Guava trees benefit from nutrients such as nitrogen, phosphorus, and potassium, which promote healthy growth and fruit production.
Step 6: Transplanting the Guava Tree Outdoors
Once your guava tree has grown several sets of leaves and appears strong, it’s time to transplant it outdoors (if you live in a suitable climate) or into a larger container. The best time to transplant guava is during late spring or early summer when the weather is consistently warm.
To transplant:
- Choose a sunny location with well-draining soil. Guava trees need plenty of space to spread their roots, so ensure the planting area is wide enough.
- Dig a hole that’s twice the size of the tree’s root ball.
- Gently remove the guava tree from its pot and place it into the hole.
- Backfill the hole with soil and water thoroughly.
Step 7: Maintenance and Harvesting
As your guava tree grows, prune it regularly to maintain a healthy structure and encourage fruiting. Pruning helps to remove any dead or diseased branches, improving air circulation and sunlight penetration.
Guava trees typically take 3-4 years to produce fruit when grown from leaves, so patience is key. Once your tree begins to fruit, you’ll be rewarded with a bountiful harvest of sweet, tropical guavas.
Conclusion
Growing a guava tree from leaves may seem like an unconventional approach, but it’s a rewarding and sustainable method of propagation. By following the steps outlined in this guide, you’ll be able to cultivate a thriving guava tree right from the comfort of your home. With proper care and attention, you’ll soon be enjoying the fruits of your labor—literally!
Motivation Sentence:
Get ready to grow your very own guava tree from leaves! Share your experience with us and let’s grow together! 🌿🍈 #GrowGuava #TropicalGardening #DIYPropagation #GuavaMagic #GardenHacks #SustainableGardening #LeafPropagation #GreenThumb