
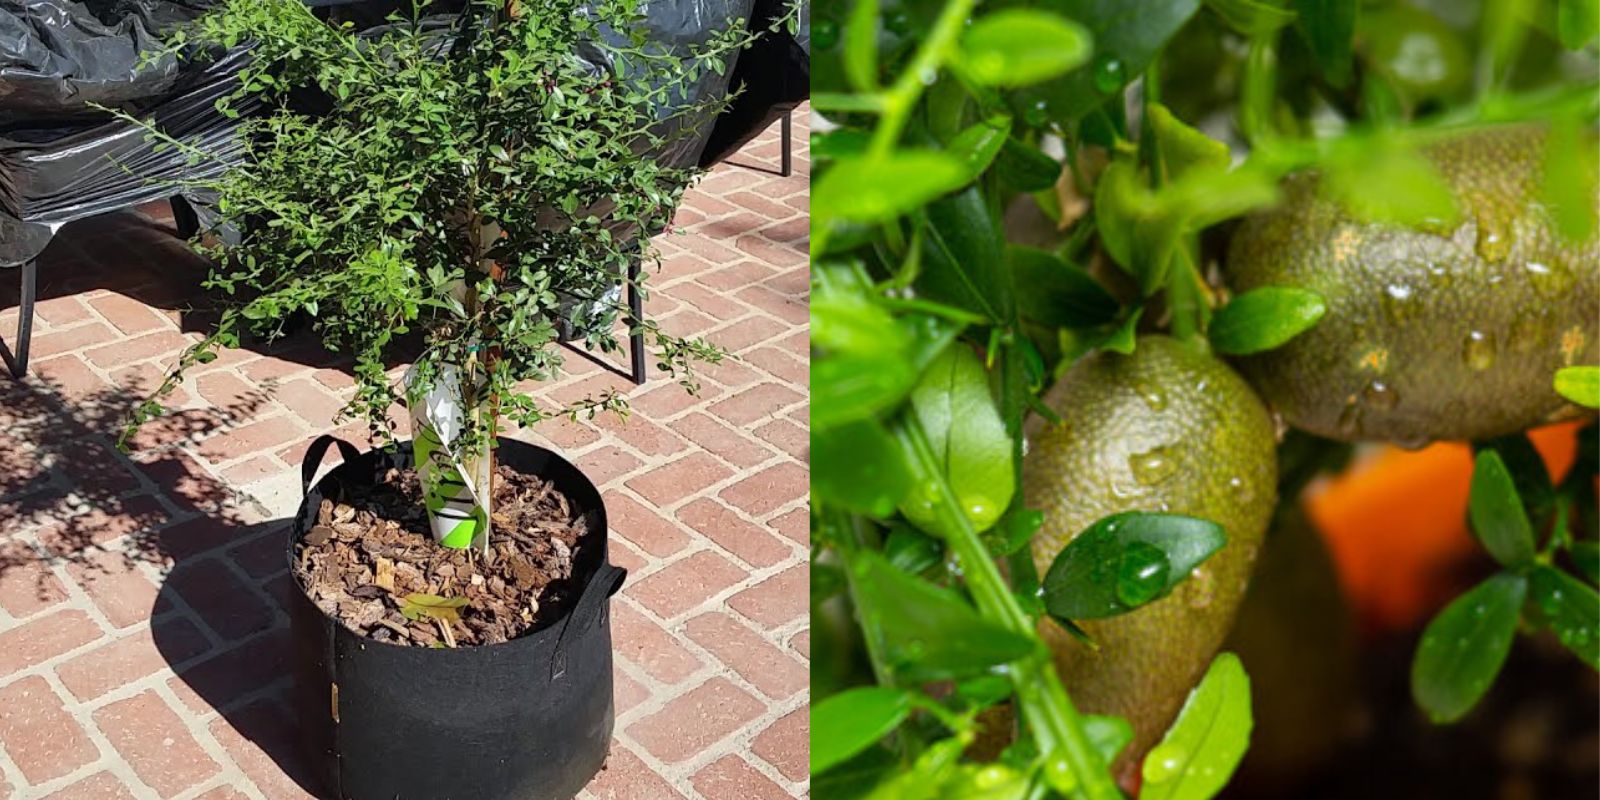
Finger limes, often dubbed “caviar limes” due to their unique, pearl-like vesicles, are a delightful addition to any garden. Native to Australia, these small, elongated limes pack a zesty punch and have become increasingly popular for culinary use, making them a sought-after ingredient in gourmet dishes. If you’re looking to grow these exotic fruits at home, you can easily cultivate them in pots, regardless of your gardening space. This article will guide you through the entire process of growing finger limes at home, from seed to harvest.
Understanding Finger Limes
Finger limes (Citrus australasica) are small, cylindrical citrus fruits that can range in color from green to yellow to pink. Their flesh is filled with tiny, juicy vesicles that burst in the mouth, delivering a burst of citrus flavor. They are not only visually striking but also add a unique taste to salads, cocktails, desserts, and savory dishes.
These limes are relatively hardy and can thrive in various conditions, making them an excellent choice for container gardening. With proper care, you can enjoy fresh finger limes right from your backyard or patio.
Benefits of Growing Finger Limes in Pots
- Space-Saving: Pot cultivation is perfect for those with limited outdoor space. You can grow finger limes on patios, balconies, or even indoors.
- Controlled Environment: Growing in pots allows you to control soil quality, moisture levels, and exposure to sunlight more easily than in-ground gardening.
- Aesthetically Pleasing: The unique shape and color of finger limes make them an attractive addition to your garden or indoor decor.
- Fresh Produce: Enjoying homegrown finger limes provides you with fresh ingredients for culinary creations and cocktails.
- Educational Experience: Growing unique plants like finger limes can be an exciting learning experience for both adults and children.
Getting Started: Choosing the Right Pot and Soil
Selecting the Right Pot
When choosing a pot for your finger lime plant, consider the following:
- Size: Opt for a pot that is at least 12 inches deep and wide. This will give the roots enough room to grow. As the plant matures, you may need to transplant it to a larger pot.
- Drainage: Ensure the pot has drainage holes at the bottom to prevent waterlogging, which can lead to root rot.
- Material: Terracotta, ceramic, or plastic pots work well. Terracotta pots are breathable, which helps with drainage, while plastic pots retain moisture better.
Choosing the Right Soil
Finger limes prefer well-draining soil that is rich in organic matter. A good potting mix for finger limes should include:
- Potting Soil: Use high-quality potting soil as a base. This provides essential nutrients for the plant.
- Perlite or Pumice: Adding perlite or pumice improves drainage and aeration, preventing soil compaction.
- Compost: Incorporate compost into the mix to provide additional nutrients and improve soil structure.
You can create a potting mix using equal parts potting soil, perlite, and compost.
Propagating Finger Limes: From Seeds to Seedlings
Obtaining Finger Lime Seeds
If you don’t have access to finger lime seeds, you can purchase them from a reputable nursery or online store. Alternatively, you can extract seeds from fresh finger limes. To do this:
- Choose Ripe Fruits: Select ripe finger limes that are deep green or yellowish in color.
- Extract Seeds: Cut the limes open and scoop out the seeds.
- Clean Seeds: Rinse the seeds to remove any pulp or juice.
- Dry Seeds: Allow the seeds to dry for a few hours before planting.
Planting the Seeds
- Prepare Seedling Pots: Fill small pots or seed trays with the prepared potting mix.
- Plant the Seeds: Plant the finger lime seeds about ½ inch deep in the soil. Space them at least 4 inches apart if planting multiple seeds.
- Water Gently: Water the seeds gently to keep the soil moist but not soggy.
- Cover and Warm: Cover the pots with plastic wrap or a plastic dome to maintain humidity and warmth. Place them in a warm location with indirect sunlight.
- Germination: Seeds typically germinate within 2-4 weeks. Remove the cover once seedlings appear and provide bright light.
Transplanting Seedlings
Once the seedlings have developed a few true leaves (usually after 4-6 weeks), they can be transplanted into larger pots.
- Prepare New Pots: Choose pots that are at least 12 inches deep and filled with the same well-draining potting mix.
- Carefully Transplant: Gently remove the seedlings from their current pots, being careful not to damage the roots. Transplant them into the new pots, ensuring the root ball is covered.
- Water: Water the newly transplanted seedlings thoroughly.
Caring for Your Finger Lime Plant
Growing finger limes in pots requires regular care to ensure healthy growth and fruit production. Here are essential care tips:
Light Requirements
Finger limes thrive in bright sunlight. Aim for at least 6-8 hours of full sun daily. If growing indoors, place them near a south-facing window or use grow lights to provide sufficient light.
Watering
- Moisture Level: Keep the soil consistently moist but not waterlogged. Check the top inch of soil; if it feels dry, it’s time to water.
- Watering Technique: Water thoroughly until excess water drains from the bottom. Avoid letting the pot sit in standing water.
Fertilization
Finger limes benefit from regular feeding to ensure robust growth:
- Fertilizer Type: Use a balanced, slow-release fertilizer or a liquid fertilizer high in potassium and magnesium.
- Fertilizing Schedule: Fertilize every 4-6 weeks during the growing season (spring and summer). Reduce feeding in the fall and winter when growth slows down.
Pruning and Maintenance
- Pruning: Regularly prune your finger lime plant to maintain shape and remove dead or overcrowded branches. Pruning encourages air circulation and helps the plant focus energy on producing fruit.
- Pest Control: Keep an eye out for common pests like aphids, scale, and spider mites. Use organic insecticidal soap or neem oil to treat infestations.
Protecting from Extreme Conditions
Finger limes are generally hardy but may need protection from extreme weather:
- Frost Protection: If you live in a region with frost, bring potted finger limes indoors or cover them with a frost blanket.
- Heat Protection: In extremely hot weather, provide some shade during the hottest part of the day to prevent sunburn on the leaves.
Harvesting Finger Limes
Finger limes typically take 3-5 years to bear fruit when grown from seed, although grafted plants may produce fruit sooner. Here’s how to know when to harvest:
- Color Check: Harvest the limes when they have turned a deep green or yellowish color, depending on the variety.
- Texture Test: Gently squeeze the fruit; it should feel slightly soft but not mushy.
- Harvesting Method: Use scissors or pruning shears to cut the limes from the plant, taking care not to damage the branches.
- Storage: Freshly harvested finger limes can be stored in the refrigerator for up to two weeks.
Culinary Uses for Finger Limes
Finger limes can be used in various culinary creations, thanks to their unique flavor and texture. Here are some ideas for incorporating them into your dishes:
- Garnish: Use finger lime vesicles as a garnish for seafood dishes, salads, and desserts.
- Cocktails: Add finger lime juice or vesicles to cocktails for a zesty twist.
- Sauces: Mix finger lime juice into dressings or sauces for an extra burst of flavor.
- Desserts: Use them to elevate desserts like cakes, sorbets, and tarts.
- Savory Dishes: Incorporate them into marinades, salsas, or as toppings for grilled meats.
Conclusion: Enjoy the Delight of Homegrown Finger Limes
Growing finger limes at home in pots is a rewarding and enjoyable experience that allows you to cultivate a unique fruit with incredible flavor and culinary potential. With the right care and attention, you can enjoy the delightful taste of fresh finger limes straight from your own garden.
Whether you’re a seasoned gardener or a beginner, this guide provides all the information you need to successfully grow finger limes at home. So, grab a pot, some seeds, and start your journey to cultivating these extraordinary caviar limes!
Get Growing!
Are you ready to elevate your gardening experience and add a splash of zest to your dishes? Start growing finger limes today and watch your culinary creations come to life! 🌱🍈
#FingerLimes #CaviarLimes #ContainerGardening #GrowYourOwnFood #CitrusLove #HomeGrown #GardeningTips #PlantLovers #SustainableGardening