
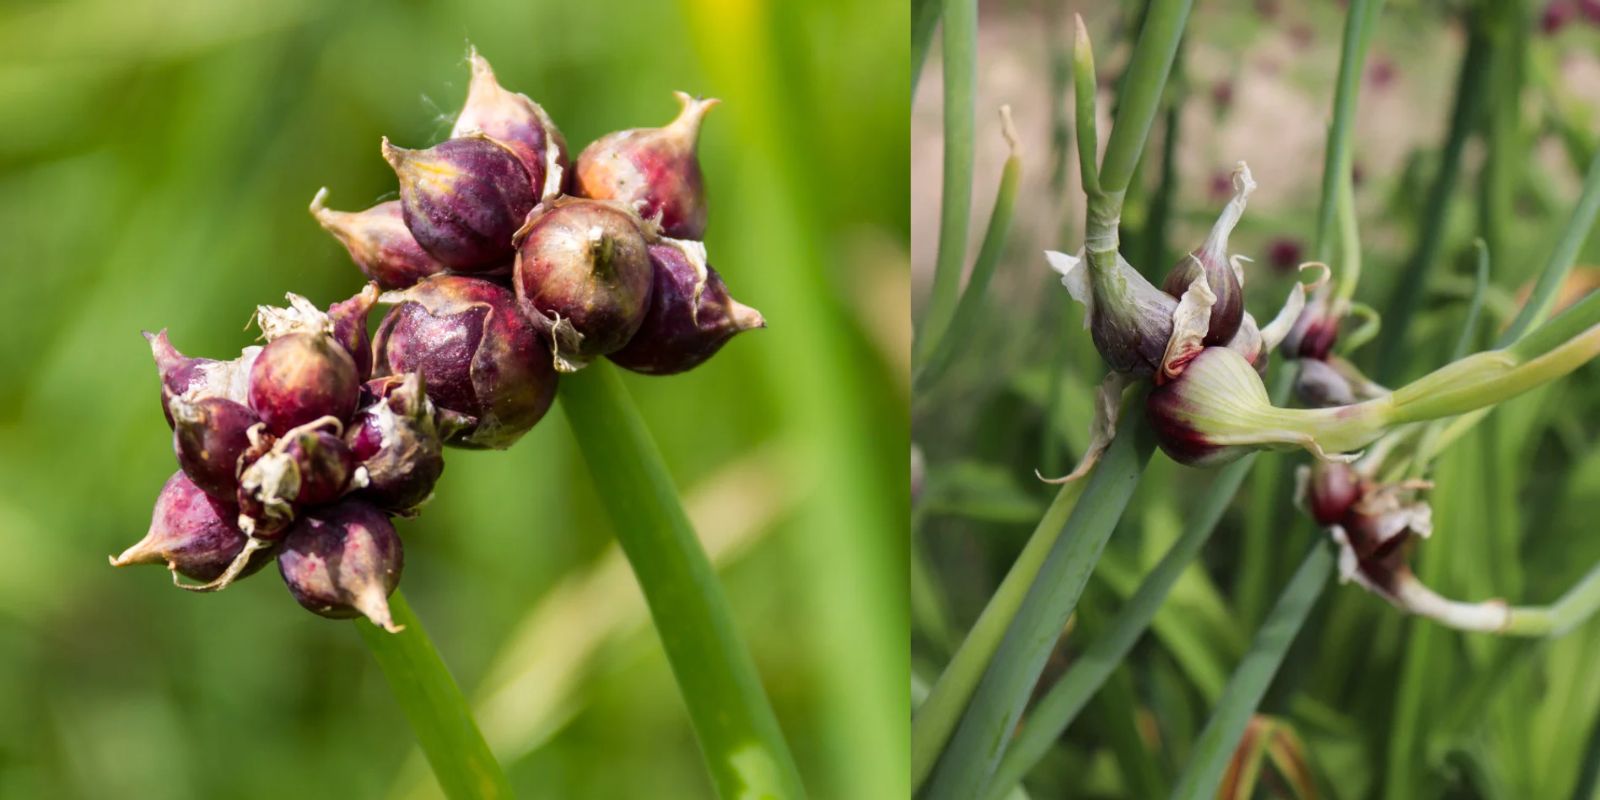
Egyptian walking onions (Allium x proliferum) are a fascinating and low-maintenance perennial crop that earns its unique name from its ability to “walk” across your garden. These onions produce small bulbs, or “topsets,” at the tips of their stalks. When the topsets grow heavy, the stalks bend, allowing the bulbs to root and grow new plants, seemingly “walking” their way around your garden.
Hardy in planting zones 3–10, Egyptian walking onions thrive in various climates and are best planted in the fall. With proper care, they’ll provide flavorful bulbs and topsets for years, making them an excellent addition to any garden. In this article, we’ll explore why these onions are so special, how to plant them in the fall, and how to care for and harvest them.
Why Choose Egyptian Walking Onions?
Egyptian walking onions are a gardener’s dream for several reasons:
- Perennial Nature: Once planted, they grow back year after year, requiring minimal effort.
- Cold Hardy: These onions can survive harsh winters, even in zone 3.
- Continuous Harvest: You can harvest both the underground bulbs and the topsets for culinary use.
- Unique Growth Habit: Their walking nature makes them a conversation starter in the garden.
- Low Maintenance: They’re drought-tolerant and pest-resistant, making them ideal for busy gardeners.
When to Plant Egyptian Walking Onions
The best time to plant Egyptian walking onions is in the fall, ideally about 4–6 weeks before the first hard frost. Planting in fall allows the onions to establish their roots before winter, giving them a head start in spring.
How to Plant Egyptian Walking Onions
Follow these steps to plant your Egyptian walking onions and ensure a successful harvest:
1. Select a Planting Site
Choose a sunny spot in your garden with well-draining soil. Egyptian walking onions thrive in full sun, but they can tolerate partial shade.
2. Prepare the Soil
Loosen the soil to a depth of 6–8 inches and enrich it with compost or well-rotted manure. This provides the onions with the nutrients they need to grow strong.
3. Plant the Bulblets
- Separate the small bulblets (topsets) from the parent plant if you’re starting with existing onions.
- Plant each bulblet 1–2 inches deep, with the pointed side facing up. Space them 6–8 inches apart in rows about 12 inches apart.
4. Water the Bulblets
Water gently after planting to settle the soil around the bulbs. Keep the soil moist (but not waterlogged) until the plants are established.
5. Mulch for Winter Protection
Apply a layer of mulch, such as straw or shredded leaves, to insulate the bulbs during winter. This is especially important in colder zones.
Caring for Egyptian Walking Onions
Egyptian walking onions require minimal care, but a little attention goes a long way in ensuring healthy growth and a bountiful harvest.
1. Watering
While they are drought-tolerant, Egyptian walking onions benefit from consistent watering, especially during dry periods. Aim to keep the soil evenly moist, particularly in the growing season.
2. Fertilizing
Feed your onions with a balanced organic fertilizer in early spring to promote vigorous growth. Avoid over-fertilizing, as this can lead to excessive foliage at the expense of bulb production.
3. Controlling Weeds
Keep the area around your onions weed-free. Weeds compete for nutrients and can hinder the onions’ growth.
4. Harvesting and Replanting Topsets
- As the topsets form in late spring or early summer, you can harvest them to use in cooking or replant them to expand your onion patch.
- If you don’t harvest the topsets, they will eventually fall and root themselves, continuing the “walking” cycle.
Harvesting Egyptian Walking Onions
Egyptian walking onions provide two main harvests: the underground bulbs and the topsets.
Harvesting Underground Bulbs
- The underground bulbs can be harvested in early summer when the stalks begin to yellow and die back.
- Gently dig them up, being careful not to damage the bulbs.
Using the Bulbs
The bulbs are smaller than regular onions but pack a strong, pungent flavor. They’re excellent for cooking, pickling, or adding to salads and soups.
Harvesting Topsets
- Topsets are ready to harvest when they turn brown and dry.
- Simply snap them off the stalks and use them as you would regular onions or replant them for future crops.
Companion Planting with Egyptian Walking Onions
Egyptian walking onions can be a great addition to a companion planting scheme. Their strong smell helps repel pests like aphids and carrot flies, making them excellent companions for carrots, beets, and lettuce. Avoid planting them near beans or peas, as these crops don’t thrive alongside onions.
Benefits of Growing Egyptian Walking Onions
- Year-Round Food Source: With proper care, you can enjoy fresh onions year-round.
- Sustainability: These onions are self-propagating, reducing the need for reseeding.
- Space Efficiency: Their unique growth habit makes them ideal for small gardens.
- Pest Resistance: Their strong aroma deters many garden pests.
- Cold Hardiness: They can survive freezing winters, making them suitable for northern climates.
Creative Ways to Use Egyptian Walking Onions in Cooking
- Sautéed: Use the bulbs in stir-fries, omelets, or as a base for soups.
- Pickled: Preserve the bulbs in vinegar for a tangy treat.
- Raw: Add chopped topsets to salads or sandwiches for a fresh onion flavor.
- Grilled: Skewer and grill topsets for a smoky, caramelized taste.
Conclusion
Egyptian walking onions are a unique and rewarding addition to any garden. Their hardy nature, self-propagating abilities, and versatility in the kitchen make them an excellent choice for both novice and experienced gardeners. By planting them in the fall, you set the stage for a perennial crop that will keep giving for years to come.
Have you grown Egyptian walking onions? Share your experiences and tips in the comments below! Let’s inspire more gardeners to add this amazing crop to their gardens.
#PerennialGardening #FallPlanting #EgyptianWalkingOnions #GardeningHacks #GrowYourOwnFood