
Growing your own clove plant at home is an exciting and rewarding journey for gardening enthusiasts and culinary lovers alike. The clove tree, with its aromatic spice-producing buds, is a tropical evergreen tree that flourishes in warm climates, offering a unique way to cultivate a precious spice right in your own garden. Whether you’re interested in the plant for its fragrance, beauty, or culinary uses, cultivating a clove plant can be an enjoyable and fulfilling experience. This article will walk you through everything you need to know about growing clove plants at home, from selecting the right location to harvesting the spice.
Understanding Clove Plants: A Quick Overview
Clove plants (Syzygium aromaticum) are native to the Moluccas, also known as the Spice Islands of Indonesia, and are widely grown in tropical regions around the world. The trees are grown primarily for their aromatic flower buds, which are harvested, dried, and used as cloves in cooking, medicine, and cosmetics. Cloves are highly valued for their strong, pungent flavor and fragrance, making them a staple in many dishes, teas, and essential oils.
The clove plant is a slow-growing evergreen tree that can reach up to 30 feet tall, though it can be pruned to a manageable size for growing at home. Growing cloves requires patience, as it may take several years for the plant to begin producing flower buds.
Selecting the Right Location for Growing Cloves
Before you begin growing cloves at home, it’s important to select the right location for the plant. Since clove trees are native to tropical regions, they thrive in warm, humid environments. They require plenty of indirect sunlight, well-drained soil, and consistent moisture to grow successfully.
Key Factors for Location:
- Climate: Cloves need a warm, tropical or subtropical climate. The plant thrives in temperatures between 60°F (15°C) and 100°F (38°C), making it ideal for USDA zones 10-11. If you live in a colder climate, you can grow the plant indoors in a greenhouse or a large pot.
- Sunlight: Clove plants prefer indirect sunlight, as direct sunlight can burn their leaves. A spot with filtered sunlight or dappled shade is ideal for growing.
- Soil: The soil should be rich in organic matter, well-draining, and slightly acidic. A pH range of 5.5 to 6.5 is optimal for clove growth.
- Humidity: Clove plants thrive in high humidity, so ensure that the location provides adequate moisture in the air. If growing indoors, consider using a humidity tray or a humidifier.
Planting Your Clove Tree: The Basics
Once you’ve chosen the right location for your clove plant, it’s time to start planting. There are two common methods for propagating clove plants: from seeds or cuttings. Here’s how to get started with each method:
1. Growing Cloves from Seeds
Growing clove plants from seeds can be a rewarding but slow process, as it may take 3-4 months for the seeds to germinate. You can find clove seeds at specialty nurseries or online gardening stores.
Steps to Grow Cloves from Seeds:
- Soak the Seeds: Before planting, soak the clove seeds in warm water for 24-48 hours. This helps to soften the seed coat and improves germination.
- Prepare the Soil: Fill a seed tray or small pots with a well-draining potting mix. You can use a mix of peat moss, perlite, and sand for a light, airy soil blend.
- Plant the Seeds: Plant the seeds about 1/2 inch (1 cm) deep into the soil. Space them at least 2 inches apart to allow room for growth.
- Watering: Gently water the seeds to keep the soil consistently moist but not waterlogged. Keep the pots in a warm, humid environment.
- Germination: Clove seeds can take 1-3 months to germinate. Ensure the seeds receive plenty of indirect sunlight, and maintain high humidity around the seeds using a humidity dome or plastic wrap.
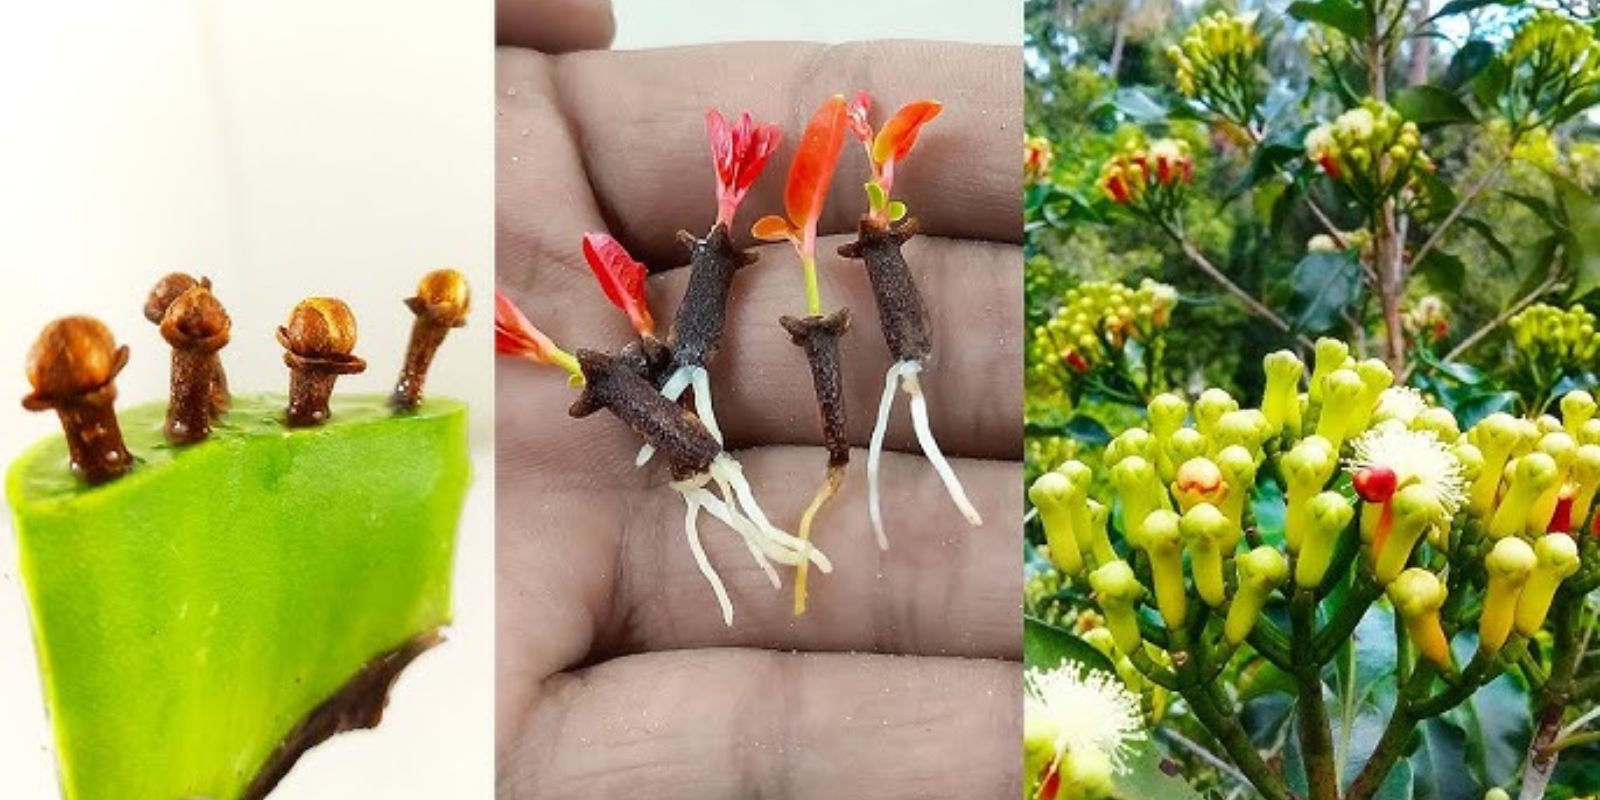
2. Growing Cloves from Cuttings
If you want to speed up the process, you can propagate clove plants from cuttings taken from a mature tree. This method ensures that the new plants are clones of the parent tree, which can lead to quicker growth and earlier flowering.
Steps to Grow Cloves from Cuttings:
- Choose a Healthy Cutting: Select a healthy branch from a mature clove tree. Look for a semi-woody branch with no signs of disease or damage.
- Prepare the Cutting: Use sharp, clean scissors or pruning shears to cut a 6-8 inch section of the branch. Remove the leaves from the lower half of the cutting.
- Rooting Hormone: Dip the cut end of the stem into rooting hormone powder to encourage root development.
- Plant the Cutting: Plant the cutting into a pot filled with a well-draining soil mix. Water the cutting thoroughly.
- Create a Humid Environment: Cover the pot with a plastic bag or place it in a propagation dome to maintain high humidity around the cutting. Place the pot in a warm spot with indirect sunlight.
- Care for the Cutting: Keep the soil moist and check for root development in 3-4 weeks. Once the cutting has developed roots, it can be transplanted into a larger pot or directly into the garden.
Caring for Your Clove Plant
Clove plants are relatively low-maintenance, but they do require consistent care to thrive. Here are some important care tips to help your clove plant grow healthy and strong:
1. Watering
Clove trees need consistent moisture, especially during the growing season. Keep the soil evenly moist, but avoid overwatering, as this can lead to root rot. If you’re growing your clove tree indoors, be sure to water it whenever the soil feels dry to the touch.
2. Fertilizing
Fertilizing your clove tree will encourage healthy growth. Use a balanced fertilizer with equal parts nitrogen, phosphorus, and potassium. Fertilize the plant every 2-3 months during the growing season (spring and summer) to support robust foliage and flowering.
3. Pruning
Prune your clove tree regularly to maintain its shape and remove any dead or damaged branches. Pruning also helps encourage the tree to grow more branches, which will lead to more buds. If growing indoors, keep the plant pruned to a manageable size.
4. Temperature and Humidity
Clove trees thrive in warm, humid environments. Make sure the plant is kept in temperatures between 60°F (15°C) and 100°F (38°C). If growing indoors, keep the humidity level high using a humidifier or misting the plant occasionally.
5. Pest Control
Clove trees are generally pest-resistant, but they may occasionally face issues with aphids, scale insects, or mealybugs. Regularly inspect the leaves and stems for signs of pests and treat the plant with organic insecticidal soap if necessary.
Harvesting Cloves: When and How
Cloves are harvested from the flower buds of the clove plant, which are picked just before they open. The buds are then dried to produce the spice cloves we use in cooking. It can take several years for a clove plant to start producing buds, so patience is key when growing this spice tree.
Steps to Harvest Cloves:
- Wait for the Buds: Clove plants typically start producing buds after 3-4 years of growth, though some varieties may take longer.
- Pick the Buds: Once the flower buds turn from pale to a reddish color, it’s time to harvest. Use pruning shears or scissors to carefully snip the buds from the branches.
- Dry the Buds: Lay the harvested buds out in a cool, dry place to dry. Once dried, the cloves can be used in cooking or ground into a powder for various purposes.
Conclusion
Growing clove plants at home is a rewarding and enjoyable experience that allows you to harvest your own aromatic spice for use in cooking, baking, and even for medicinal purposes. Whether you start from seeds or cuttings, clove plants thrive with a little care and attention. With the right growing conditions, you can enjoy fresh, homegrown cloves in your garden in just a few years. Happy gardening, and enjoy the unique experience of growing your own spice tree!