
Introduction
Carrots are a versatile and nutritious vegetable that can be grown in a variety of settings, even without a traditional garden. For those living in apartments, small spaces, or urban areas, growing carrots in plastic bags offers a simple and effective way to enjoy fresh, homegrown produce without needing a large plot of land. This method is cost-effective, space-saving, and environmentally friendly, as it also promotes the reuse of plastic materials. In this comprehensive guide, we will explore how you can grow carrots at home using plastic bags, providing you with all the steps and tips needed for a successful harvest.
Whether you’re new to gardening or an experienced green thumb, growing carrots in plastic bags is a fantastic solution that makes the most of limited space while reducing waste. Let’s dive into the details!
Why Grow Carrots in Plastic Bags?
Carrots are an ideal vegetable to grow in containers, and plastic bags provide a lightweight, flexible, and inexpensive option. Here’s why growing carrots in plastic bags is such an attractive choice for urban gardeners or anyone without access to a garden:
- Space Efficiency: Plastic bags are compact and can be placed on balconies, patios, or even indoors near a sunny window. They don’t take up much room, making them perfect for those with limited outdoor space.
- Soil Control: By growing carrots in plastic bags, you have total control over the soil quality. This is important because carrots need loose, well-draining soil to develop straight, healthy roots.
- Reuse and Recycle: Using plastic bags for gardening encourages recycling and helps reduce plastic waste. It’s a great way to give old shopping bags, compost bags, or even trash bags a new purpose.
- Mobility: Plastic bags are lightweight and portable. You can move them around to catch the sun’s rays or protect them from bad weather, giving you greater flexibility in your gardening efforts.
Materials You’ll Need
Before getting started, here’s a quick list of the materials you’ll need to grow carrots in plastic bags:
- Large plastic bags (minimum of 18 inches deep, such as garbage or compost bags)
- Well-draining soil mix (a blend of potting soil, compost, and sand works well)
- Carrot seeds (choose varieties that grow well in containers, like ‘Little Finger’ or ‘Nantes’)
- Watering can or spray bottle
- Scissors or a sharp knife to make drainage holes
- Sunny location (preferably a spot that receives at least 6 hours of sunlight per day)
Step-by-Step Guide to Growing Carrots in Plastic Bags
Step 1: Choose Your Plastic Bag
To grow healthy carrots, select a large, sturdy plastic bag with a minimum depth of 18 inches. Carrot roots need plenty of space to grow, so the deeper the bag, the better. Avoid using bags that are too thin, as they may tear when filled with soil or moved around. Heavy-duty garbage bags, soil or compost bags, or reusable shopping bags are excellent options.
Step 2: Prepare the Bag
Using scissors or a sharp knife, carefully cut several drainage holes at the bottom of the plastic bag. This is a crucial step to prevent water from collecting at the bottom and causing the roots to rot. Place the bag in its final location before filling it, as it will be harder to move once full.
Step 3: Fill the Bag with Soil
Carrots thrive in light, well-draining soil. To ensure the roots can grow straight and healthy, fill your plastic bag with a mixture of potting soil, compost, and sand. Aim for a ratio of 1 part compost, 2 parts potting soil, and 1 part sand to create an airy, nutrient-rich mix that supports root development.
Fill the bag about three-quarters full with this soil mix, leaving enough room at the top to allow for planting and watering.
Step 4: Plant Carrot Seeds
Carrot seeds are tiny and delicate, so it’s important to plant them carefully. Lightly sprinkle the seeds over the surface of the soil, aiming to space them about 2 inches apart. Once planted, cover the seeds with a thin layer of soil (around ¼ inch deep) and lightly pat it down. Carrots don’t like to be overcrowded, so be mindful of spacing.
Step 5: Water the Seeds
After planting, gently water the soil using a watering can or spray bottle. Keep the soil consistently moist, but not waterlogged, especially during the early stages of germination. It’s important to maintain a balanced moisture level, as carrot seeds can dry out easily if not regularly watered.
Step 6: Place the Bag in a Sunny Location
Carrots need plenty of sunlight to grow well, so place your plastic bag in a location that receives at least 6 hours of direct sunlight per day. A sunny balcony, patio, or even a bright windowsill will work. If growing indoors, consider using grow lights to supplement natural sunlight.
Step 7: Thin the Seedlings
Once your carrot seedlings sprout and reach about 2 inches in height (usually within 2-3 weeks), you’ll need to thin them out. This step is essential for ensuring your carrots have enough space to develop properly. Remove the weaker or smaller seedlings, leaving about 2-3 inches between each remaining plant. Thinning helps prevent overcrowding and promotes healthy root growth.
Step 8: Care for Your Growing Carrots
As your carrots continue to grow, maintain consistent watering, ensuring the soil stays moist but not soggy. If the weather is particularly hot or dry, you may need to water more frequently. Additionally, if you notice the soil level sinking, top it up with more soil to keep the roots well-covered.
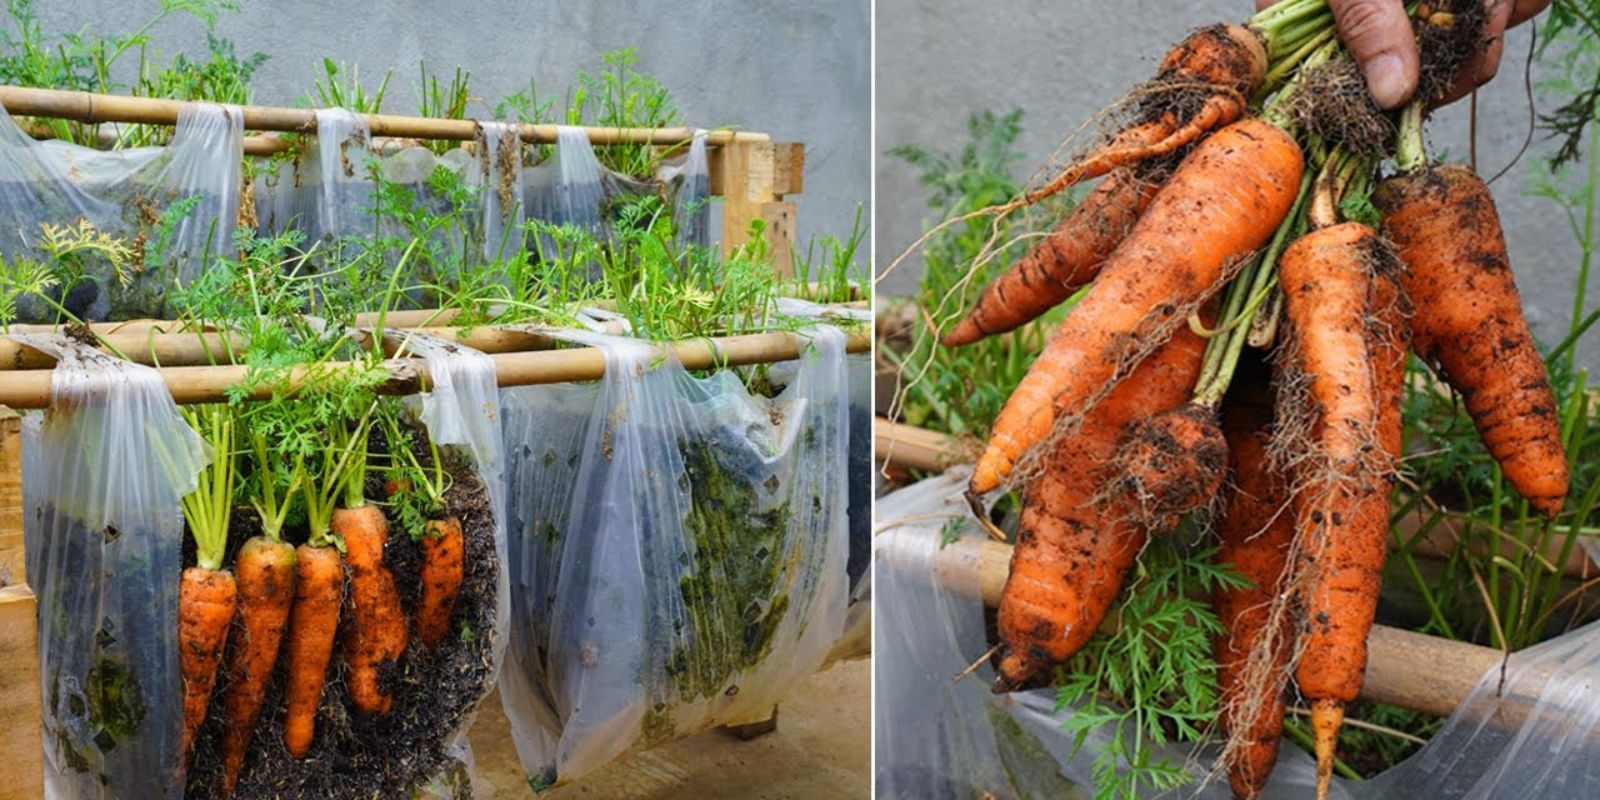
Step 9: Harvesting Time
Carrots are typically ready for harvest about 60 to 75 days after planting, depending on the variety. You’ll know they’re ready when the tops of the carrots are visible just above the soil surface and are at least ½ inch in diameter. To harvest, gently pull the carrots out by grasping the leafy tops and pulling them upward.
Tips for Success
- Choose the Right Carrot Variety: When growing carrots in containers or plastic bags, select varieties that are well-suited for smaller spaces. Shorter carrots, such as ‘Nantes’ or ‘Paris Market’, work particularly well in confined environments.
- Use a Fertilizer: Carrots thrive in nutrient-rich soil. Consider using an organic fertilizer or compost tea every few weeks to provide them with essential nutrients.
- Rotate the Bags: If growing outdoors, rotate your plastic bags every week or so to ensure even sunlight exposure for all the plants.
- Avoid Overcrowding: Be mindful of spacing during planting and thinning. Carrots that are too close together won’t develop properly.
Benefits of Growing Carrots in Plastic Bags
- Space-saving: Perfect for small balconies or patios, plastic bags don’t require a traditional garden bed.
- Portable: You can easily move your bags around to optimize sunlight or protect them from harsh weather conditions.
- Cost-effective: Using recycled plastic bags cuts down on gardening costs while promoting an eco-friendly gardening practice.
- Fresh Produce: Enjoy the satisfaction of harvesting your own fresh, organic carrots, free from pesticides and chemicals.
Conclusion
Growing carrots at home in plastic bags is a simple, sustainable, and rewarding gardening method that anyone can try, even without a traditional garden. By following the steps outlined above, you’ll be able to grow healthy, delicious carrots with minimal space and resources. Whether you’re an experienced gardener or a beginner, this space-saving technique is a fantastic way to enjoy fresh vegetables year-round.
Why not give it a try and grow your own carrots today? You’ll be amazed at how easy and rewarding it can be!