
Bell peppers, with their vibrant colors and crisp texture, are a versatile addition to any meal. Growing them in containers or buckets is an excellent way to enjoy fresh peppers, even if you have limited garden space. This comprehensive guide will walk you through the process of cultivating bell peppers in buckets, highlight their health benefits, and provide delicious recipes to make the most of your harvest.
1. Introduction to Growing Bell Peppers in Buckets
Bell peppers are not only flavorful but also packed with nutrients. Growing them in buckets is a practical solution for urban gardeners or those with small yards. Containers provide a controlled environment for your peppers and can be placed in sunny spots, making it easier to manage their growing conditions.
By following the right steps and understanding the needs of bell peppers, you can enjoy a bountiful harvest and reap the health benefits of these colorful vegetables.
2. Choosing the Right Container
Container Size and Type
When growing bell peppers in buckets, selecting the right container is crucial for healthy plant development. Here’s what to consider:
- Size: Choose a container that holds at least 5 gallons of soil. Bell peppers need ample space for their root systems to expand. A container of this size ensures adequate room for growth and supports the development of a healthy plant.
- Type: Use a container with good drainage. Buckets or pots with drainage holes at the bottom are ideal, as they prevent waterlogging, which can lead to root rot. You can also add a layer of gravel or stones at the bottom of the container to enhance drainage.
3. Preparing the Soil
Soil Composition
Bell peppers thrive in well-draining, nutrient-rich soil. Here’s how to prepare the soil for your containers:
- Mix: Use a high-quality potting mix designed for container gardening. These mixes typically contain a blend of peat moss, vermiculite, and perlite, which provide excellent aeration and drainage.
- Enrich: Add compost or well-rotted manure to the potting mix. This enriches the soil with essential nutrients and improves its moisture retention capabilities.
- pH Level: Bell peppers prefer a slightly acidic to neutral soil pH, ideally between 6.0 and 6.8. You can test the soil pH with a simple soil test kit and amend it if necessary.
4. Planting Bell Peppers
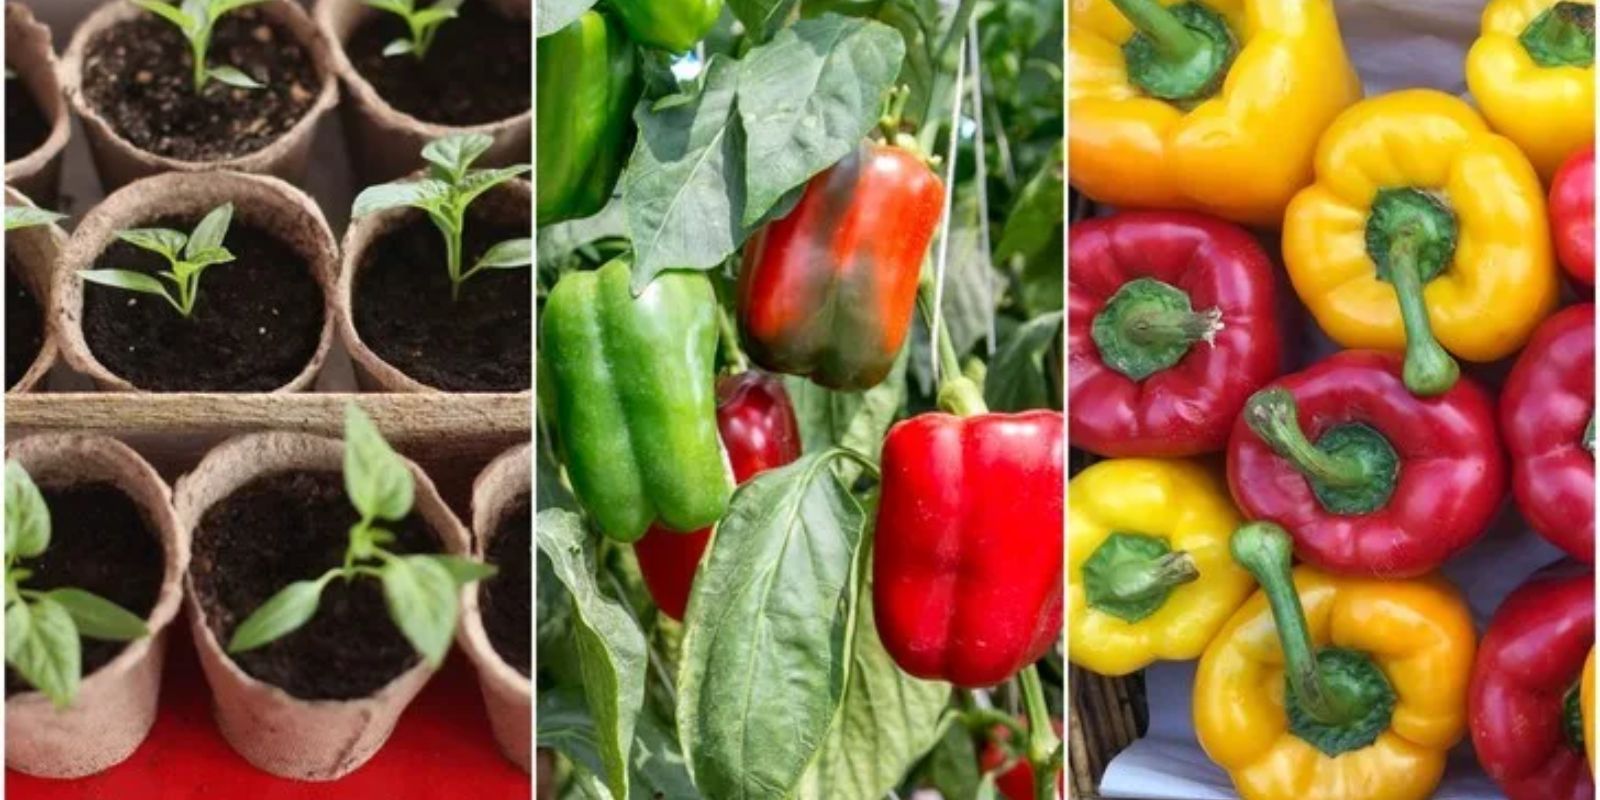
Starting Seeds vs. Seedlings
- Starting Seeds: If you’re starting from seeds, sow them indoors about 8-10 weeks before the last expected frost. Plant seeds about 1/4 inch deep in seed trays or small pots. Keep the soil consistently moist and provide warmth (70-85°F or 21-29°C) for germination. Once seedlings develop 2-3 sets of true leaves, they can be transplanted into larger buckets.
- Using Seedlings: Alternatively, you can purchase young bell pepper plants from a nursery. Transplant seedlings into your prepared buckets after the danger of frost has passed and when the soil temperature has warmed to at least 60°F (15°C).
Planting Process
- Fill the Bucket: Fill your container with the prepared potting mix, leaving about 2 inches of space at the top for watering.
- Plant the Seedlings: Make a hole in the center of the soil, gently place the seedling in the hole, and cover the roots with soil. Press down lightly to remove air pockets.
- Water Thoroughly: Water the newly planted seedlings deeply to help them settle into their new container.
5. Caring for Your Bell Peppers
Watering
Bell peppers require consistent moisture. Here’s how to manage watering:
- Frequency: Water your peppers regularly, ensuring the soil stays evenly moist but not soggy. Check the soil moisture by sticking your finger about an inch into the soil. If it feels dry, it’s time to water.
- Method: Water at the base of the plant to avoid wetting the foliage, which can promote disease. Use a watering can with a gentle spout or a soaker hose for even watering.
Fertilizing
Bell peppers benefit from regular feeding to support their growth and fruit production:
- Type: Use a balanced, water-soluble fertilizer with equal parts nitrogen, phosphorus, and potassium (e.g., 10-10-10).
- Schedule: Apply fertilizer every 2-3 weeks during the growing season. Follow the manufacturer’s instructions for the correct dosage.
Supporting the Plants
Bell pepper plants may need support as they grow:
- Staking: Use stakes or cages to support the plants and prevent them from bending or breaking under the weight of the fruit. Place the support structures early in the growing season to avoid disturbing the roots later.
- Pruning: Remove any yellowing or dead leaves to improve air circulation and reduce the risk of diseases. Pinch off any lower branches that touch the soil to keep the plant healthy.
6. Harvesting Bell Peppers
Bell peppers can be harvested at different stages of maturity:
- Green Peppers: Harvest when the peppers are firm and fully sized but still green. They are less sweet at this stage but are still delicious and crunchy.
- Colored Peppers: For sweeter, more flavorful peppers, allow them to ripen on the plant until they change color (red, yellow, orange, or purple, depending on the variety). The peppers will become softer and more aromatic as they mature.
To harvest, use sharp scissors or pruning shears to cut the peppers from the plant, leaving a small stem attached.
7. Health Benefits of Bell Peppers
Bell peppers are not only tasty but also packed with health benefits:
- Rich in Vitamins: They are an excellent source of vitamins A and C, which support immune function, skin health, and vision.
- Antioxidants: Bell peppers contain antioxidants like carotenoids and flavonoids, which help protect the body from oxidative stress and inflammation.
- Low in Calories: They are low in calories and high in dietary fiber, making them a great addition to a balanced diet.
8. Delicious Recipes Using Bell Peppers
Here are some flavorful recipes to enjoy your home-grown bell peppers:
1. Stuffed Bell Peppers
Ingredients:
- Bell peppers
- Ground beef or turkey
- Cooked rice
- Onion
- Garlic
- Tomato sauce
- Cheese (optional)
Instructions:
- Preheat your oven to 375°F (190°C).
- Cut the tops off the bell peppers and remove the seeds.
- In a skillet, cook the ground meat with chopped onion and garlic until browned.
- Mix in cooked rice and tomato sauce.
- Stuff the mixture into the bell peppers and top with cheese if desired.
- Bake for 30-35 minutes until peppers are tender.
2. Bell Pepper Stir-Fry
Ingredients:
- Bell peppers (various colors)
- Chicken, beef, or tofu
- Broccoli
- Carrots
- Soy sauce
- Garlic and ginger
Instructions:
- Slice the bell peppers, chicken (or tofu), and other vegetables.
- In a wok or large skillet, stir-fry the garlic and ginger in oil.
- Add the chicken or tofu and cook until browned.
- Add the vegetables and stir-fry until tender-crisp.
- Season with soy sauce and serve over rice or noodles.
3. Roasted Bell Peppers
Ingredients:
- Bell peppers
- Olive oil
- Salt and pepper
- Herbs (e.g., thyme, rosemary)
Instructions:
- Preheat your oven to 400°F (200°C).
- Slice the bell peppers into strips and place on a baking sheet.
- Drizzle with olive oil and season with salt, pepper, and herbs.
- Roast for 20-25 minutes until peppers are soft and slightly charred.
9. Conclusion
Growing bell peppers in buckets is a rewarding way to enjoy fresh, home-grown produce. With the right container, soil preparation, and care, you can cultivate a bountiful harvest of these nutritious and versatile vegetables. By incorporating companion plants and maintaining proper gardening practices, you can enhance the health and productivity of your bell pepper plants.
In addition to their culinary uses, bell peppers offer numerous health benefits, making them a valuable addition to your diet. Experiment with different recipes to savor the flavors of your home-grown peppers and enjoy the satisfaction of growing your own food.
Happy gardening, and may your buckets overflow with vibrant bell peppers! 🌶️🌿 #BellPeppers #ContainerGardening #GrowYourOwnFood #HealthyEating #UrbanFarming #HomeGardening #GardeningTips #SustainableLiving