
Walnut trees are a symbol of strength, longevity, and abundance. Growing a walnut tree from seed might seem like a long-term project, but with the right guidance and patience, it can be a rewarding experience. Not only will you contribute to a greener environment, but you’ll also enjoy fresh, homegrown walnuts in the future. This comprehensive guide will walk you through the process of growing a walnut tree from seed, covering everything from seed collection to transplanting.
Why Grow a Walnut Tree from Seed?
Walnut trees are valuable for their wood, shade, and nutritious nuts. Walnut wood is prized for its strength and beauty, making it a popular choice for furniture and cabinetry. Meanwhile, the nuts are rich in healthy fats, antioxidants, and vitamins. Growing a walnut tree from seed allows you to witness the entire life cycle of the tree and offers a sustainable way to contribute to nature.
Planting a walnut tree is a long-term investment in both your landscape and the environment. It provides shade, enhances biodiversity, and can even increase property value. Plus, the joy of seeing your tree grow from a tiny seed into a towering tree is incomparable.
Step 1: Collecting Fresh Walnuts
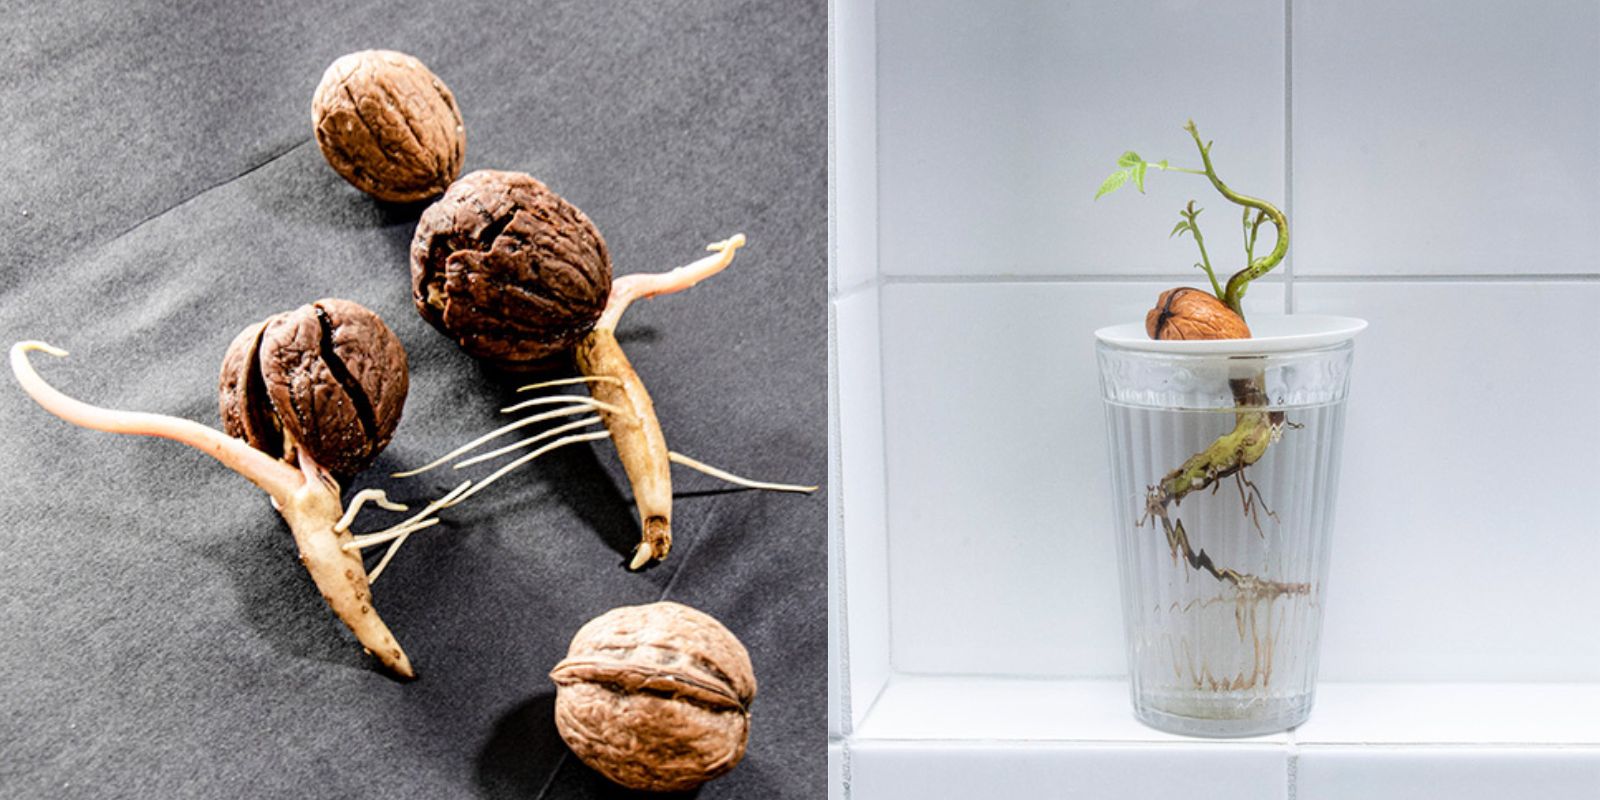
The first step in growing a walnut tree from seed is to collect fresh walnuts. It’s essential to use walnuts that haven’t been processed, as store-bought walnuts are often treated and won’t germinate.
- Harvesting Walnuts: In autumn, walnut trees drop their nuts. Look for mature walnuts that have fallen to the ground. These nuts are encased in a green husk, which turns brown as it ripens. If possible, gather walnuts directly from the tree or freshly fallen ones for the best chance of germination.
- Using Unprocessed Nuts: If you don’t have access to a walnut tree, you can buy unprocessed, fresh walnuts from a farmer’s market or specialty supplier. Make sure the nuts still have their shells and are not roasted or treated.
Step 2: Removing the Outer Hull
Once you have collected fresh walnuts, you need to remove the green, outer hull. The hull is thick and often sticky, but removing it is crucial for the seed to germinate properly.
- Removing the Hull: Wear gloves, as walnut hulls can stain your skin. Use a knife to score the hull or peel it away by hand. Once the hull is removed, you’ll be left with the hard, inner shell of the walnut.
- Washing the Nuts: After removing the hull, rinse the walnuts in water to remove any remaining debris. Allow the nuts to dry for a day or two in a cool, dry place.
Step 3: Stratifying the Seeds
Walnut seeds require cold stratification to break their dormancy. In nature, walnut seeds go through winter conditions before sprouting in spring. You can mimic this process by stratifying the seeds at home.
- What is Cold Stratification?: Cold stratification is a process that exposes seeds to a cold, moist environment for an extended period. This helps soften the hard seed coat and prepares the seed for germination.
- How to Stratify Walnuts: Place the cleaned walnut seeds in a plastic bag filled with moist sand, peat moss, or sawdust. Ensure the medium is damp but not soaking wet. Seal the bag and store it in your refrigerator for 90 days. The temperature should be around 33-41°F (0-5°C).
- Checking the Seeds: During the stratification period, check the bag occasionally to ensure the medium remains moist. Avoid letting the seeds dry out, as this can affect germination.
Step 4: Preparing to Plant the Seeds
After the stratification period, the walnut seeds are ready for planting. It’s essential to choose the right location and conditions for your walnut tree to thrive.
- Choosing the Planting Site: Walnut trees need full sun and well-draining soil to grow well. Choose a location that receives at least 6-8 hours of sunlight per day and has deep, fertile soil. Walnut trees have extensive root systems, so they need plenty of space to grow. Ensure that the planting site is at least 50 feet away from buildings, power lines, and other trees.
- Soil Preparation: Walnut trees prefer slightly acidic to neutral soil with a pH of 6.0-7.5. Before planting, amend the soil with compost or organic matter to improve drainage and provide nutrients. Avoid planting in waterlogged or compacted soil, as walnuts are prone to root rot.
Step 5: Planting the Walnut Seeds
Now that your seeds are stratified and you have prepared the site, it’s time to plant the walnut seeds. Here’s how to do it:
- Planting Depth: Dig a hole about 2 inches deep for each seed. Place the walnut seed with the pointed end facing down. Cover it with soil and lightly tamp down the soil to ensure good contact with the seed.
- Spacing: If you’re planting multiple seeds, space them about 12-15 feet apart to allow room for growth. As the trees mature, they’ll need even more space, but this spacing is ideal for the early stages.
- Watering: After planting, water the seeds thoroughly. Keep the soil consistently moist, but not waterlogged, during the germination process.
Step 6: Caring for the Seedlings
Walnut seeds can take anywhere from 4 to 6 weeks to germinate. Once they sprout, they need ongoing care to ensure healthy growth.
- Watering: Walnut trees need regular watering, especially during the first few years. Water the seedlings deeply once or twice a week, depending on the weather. Avoid letting the soil dry out completely between waterings.
- Mulching: Apply a layer of organic mulch, such as wood chips or straw, around the base of the seedlings. Mulching helps retain moisture, regulate soil temperature, and suppress weeds.
- Protecting the Seedlings: Walnut seedlings are vulnerable to pests, animals, and harsh weather. Consider using a tree guard or chicken wire around the seedlings to protect them from deer, rabbits, and other wildlife.
Step 7: Transplanting the Seedlings
As the walnut tree grows, you may need to transplant it to a more permanent location, especially if you started the seeds in a pot or temporary garden bed.
- When to Transplant: Walnut seedlings can be transplanted when they are about 1-2 feet tall, typically after their first growing season. Transplant them in early spring or fall, when the weather is cool.
- How to Transplant: Dig a hole that’s twice as wide and just as deep as the root ball of the seedling. Gently remove the seedling from its original location and place it in the hole. Backfill with soil, making sure the tree is planted at the same depth it was growing before. Water thoroughly after transplanting.
Step 8: Long-Term Care for Your Walnut Tree
Walnut trees are relatively low-maintenance once established, but they still require care to ensure healthy growth and a productive nut harvest.
- Pruning: Prune your walnut tree during its dormant season (late winter or early spring) to remove dead or diseased branches and promote a strong structure.
- Fertilizing: Walnut trees benefit from annual fertilization with a balanced, slow-release fertilizer. Apply fertilizer in early spring to support new growth.
- Pest and Disease Control: Keep an eye out for pests like walnut husk flies and caterpillars. Regularly inspect the tree for signs of disease, such as leaf blight or cankers, and take appropriate action to manage them.
Harvesting Walnuts
It will take several years for your walnut tree to mature and start producing nuts—usually around 7-10 years from seed. Once the tree starts bearing fruit, walnuts can be harvested in the fall when the green husks split open. Simply collect the fallen nuts, remove the husks, and allow the nuts to dry before storing.
Conclusion
Growing a walnut tree from seed is a rewarding project that requires patience, care, and a bit of effort. By following these steps, you can nurture a healthy tree that will provide shade, beauty, and delicious nuts for generations to come. Whether you have a large backyard or a small garden, planting a walnut tree is a long-lasting contribution to your landscape and the environment.
Ready to plant your walnut tree? 🌳 Share your journey with us!